1. Einleitung
Thank you for choosing the Sleipner Dual Joystick Control Panel. This panel is designed for intuitive and comfortable control of your vessel's bow and stern thruster systems. It is engineered for reliability and ease of use, providing precise maneuvering capabilities. This manual provides essential information for the proper installation, operation, and maintenance of your control panel.
The dual joystick design is a top-selling solution for double thruster installations, ensuring a comfortable and friendly interface for managing your thruster system.
2. Wichtige Sicherheitshinweise
Please read all instructions carefully before installation and operation. Failure to follow these instructions may result in personal injury, damage to the product, or damage to the vessel.
- Always ensure the thruster system is de-energized before performing any installation, maintenance, or inspection.
- Installation should only be performed by qualified personnel familiar with marine electrical systems.
- Do not operate the thrusters if anyone is in the water near the thruster tunnels.
- Keep the control panel clean and dry. Avoid exposure to excessive moisture or direct sunlight for prolonged periods.
- This control panel is programmed to shut down automatically after approximately 6 minutes of inactivity to prevent accidental activation. Always verify the system status before use.
3. Einrichtung und Installation
Proper installation is crucial for the optimal performance and longevity of your Sleipner control panel. Ensure all connections are secure and protected from the marine environment.
3.1. Montage des Bedienfelds
The control panel is designed for flush mounting. Choose a location on your dashboard or console that is easily accessible and visible to the operator, away from direct spray or excessive vibration.
- Cut an opening in the mounting surface according to the provided template (not included in this manual, refer to packaging).
- Ensure sufficient clearance behind the panel for wiring and connections.
- Insert the control panel into the opening and secure it using the supplied mounting hardware.
3.2. Elektrische Anschlüsse
Connect the control panel to the thruster system's main control unit following the wiring diagram provided with your thruster system. Ensure correct polarity and secure connections to prevent electrical issues.
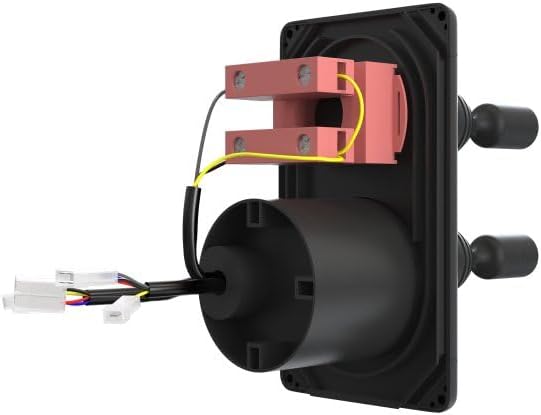
Abbildung 3.2.1: Hinteren view of the Sleipner Dual Joystick Control Panel. This image illustrates the back of the control panel, highlighting the various wiring harnesses and connection points. The yellow and black wires are visible, connecting to internal components, and white multi-pin connectors extend from the bottom left, ready for integration with the vessel's electrical system. This view is critical for understanding the electrical installation process.
- Connect the power supply (12V or 24V DC, depending on your system) to the designated terminals.
- Connect the communication cables to the thruster control unit.
- Ensure all connections are waterproofed and protected from corrosion.
4. Bedienungsanleitung
The Sleipner Dual Joystick Control Panel offers intuitive control over your bow and stern thrusters.
4.1. Grundlegende Funktionalität

Abbildung 4.1.1: Front view of the Sleipner Dual Joystick Control Panel. This image displays the sleek black faceplate of the control panel, featuring two prominent joysticks. Each joystick has directional arrows (left/right) indicating thruster movement. Below the joysticks, there are three push-buttons labeled 'ON', 'ON', and 'OFF' for activating and deactivating the thruster system. The Sleipner logo is visible at the top, and 'BOW' and 'STERN' labels are positioned between the joysticks, indicating their respective control functions. This view is essential for understanding the user interface.
- Einschalten: Press one of the 'ON' buttons located at the bottom of the panel to activate the thruster system. An indicator light will illuminate, confirming the system is active.
- Bow Thruster Control: Use the upper joystick to control the bow thruster. Move the joystick left or right to direct the bow of the vessel accordingly.
- Stern Thruster Control: Use the lower joystick to control the stern thruster. Move the joystick left or right to direct the stern of the vessel accordingly.
- Combined Control: For advanced maneuvering, both joysticks can be operated simultaneously to achieve diagonal or rotational movements of the vessel.
- Ausschalten: Press the 'OFF' button to deactivate the thruster system when not in use.
4.2. Automatic Shutdown Feature
The Sleipner control panel is equipped with an automatic shutdown feature for safety and power conservation. If the panel detects no activity for approximately 6 minutes, it will automatically power off the thruster system. This prevents unintended activation and conserves battery power. To reactivate, simply press an 'ON' button.
5. Wartung
Regular maintenance ensures the longevity and reliable operation of your control panel.
- Reinigung: Clean the control panel surface regularly with a soft, damp Mit einem Tuch abwischen. Verwenden Sie keine Scheuermittel, Lösungsmittel oder Hochdruckreiniger, da diese die Oberfläche oder interne Bauteile beschädigen können.
- Inspektion: Periodically inspect the wiring connections behind the panel for any signs of corrosion, loose connections, or damage. Ensure all seals and gaskets are intact to prevent water ingress.
- Funktionsprüfung: Before each use, perform a quick functional check of the joysticks and buttons to ensure they respond correctly.
6. Fehlerbehebung
This section provides solutions to common issues you might encounter with your Sleipner control panel. For more complex problems, contact qualified service personnel.
| Problem | Mögliche Ursache | Lösung |
|---|---|---|
| Das Bedienfeld lässt sich nicht einschalten. | Keine Stromversorgung; Sicherung durchgebrannt; Lose Kabelverbindung. | Check vessel's main power supply; Inspect and replace fuse if necessary; Verify all electrical connections are secure. |
| Thrusters do not respond to joystick input. | Panel not active; Communication error with thruster control unit; Thruster system fault. | Ensure panel is powered on (indicator light); Check communication cables; Refer to your thruster system's manual for specific fault codes. |
| Panel automatically shuts down too quickly. | Normal operation (6-minute inactivity); Intermittent power loss. | This is a safety feature; if it happens during active use, check power supply stability. |
| Buttons or joysticks feel stiff. | Ansammlung von Schmutz oder Ablagerungen. | Clean the panel surface and around the controls with a soft, damp Tuch. |
7. Spezifikationen
- Marke: Sleipner
- Modellname: Bedienfeld
- Farbe: Schwarz
- Material: Plastik
- Vorgeschlagene Benutzer: Unisex
- Hersteller: Sleipner
- Größe: Klein
- ASIN: B0DF7FPSRX
- Als Erstes verfügbar: 26. August 2024
8. Garantie und Support
Sleipner products are manufactured to the highest quality standards. This control panel comes with a standard manufacturer's warranty covering defects in materials and workmanship. For specific warranty terms and conditions, please refer to the documentation provided with your purchase or visit the official Sleipner webWebsite.
For technical support, spare parts, or service inquiries, please contact your authorized Sleipner dealer or visit www.sleipnergroup.com.


