1. Einleitung
This user manual provides detailed instructions for the safe and efficient operation, maintenance, and troubleshooting of your DuroFort Cordless Electric Screwdriver Set. Please read this manual thoroughly before using the product to ensure optimal performance and longevity.
The DuroFort Cordless Electric Screwdriver Set is designed for various home repairs and DIY projects, offering powerful electric torque, a long-lasting battery, and versatile accessories for a wide range of applications.
2. Produktüberschreitungview und Komponenten
Familiarize yourself with the main components of your electric screwdriver:

Abbildung 2.1: Main components of the DuroFort Cordless Electric Screwdriver, including the magnetic chuck, battery indicator light, built-in LED light, forward/reverse button, 2-position toggle button, and charging port.
- Magnetic Chuck: Hält Schraubendreherbits sicher.
- Batteriekontrollleuchte: Zeigt den verbleibenden Akkuladestand an.
- Eingebautes LED-Licht: Beleuchtet den Arbeitsbereich für bessere Sicht.
- Vorwärts-/Rückwärts-Taste: Controls the rotation direction of the chuck.
- 2-Position Toggle Button: Allows adjustment of the handle angle (90° or 180°).
- Ladeanschluss: For connecting the charger to recharge the battery.
- Drehmomenteinstellring: Selects the desired torque setting (10+1 settings).
2.1 Mitgeliefertes Zubehör
Your DuroFort Cordless Electric Screwdriver Set comes with a comprehensive collection of accessories to meet various needs:

Abbildung 2.2: Überview des 89-teiligen Zubehörsets.
- Schraubendreherbits: A wide variety of Phillips, Slotted, Hex, Torx, and other common bit types.
- Flexible Welle: For accessing screws in tight or awkward spaces.
- Socket Wrench Set: Various sizes (5mm-12mm) for nuts and bolts.
- Verlängerungsstange: Extends the reach of screwdriver bits.
- Adapter: For connecting sockets to the screwdriver.
- Ladegerät: For recharging the screwdriver's battery.
- Tragbare Aufbewahrungsbox: A durable cloth bag for organizing and transporting the set.
3. Technische Daten
| Besonderheit | Spezifikation |
|---|---|
| Bandtage | 8V |
| Akku-Typ | Lithium-Ionen |
| Batteriekapazität | 2000 mAh |
| Ladezeit | Ca. 1 Stunde |
| Leerlaufdrehzahl | 320 U/min |
| Max Electric Torque | 5.5 Nm |
| Manuelles Drehmoment | 10 Nm |
| Drehmomenteinstellungen | 10+1 |
| Positionen handhaben | 90° (Pistol) and 180° (In-line) |
| Artikelgewicht | 1.62 kg (3.56 Pfund) |
| Technische Daten | 7.01 x 5.71 x 2.01 Zoll |
4. Einrichtung
4.1 Laden des Akkus
Before first use, fully charge the screwdriver's battery. The battery indicator lights will show the charging status.
- Connect the charger to the charging port on the screwdriver.
- Stecken Sie das Ladegerät in eine normale Steckdose.
- The battery indicator lights will illuminate to show charging progress. A full charge typically takes about 1 hour.
- Sobald das Gerät vollständig aufgeladen ist, trennen Sie es vom Ladegerät.

Abbildung 4.1: Charging the 2000mAh battery. A full charge is indicated by the battery indicator lights.
The battery indicator lights provide real-time power status:
- Rot: Low battery (approx. 30% remaining)
- Orange: Medium battery (approx. 50% remaining)
- Grün: High battery (approx. 100% remaining)

Abbildung 4.2: Battery indicator light states.
4.2 Einsetzen und Entfernen von Schraubendreherbits
The screwdriver features a magnetic chuck for easy bit changes.
- Wählen Sie den passenden Schraubendreherbit für Ihre Aufgabe.
- Insert the bit firmly into the magnetic chuck until it clicks into place.
- To remove, simply pull the bit straight out from the chuck.

Abbildung 4.3: Inserting a screwdriver bit.

Abbildung 4.4: Magnetic chuck in action.
5. Bedienungsanleitung
5.1 Adjusting Handle Position
The screwdriver features a dual-position handle, allowing you to switch between a 90° pistol grip and a 180° in-line grip for optimal comfort and access in different situations.
- Locate the 2-position toggle button on the handle.
- Press the button and rotate the handle to your desired position (90° or 180°).
- Lassen Sie den Knopf los, um den Griff zu verriegeln.
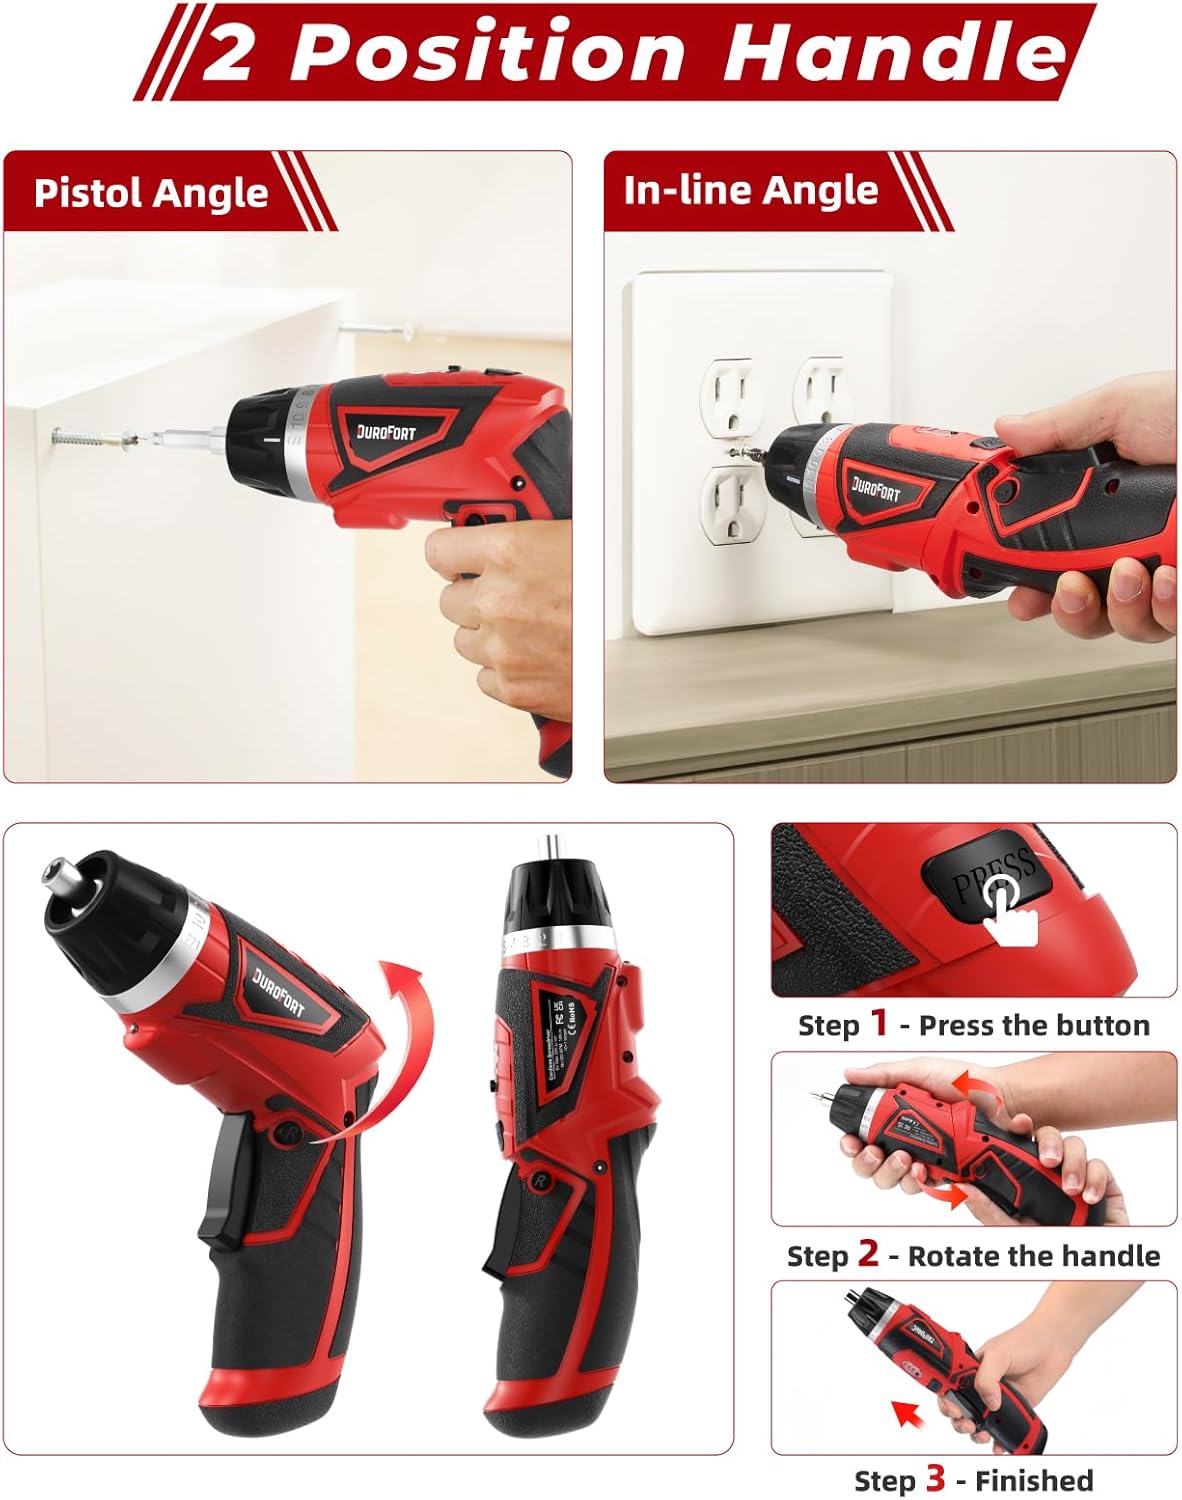
Abbildung 5.1: Adjusting the handle between Pistol Angle (90°) and In-line Angle (180°).
5.2 Setting Torque
The screwdriver offers 10+1 torque settings, allowing you to adjust the power output to prevent over-tightening or stripping screws. The '1' setting is for drilling or maximum torque.
- Rotate the torque adjustment ring located near the chuck.
- Align the desired torque number with the indicator mark on the screwdriver body.
- Start with a lower torque setting and increase if more power is needed.

Abbildung 5.2: Adjusting the 10+1 torque settings.
5.3 Forward, Reverse, and Lock Operation
The forward/reverse button controls the direction of rotation and also acts as a lock mechanism.
- Vorwärts (F): Push the button to the left for clockwise rotation (tightening screws).
- Rückwärts (R): Push the button to the right for counter-clockwise rotation (loosening screws).
- Sperren: Position the button in the center to lock the trigger and prevent accidental operation. This also allows for manual tightening/loosening.

Abbildung 5.3: Forward, Reverse, and Lock mechanism.
5.4 Using the Built-in LED Light
Die integrierte LED-Leuchte schaltet sich beim Drücken des Auslösers automatisch ein und sorgt so für gute Sichtverhältnisse in schwach beleuchteten Arbeitsbereichen.

Abbildung 5.4: LED light illuminating the work area.
5.5 Applications and Versatility
The DuroFort screwdriver set is versatile for various tasks:
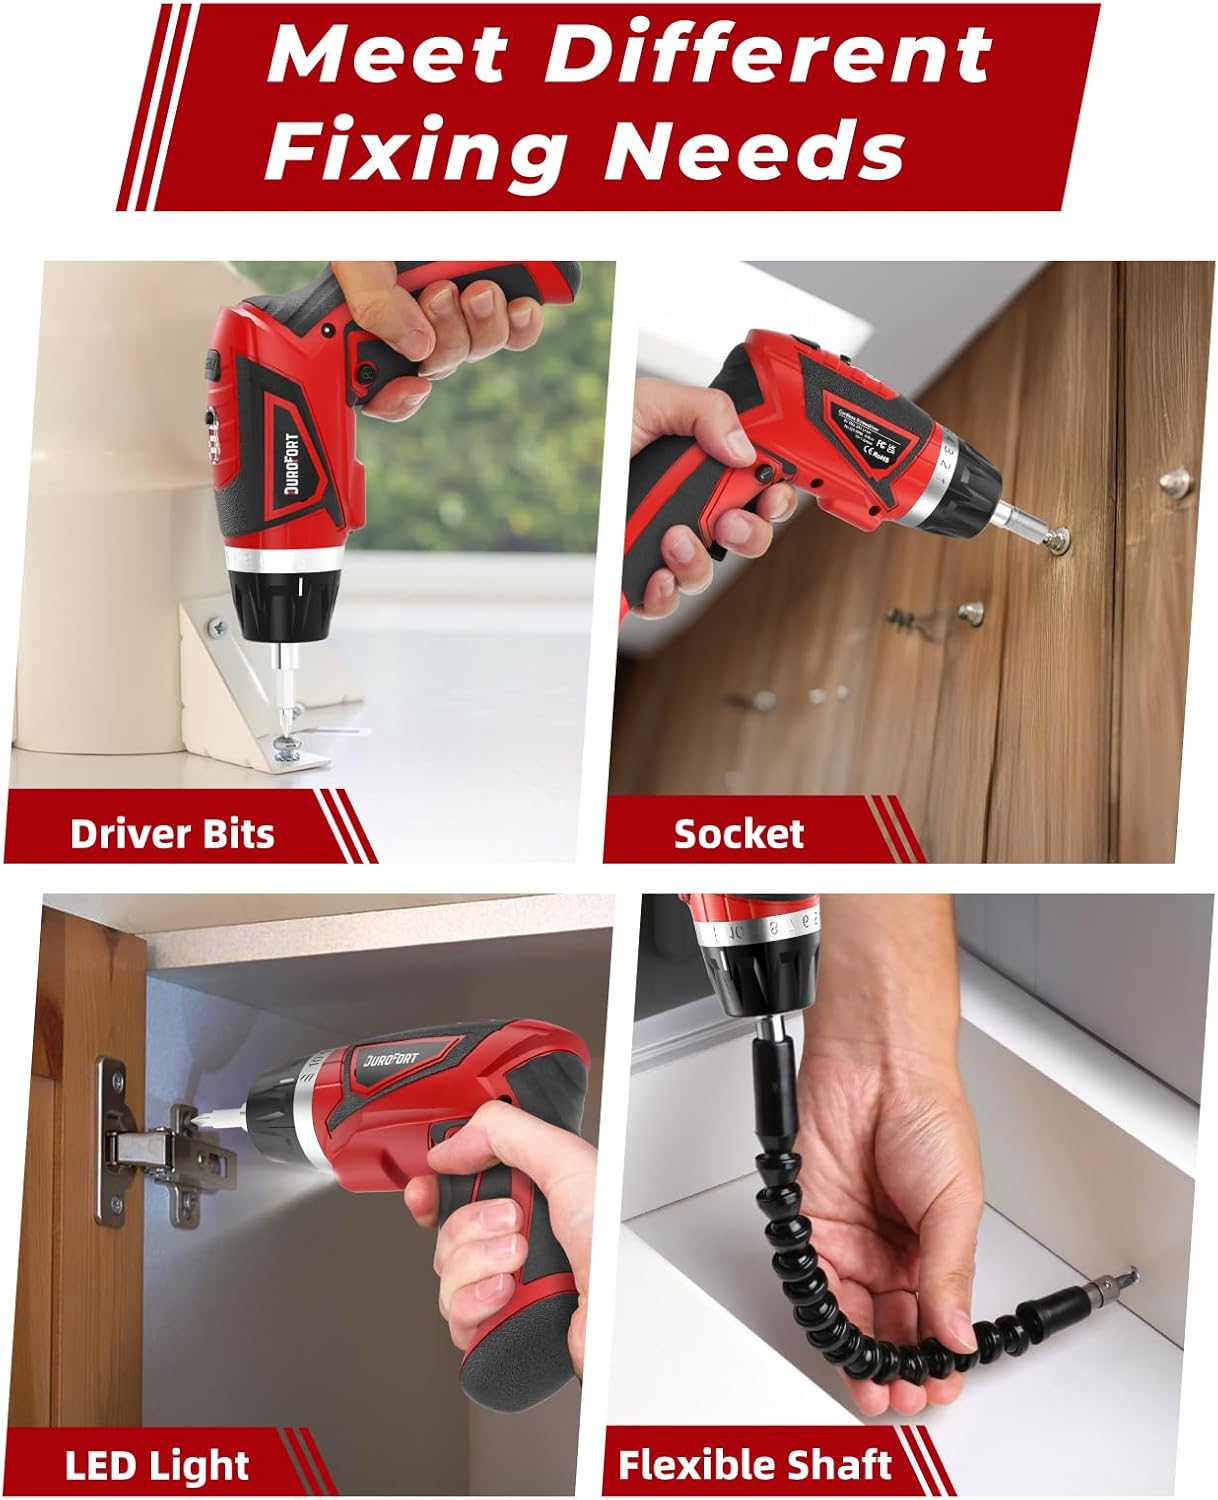
Abbildung 5.5: Examples of use with driver bits, sockets, LED light, and flexible shaft.
- Treiberbits: Ideal for assembling furniture, installing shelves, or general household repairs.
- Steckdosen: Use with the adapter and extension rod for tightening or loosening nuts and bolts.
- Flexible Welle: Perfect for reaching screws in confined or hard-to-reach areas, such as inside cabinets or behind appliances.
6. Wartung
Durch sachgemäße Pflege wird die Langlebigkeit und optimale Leistung Ihres Schraubendrehers gewährleistet.
- Reinigung: Regularly wipe down the tool with a clean, damp cloth. Do not use harsh chemicals or abrasive cleaners. Ensure no moisture enters the motor or battery compartments.
- Lagerung: Store the screwdriver and its accessories in the provided portable cloth bag in a dry, cool place, away from direct sunlight and extreme temperatures.
- Batteriepflege:
- Vermeiden Sie häufiges vollständiges Entladen des Akkus.
- Recharge the battery before it is completely depleted.
- If storing for extended periods, charge the battery to approximately 50% every 3-6 months to maintain battery health.
- Die Batterie darf weder Wasser noch extremer Hitze ausgesetzt werden.
- Bit-Wartung: Keep screwdriver bits clean and free of debris. Replace worn or damaged bits to ensure proper screw engagement and prevent stripping.
7. Fehlerbehebung
In der folgenden Tabelle finden Sie häufig auftretende Probleme und deren Lösungen:
| Problem | Mögliche Ursache | Lösung |
|---|---|---|
| Der Schraubendreher lässt sich nicht einschalten. | Batterie ist leer. Forward/Reverse switch is in the locked (center) position. | Laden Sie den Akku vollständig auf. Move the switch to the Forward (F) or Reverse (R) position. |
| Der Schraubendreher hat nicht genug Kraft oder setzt während des Gebrauchs aus. | Niedrige Batterieladung. Torque setting is too low. Überlastschutz aktiviert. | Laden Sie den Akku auf. Erhöhen Sie die Drehmomenteinstellung. Reduce pressure on the tool; allow it to cool down if overheated. |
| Screwdriver bit slips or strips screw head. | Falsche Bitgröße/-art. Worn or damaged bit. Torque setting too high or too low. | Use the correct bit for the screw type. Ersetzen Sie das Bit. Adjust torque setting appropriately. |
| Der Griff rastet nicht ein. | Toggle button not fully released. Debris obstructing mechanism. | Ensure the toggle button is fully released after adjusting. Clean the area around the pivot mechanism. |
8. Garantie und Support
For warranty information, technical support, or service inquiries, please contact DuroFort customer service. Refer to your purchase documentation for specific warranty terms and conditions.
Hersteller: DuroFort
Modellnummer: 8V Magnetic Electric Screwdriver
For further assistance, please visit the official DuroFort website or contact their customer support channels as provided with your product packaging.


