Einführung
Thank you for choosing the YESWELDER MIG-205DS PRO Multi-Process Welder. This machine is designed for versatility, offering 5-in-1 welding capabilities including Gas MIG, Flux Core MIG, Spool Gun MIG, Lift TIG, and Stick welding. This manual provides essential information for the safe and efficient operation, setup, maintenance, and troubleshooting of your welding machine. Please read this manual thoroughly before operation to ensure proper use and to prevent injury or damage.
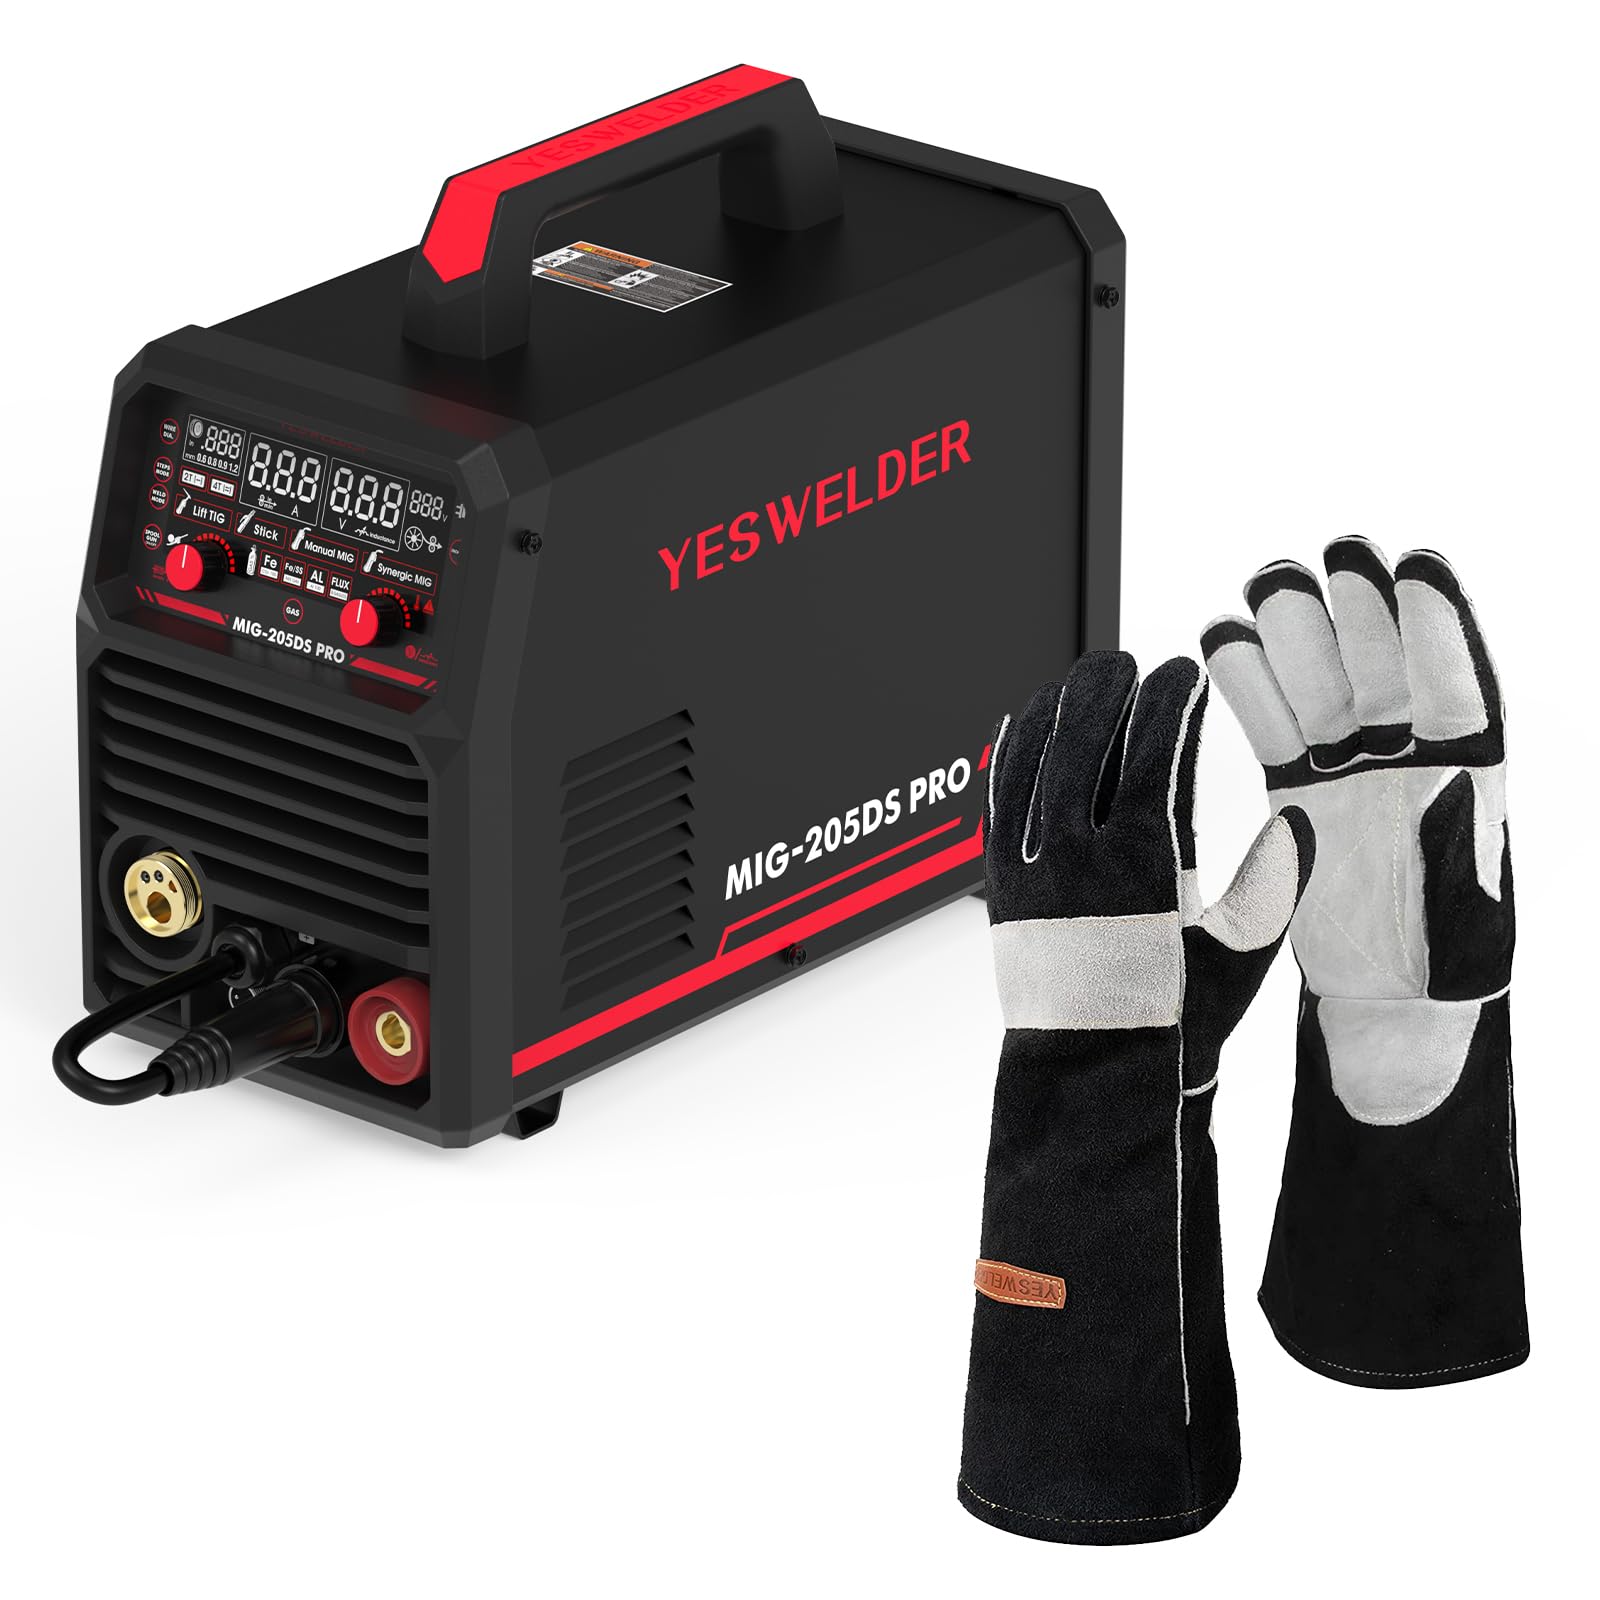
Image: The YESWELDER MIG-205DS PRO Multi-Process Welder, showcasing its compact design and various connection points for different welding processes, along with included accessories like the MIG torch, ground clampund Elektrodenhalter.
Sicherheitshinweise
Welding can be dangerous. It is crucial to follow all safety precautions to prevent serious injury or death. Always wear appropriate personal protective equipment (PPE) including a welding helmet with proper shade, welding gloves, protective clothing, and safety shoes. Ensure adequate ventilation to avoid inhaling welding fumes. Keep a fire extinguisher nearby. Disconnect power before performing any maintenance or service.
- Elektrischer Schock: Can kill. Do not touch live electrical parts. Wear dry insulating gloves and clothing.
- Dämpfe und Gase: Kann gesundheitsschädlich sein. Halten Sie Ihren Kopf von den Dämpfen fern. Sorgen Sie für ausreichende Belüftung oder Absaugung am Lichtbogen, um Dämpfe und Gase von der Atemzone fernzuhalten.
- Lichtbogenstrahlen: Can burn eyes and skin. Wear a welding helmet with a proper shade filter. Wear protective clothing to protect your skin.
- Feuer und Explosion: Schweißfunken können Brände oder Explosionen verursachen. Halten Sie brennbare Materialien vom Schweißbereich fern. Halten Sie einen Feuerlöscher griffbereit.
- Heiße Teile: Can cause severe burns. Do not touch hot parts with bare hands.

Image: A pair of black and gray YESWELDER MIG welding gloves, designed for hand protection during welding operations. These gloves feature a durable leather construction with reinforced palms and fingers.

Image: A diagram illustrating the dimensions of the YESWELDER MIG welding gloves, showing a total length of 16 inches, a palm width of 6.7 inches, and a finger length of 7.5 inches, indicating their extended coverage and fit.
Produkt überview
The MIG-205DS PRO is a versatile welding machine featuring advanced IGBT inverter technology for stable performance. It includes a large digital display for clear parameter adjustments and monitoring. The machine supports multiple welding processes, making it suitable for various applications.
Hauptmerkmale:
- 5-in-1 Multi-Process: Gas MIG, Flux Core MIG, Spool Gun MIG, Lift TIG, Stick.
- Duale Lautstärketage Input: 110V/220V automatic detection.
- Advanced Digital Display: Enhanced clarity for settings.
- IGBT Inverter Technology: For reliable and stable arc performance.
- Synergic Control: Simplifies parameter setup for MIG welding.

Bild: Eine Nahaufnahme view of the YESWELDER MIG-205DS PRO's upgraded large LED digital display, showing various welding parameters and mode selections such as Lift TIG, Stick, Manual MIG, and Synergic MIG, along with material and gas settings.

Image: A visual representation of the five welding processes supported by the YESWELDER MIG-205DS PRO: Spool Gun Welding, Gas MIG Welding, Flux Core Welding, Stick Welding, and Lift TIG Welding, each depicted with an example of the welding process.
Aufstellen
1. Auspacken und Inspektion
- Nehmen Sie das Schweißgerät und sämtliches Zubehör vorsichtig aus der Verpackung.
- Inspect for any shipping damage. Contact your supplier immediately if damage is found.
- Prüfen Sie, ob alle in der Packliste aufgeführten Komponenten vorhanden sind.
2. Stromanschluss
- The MIG-205DS PRO automatically detects input voltage (110 V oder 220 V).
- Connect the power cord to a suitable grounded power outlet. Ensure the circuit breaker rating is appropriate for welding current.
- For 220V operation, ensure the correct plug adapter is used if necessary.
3. Boden Clamp Verbindung
- Verbinden Sie die Erdungsklemmeamp cable to the appropriate terminal on the front panel (usually the negative (-) terminal for MIG/Stick, or positive (+) for Lift TIG).
- Befestigen Sie die Bodenklemme sicher.amp zum Werkstück, um einen guten elektrischen Kontakt zu gewährleisten.
4. Gas Connection (for Gas MIG)
- Connect the gas hose from your shielding gas cylinder (e.g., Argon/CO2 mix for MIG, 100% Argon for TIG) to the gas inlet on the rear of the machine.
- Um Gaslecks zu vermeiden, stellen Sie sicher, dass alle Verbindungen dicht sind.
- Set the gas regulator to the recommended flow rate (typically 15-25 CFH for MIG).
5. Wire Installation (MIG/Flux Core)
- Öffnen Sie das Drahtzufuhrfach.
- Install the wire spool onto the spindle, ensuring it rotates freely.
- Thread the welding wire through the guide tube and into the drive rollers.
- Adjust the drive roller tension to prevent slipping or crushing the wire.
- Select the correct drive roller groove size for your wire diameter.
- Führen Sie den Draht durch die MIG-Brennerdüse, bis er aus der Kontaktspitze austritt.
6. Spool Gun Connection (Optional)
- Connect the spool gun cable to the dedicated spool gun port on the front panel.
- Ensure the spool gun is loaded with the appropriate wire (e.g., aluminum wire for aluminum welding).
7. Lift TIG Torch Connection (Optional, not included)
- Connect the Lift TIG torch to the appropriate terminal (usually the negative (-) terminal for DC TIG).
- Connect the gas hose from the TIG torch to the gas outlet on the machine or directly to the gas cylinder with a separate regulator.
- Ensure a tungsten electrode is properly installed in the torch.
8. Stick Electrode Holder Connection
- Schließen Sie das Kabel des Elektrodenhalters an den Pluspol (+) auf der Vorderseite an.
- Insert the desired stick electrode into the holder.
Betriebsarten
The MIG-205DS PRO offers multiple welding processes. Select the desired mode using the control panel.
1. Digital Display and Control Panel
The large digital display shows welding parameters such as current (Amps), Bd.tage (Volts), and wire feed speed. Use the control knobs to adjust these parameters. The display also indicates the selected welding mode and material type.
Bild: Eine detaillierte view of the YESWELDER MIG-205DS PRO's control panel and digital display, highlighting the clear readouts for current, voltage, and wire feed speed, along with indicators for selected welding modes and material types (Fe, Fe/Ss, AL, Flux).
2. Gas MIG Welding
- Aufstellen: Ensure gas cylinder is connected and flowing, correct wire is installed, and ground clamp ist sicher.
- Modusauswahl: Select "Gas MIG" on the control panel.
- Parameteranpassung: Use the synergic function for automatic parameter setting based on wire diameter and material, or adjust manually.
- Betrieb: Position the torch, press the trigger to start the arc and wire feed. Maintain a consistent travel speed and arc length.
3. Flux Core MIG Welding
- Aufstellen: Install flux core wire. No shielding gas is required. Ensure polarity is set correctly (usually DCEN - electrode negative).
- Modusauswahl: Select "Flux Core MIG" on the control panel.
- Parameteranpassung: Adjust current and wire feed speed according to wire manufacturer recommendations.
- Betrieb: Similar to Gas MIG, but the flux in the wire provides shielding.
4. Spool Gun MIG Welding
- Aufstellen: Connect the spool gun with appropriate wire (e.g., aluminum). Ensure shielding gas (100% Argon for aluminum) is connected.
- Modusauswahl: Select "Spool Gun MIG" on the control panel.
- Parameteranpassung: Adjust settings for aluminum welding, typically higher wire feed speed and AC balance if available (this machine is DC only for TIG, so MIG will be DC).
- Betrieb: The spool gun feeds wire directly, ideal for softer wires like aluminum.
5. WIG-Schweißen mit Hebevorrichtung
- Aufstellen: Connect Lift TIG torch, gas, and ground clamp. Ensure tungsten electrode is sharpened.
- Modusauswahl: Select "Lift TIG" on the control panel.
- Parameteranpassung: Gewünscht einstellen ampära.
- Betrieb: Touch the tungsten to the workpiece, then lift slightly to initiate the arc. This method minimizes tungsten contamination.
6. Stick Welding (SMAW)
- Aufstellen: Connect electrode holder to positive (+) and ground clamp to negative (-) for DCEP (most common), or vice-versa for DCEN. Insert appropriate electrode.
- Modusauswahl: Select "Stick" on the control panel.
- Parameteranpassung: Satz amperage based on electrode type and diameter.
- Betrieb: Strike the arc by lightly scratching the electrode on the workpiece. Maintain a consistent arc length and travel speed.

Image: A welder wearing a helmet and protective gear, operating the YESWELDER MIG-205DS PRO machine. The image emphasizes the smooth operation and quality results achievable with the welder, showing sparks during a welding process.
Wartung
Regular maintenance ensures the longevity and optimal performance of your welding machine. Always disconnect power before performing any maintenance.
1. Allgemeine Reinigung
- Reinigen Sie die Außenseite des Geräts regelmäßig mit einem trockenen, weichen Tuch.
- Use compressed air to blow out dust and debris from the cooling vents. Ensure the air is dry and oil-free.
- Keep the control panel clean and free from grease or dirt.
2. Verbrauchsmaterialersatz
- MIG-Brenner: Regularly inspect and replace worn contact tips, nozzles, and diffusers. Ensure the liner is clean and free of kinks.
- WIG-Brenner: Inspect and replace tungsten electrodes as needed. Ensure the collet and collet body are clean.
- Stick Electrode Holder: Check for wear on the jaws and cable connections.
3. Wire Feeder Maintenance
- Clean the drive rollers and wire guide tubes to prevent wire feeding issues.
- Check drive roller tension and adjust as necessary.
- Inspect the wire spool spindle for smooth rotation.
4. Kabel- und Verbindungsprüfung
- Regularly inspect all welding cables (MIG torch, ground clamp, electrode holder) for cuts, abrasions, or loose connections.
- Ensure power cord and plug are in good condition.
Fehlerbehebung
Dieser Abschnitt bietet Lösungen für häufig auftretende Probleme. Bei Problemen, die hier nicht aufgeführt sind, wenden Sie sich bitte an den Kundensupport.
| Problem | Mögliche Ursache | Lösung |
|---|---|---|
| Kein Strom | Power switch off, circuit breaker tripped, loose power cord. | Turn on power switch. Reset circuit breaker. Check power cord connection. |
| Kein Bogen | Poor ground connection, incorrect welding mode, wrong parameters, faulty torch/electrode holder. | Sicherstellen, dass die Erdung geschlossen istamp is secure. Select correct mode. Adjust parameters. Inspect and replace torch/holder if damaged. |
| Poor Wire Feed (MIG) | Incorrect drive roller tension, wrong drive roller size, clogged liner, wire tangled. | Adjust drive roller tension. Use correct roller groove. Clean or replace liner. Untangle wire spool. |
| Porosity in Weld (MIG) | Unzureichendes Schutzgas, Gasleck, verunreinigtes Werkstück, falsche Gasart. | Check gas cylinder level and flow rate. Inspect gas hose for leaks. Clean workpiece thoroughly. Use correct shielding gas. |
| Überhitzungsschutz | Betriebsdauer überschritten, Lüftungsschlitze blockiert. | Allow machine to cool down. Ensure cooling vents are clear. Reduce welding time or current. |
Technische Daten
| Besonderheit | Detail |
|---|---|
| Modell | MIG-205DS PRO |
| Schweißverfahren | Gas MIG, Flux Core MIG, Spool Gun MIG, Lift TIG, Stick |
| Eingangslautstärketage | 110 V/220 V Doppelvoltage (Automatic Detection) |
| Ausgangsstrombereich | 30-205 Amps (max.) |
| Technologie | IGBT-Wechselrichter |
| Anzeige | Advanced Digital Display |
| Mitgeliefertes Zubehör | MIG Torch, Ground Clamp, Electrode Holder, Welding Gloves |
Garantie und Support
For warranty information, technical support, or service inquiries, please refer to the warranty card included with your product or visit the official YESWELDER webBewahren Sie Ihren Kaufbeleg als Kaufnachweis auf.
Online-Ressourcen: For additional support, FAQs, and product registration, please visit www.yeswelder.com.


