Einführung
Thank you for choosing the Craftersmark 16-inch Gold Battery Operated Picture Light. This manual provides detailed instructions for the installation, operation, and maintenance of your new picture light. Please read this manual thoroughly before use to ensure proper function and longevity of the product.
Lieferumfang
- 1 x Craftersmark 16-inch Gold Picture Light
- 1 x Fernbedienung
- 1 x Mounting Hardware Set (screws, anchors)
- 1 x USB-C-Kabel
- 1 x Bedienungsanleitung (dieses Dokument)
Hauptmerkmale
- Wide Lighting Range: Equipped with a 16-inch light bar and unique focusing cup design, providing a broad illumination range suitable for artworks up to 40 inches wide and 80 inches high.
- Einstellbare Helligkeit und Farbtemperatur: Features 36 high-quality LED beads with a maximum brightness of 350 lumens. Offers three color temperature options: 3000K (warm yellow), 5000K (natural white), and 6500K (cool white).
- Langlebiger Akku: Built-in 5000mAh rechargeable battery provides approximately 10-13 hours of lighting at maximum illumination on a single charge.
- Dual-Control-Optionen: Operate the light using either the integrated touch buttons on the light body or the included remote control.
- Magnetic Installation & Flexible Adjustment: Designed with a magnetic suction structure for easy removal of the light bar for charging. An adjustable metal gooseneck hook allows for 360° rotation to direct light precisely.
- Hoher Farbwiedergabeindex (CRI 95+): Ensures accurate reproduction of artwork colors, enhancing visual appeal.

Image: The picture light provides a wide illumination range, effectively lighting large artworks.
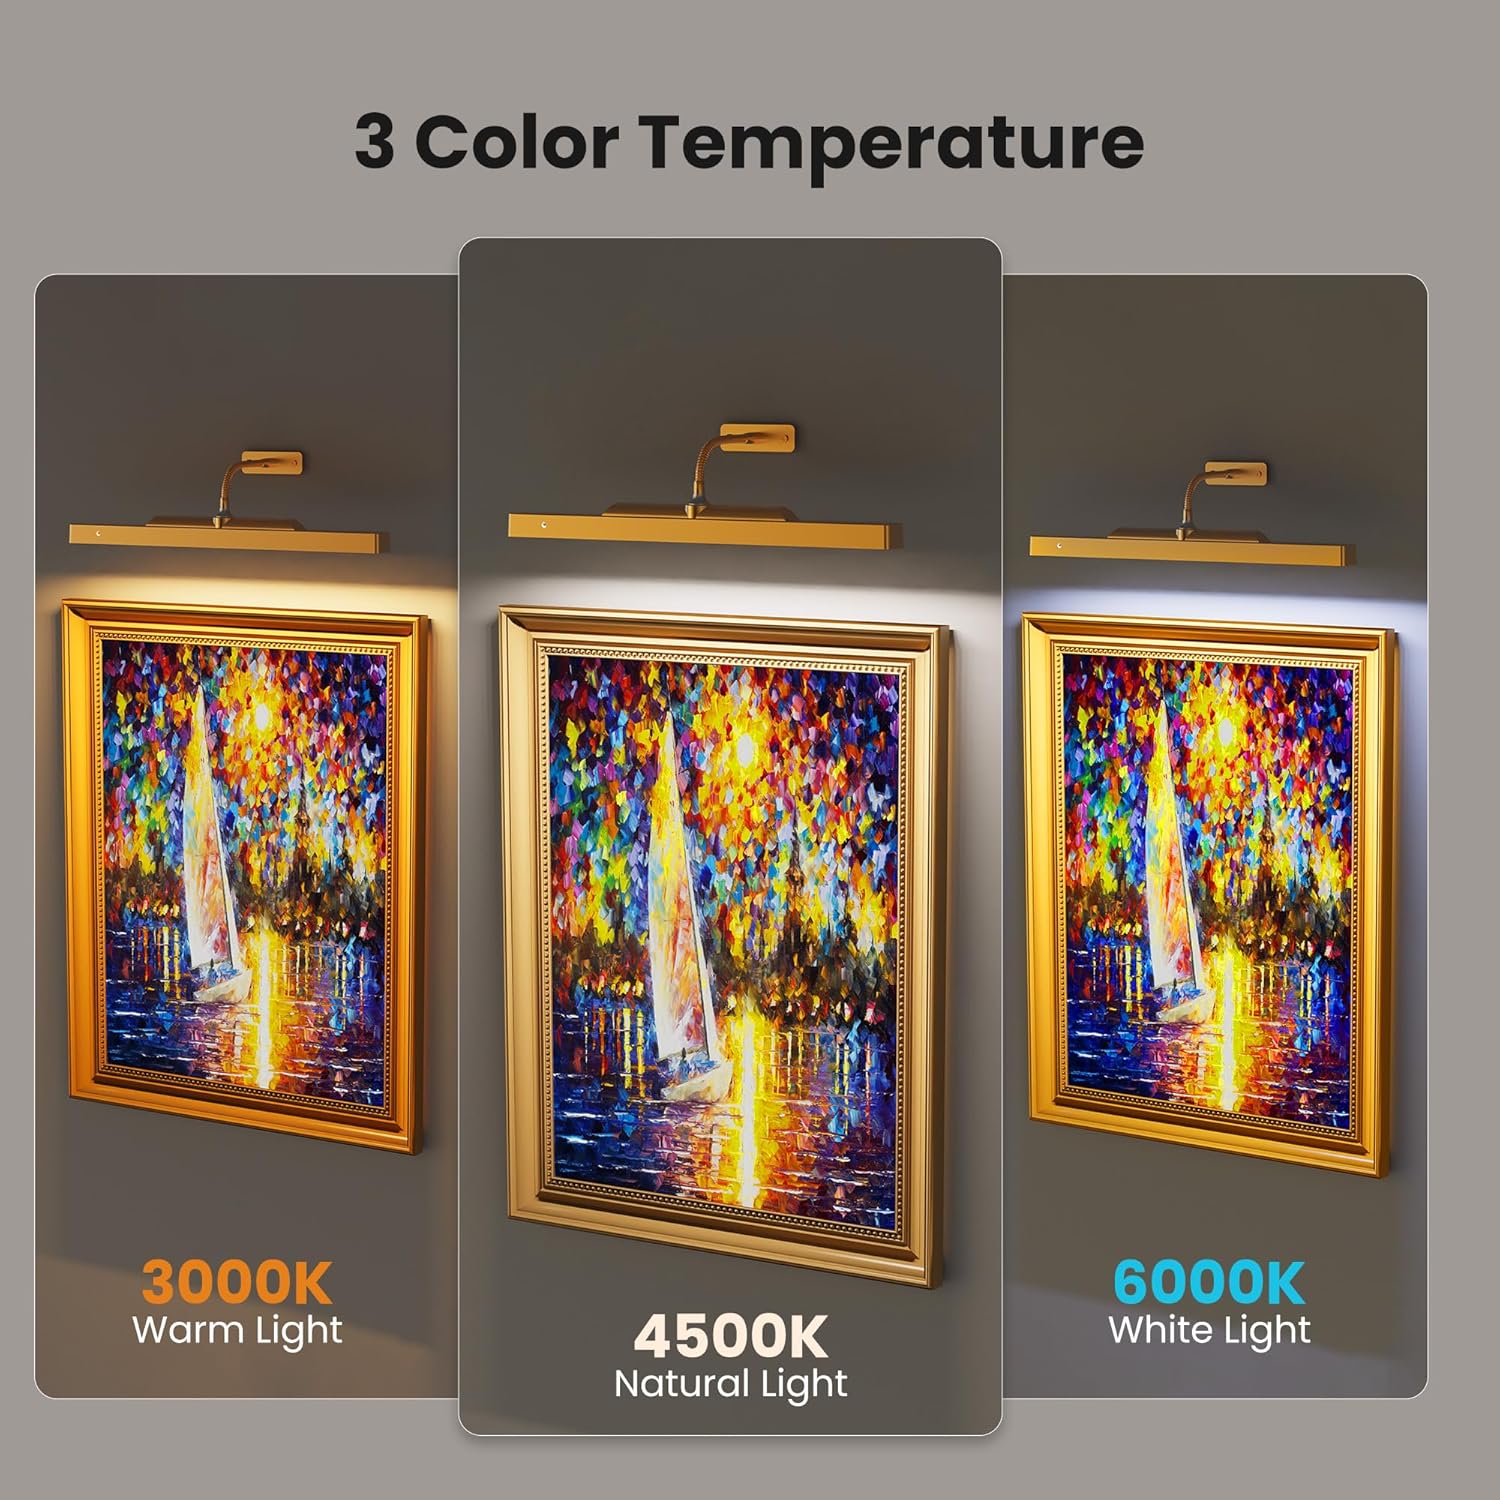
Image: The light offers three distinct color temperatures to suit different preferences and artwork types.
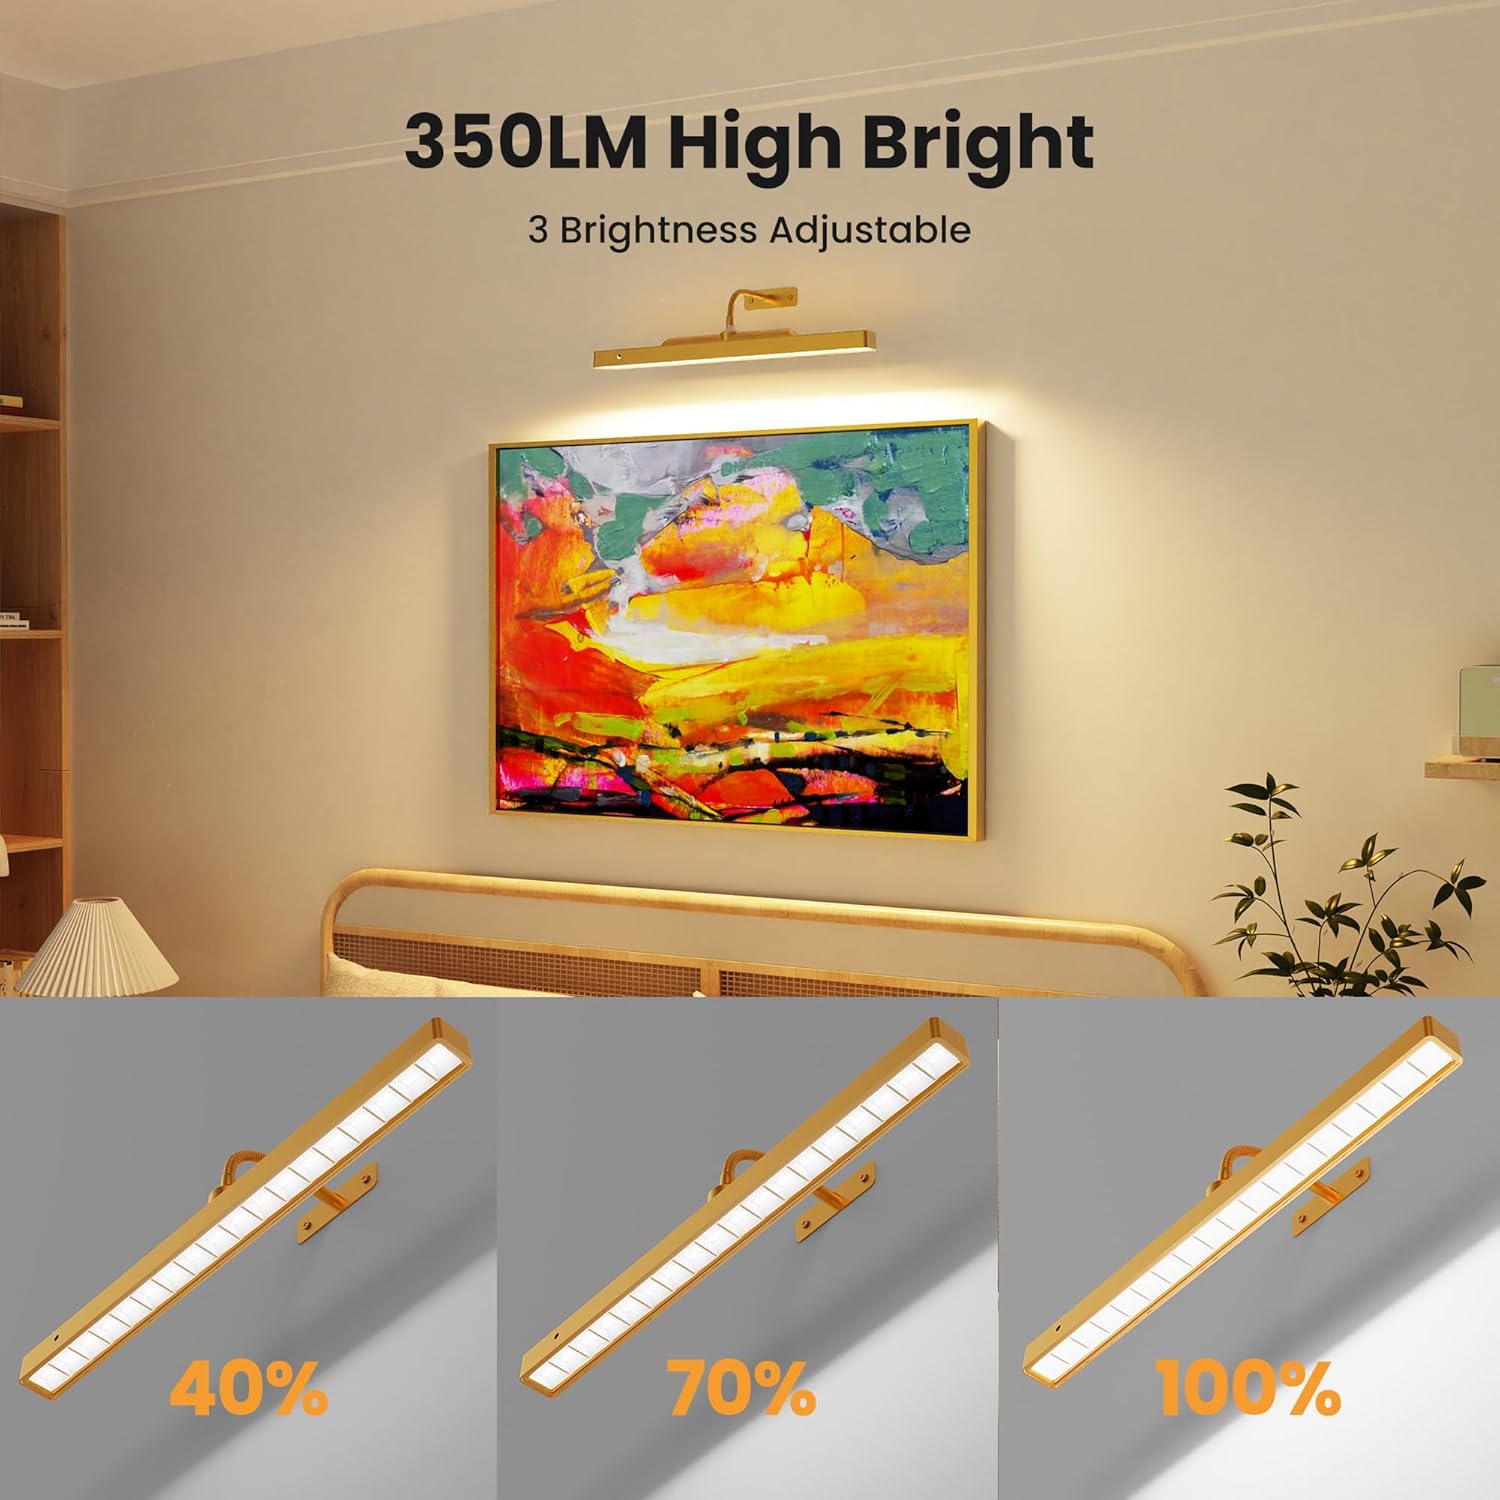
Image: Adjust the brightness to your desired level for optimal display.

Image: High CRI 95+ ensures true color representation of your art.
Setup und Installation
Follow these steps to install your Craftersmark Picture Light:
- Bereiten Sie den Montageort vor: Choose a suitable location above your artwork. Ensure the surface is clean and dry.
- Bohrlöcher markieren: Hold the mounting bracket against the wall at the desired height. Use a pencil to mark the positions for the drill holes.
- Bohrlöcher: Drill pilot holes at the marked positions. If installing into drywall, insert the provided wall anchors.
- Montagehalterung anbringen: Befestigen Sie die Montagehalterung mit den mitgelieferten Schrauben an der Wand.
- Schwanenhals anbringen: Screw the flexible gooseneck arm into the mounting bracket.
- Lichtleiste anbringen: The light bar attaches magnetically to the end of the gooseneck. Simply align the magnetic connection points and let it snap into place.

Image: Simple two-step installation process.

Image: The magnetic design allows for easy removal of the light bar for charging.
Bedienungsanleitung
Your picture light offers both touch and remote control for convenience.
Touch-Steuerung
- Ein-/Ausschalten: Lightly touch the power button on the light bar to turn the light on or off.
- Farbtemperatur anpassen: While the light is on, touch the color temperature button to cycle through 3000K (Warm White), 5000K (Natural White), and 6500K (Cool White).
Fernbedienung
The remote control provides comprehensive functionality:
- EIN/AUS: Press the 'ON' or 'OFF' button to power the light.
- Helligkeitsanpassung: Use the '+' and '-' buttons to increase or decrease the brightness.
- Auswahl der Farbtemperatur: Press 'WW' for Warm White (3000K), 'NW' for Natural White (5000K), or 'CW' for Cool White (6500K).
- Timereinstellung: Set the light to automatically turn off after a specified duration by pressing '2H' (2 hours), '4H' (4 hours), or '8H' (8 hours).

Image: Control your picture light conveniently with the remote.
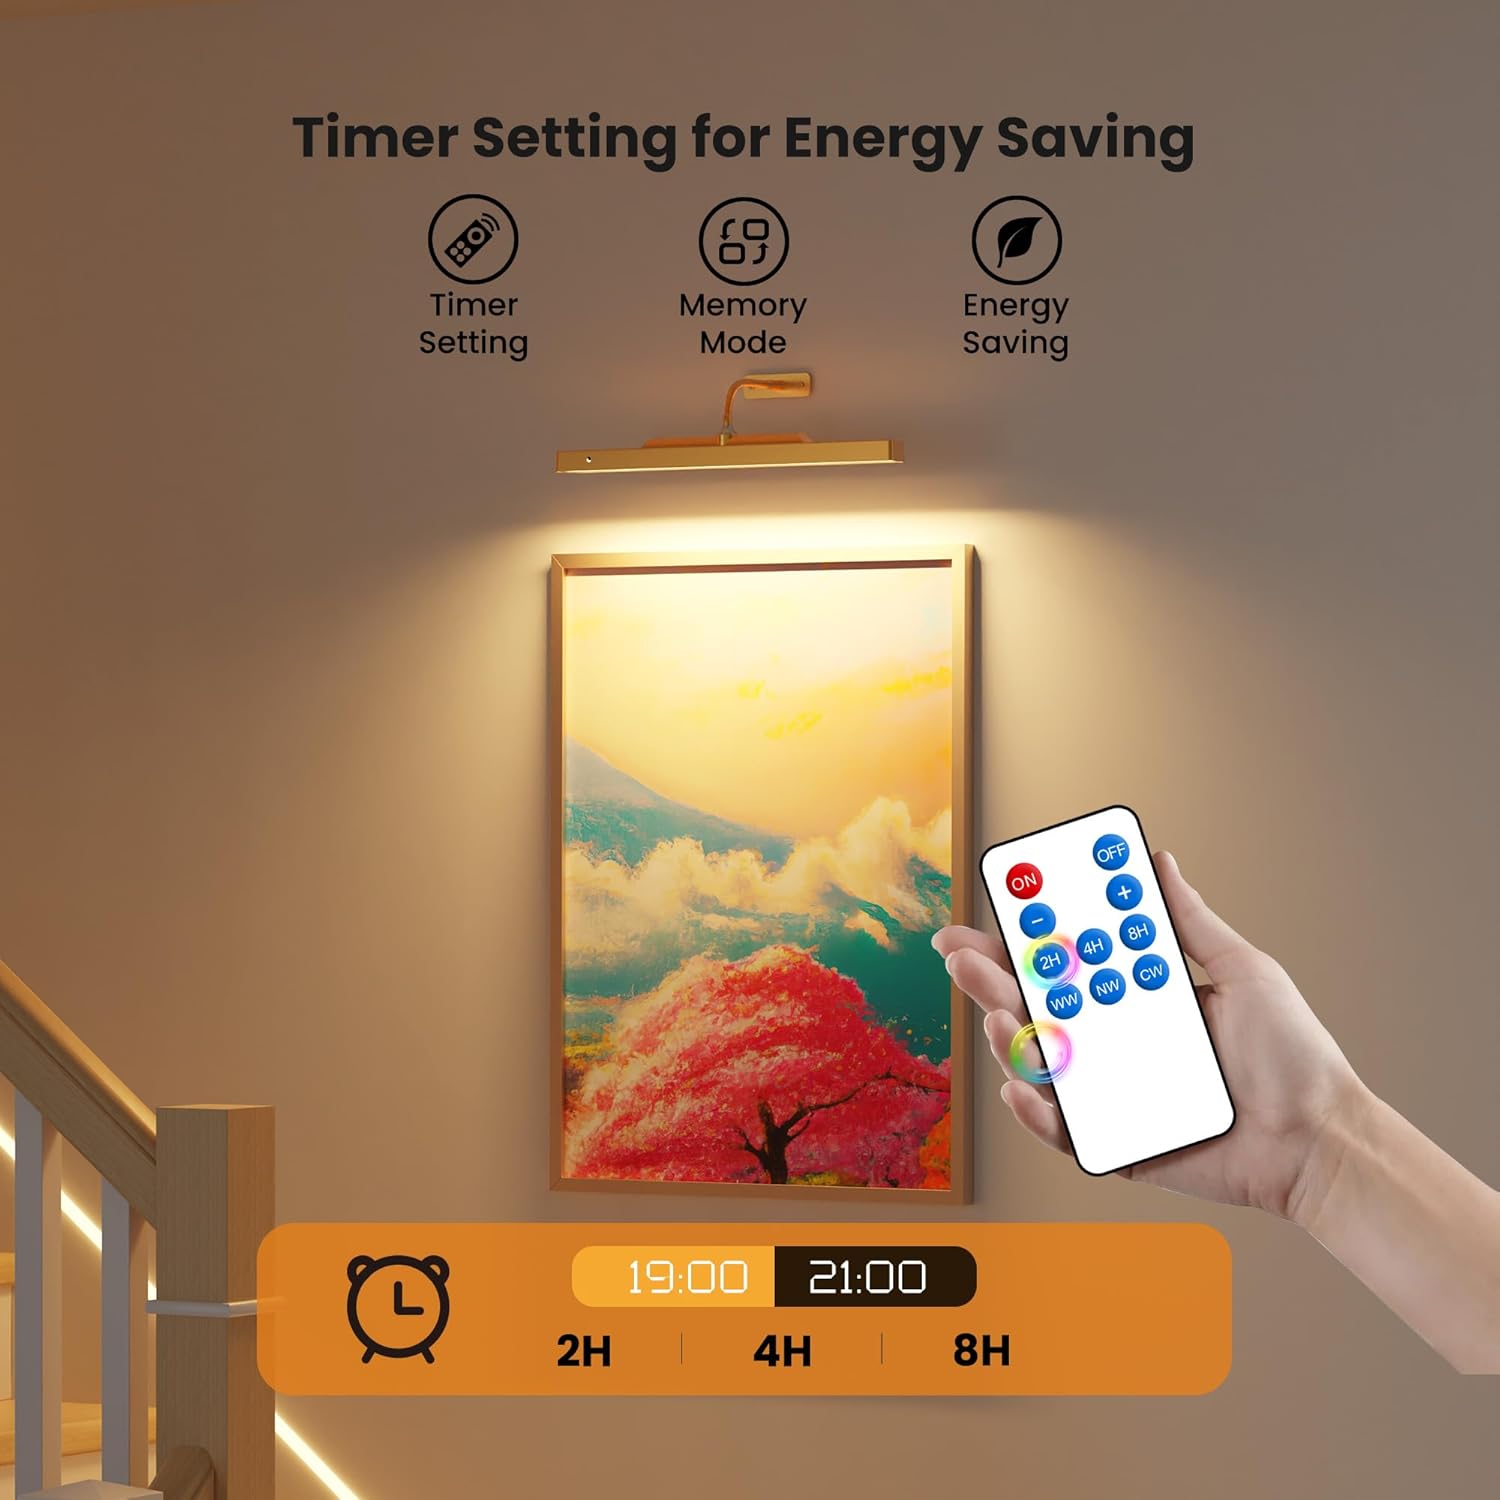
Image: Utilize the timer function for energy saving and convenience.
Anpassen der Lichtrichtung
The flexible gooseneck allows for 360° rotation. Gently bend and position the light bar to achieve the desired illumination angle for your artwork.

Image: The flexible gooseneck allows for precise light positioning.
Video: Demonstrates the flexible and adjustable nature of the picture light, allowing for optimal positioning.
Laden des Akkus
The picture light is equipped with a 5000mAh rechargeable battery. When the battery is low, the light indicator will signal the need for charging.
- Remove Light Bar: Gently detach the light bar from the magnetic gooseneck for easy access to the charging port.
- USB-C-Kabel anschließen: Plug the provided USB-C cable into the charging port on the light bar and connect the other end to a suitable USB power adapter (not included).
- Ladeanzeige: The indicator light will show the charging status. It will typically turn green or off when fully charged.
- Reattach Light Bar: Once fully charged, reattach the light bar to the magnetic gooseneck.

Image: The 5000mAh battery provides extended use and is easily rechargeable via USB-C.
Wartung
- Reinigung: Use a soft, dry cloth to wipe the surface of the light. Do not use abrasive cleaners or solvents, as they may damage the finish.
- Batteriepflege: To prolong battery life, avoid fully discharging the battery frequently. Charge the light regularly, even if not in constant use.
- Lagerung: If storing the light for an extended period, ensure it is fully charged and store it in a cool, dry place.
Fehlerbehebung
| Problem | Mögliche Ursache | Lösung |
|---|---|---|
| Licht geht nicht an. | Batterie ist leer. | Laden Sie die Lampe mit dem mitgelieferten USB-C-Kabel auf. |
| Die Fernbedienung funktioniert nicht. | Remote battery is low or depleted. Obstruction between remote and light. | Replace the remote control battery. Ensure a clear line of sight to the light's receiver. |
| Licht geht unerwartet aus. | Timer function activated. Low battery. | Check if a timer was set. Recharge the battery. |
| Light bar detaches easily from gooseneck. | Improper attachment or excessive force during adjustment. | Ensure the light bar is securely seated on the magnetic connection. Adjust the gooseneck gently. |
Technische Daten
| Besonderheit | Detail |
|---|---|
| Marke | Handwerkerzeichen |
| Modellname | Bild Licht |
| Farbe | Gold |
| Material | Metall, Kunststoff |
| Technische Daten | 16 Zoll L x 1.18 Zoll B x 0.9 Zoll H |
| Stromquelle | Batteriebetrieben |
| Akku-Typ | 2 Lithium-Ionen-Akku (im Lieferumfang enthalten) |
| Batteriekapazität | 5000 mAh |
| Lichtquellentyp | LED |
| Anzahl der Lichtquellen | 36 |
| Helligkeit | 350 Lumen (Max.) |
| Farbtemperatur | 3000K, 5000K, 6500K (einstellbar) |
| Kontrollmethode | Fernbedienung, berühren |
| Besondere Merkmale | Adjustable Color Temperature, Dimmable, Remote Control, Timer Setting |
| Installationstyp | Oberflächenmontage (magnetisch) |
| Verwendung im Innen- und Außenbereich | Innenbereich |
| Artikelgewicht | 14 Unzen |
Garantie und Support
This Craftersmark Picture Light comes with a Limited Warranty. For specific details regarding warranty coverage, please refer to the warranty information provided with your purchase or contact Craftersmark customer support.
Sollten Sie auf Probleme stoßen oder Fragen haben, die in diesem Handbuch nicht behandelt werden, wenden Sie sich bitte an unser Kundendienstteam.


