1. Einleitung
Thank you for choosing the Lepro 1500LM Battery Powered LED Camping Lantern. This manual provides essential information for the safe and efficient operation, maintenance, and troubleshooting of your lantern. Please read this manual thoroughly before use and retain it for future reference.
2. Wichtige Sicherheitshinweise
- Mischen Sie keine alten und neuen Batterien.
- Mischen Sie keine Alkali-, Standard- (Kohle-Zink) oder wiederaufladbaren (Nickel-Cadmium) Batterien.
- Batterien müssen stets korrekt hinsichtlich der Polarität (+ und -) eingelegt werden.
- Remove batteries if the lantern will not be used for an extended period.
- Außerhalb der Reichweite von Kindern aufbewahren.
- Do not stare directly into the LED light source to avoid eye strain.
- This product is IPX4 water-resistant, meaning it is protected against splashing water from all angles. It is not designed for submersion.
3. Packungsinhalt
Prüfen Sie nach dem Öffnen der Verpackung, ob alle Artikel vorhanden sind:
- Lepro 1500LM Batteriebetriebene LED Camping Lantern (1 unit)
- Benutzerhandbuch (dieses Dokument)
Note: 3 D-cell batteries are required and are not included in the package.
4. Produktüberschreitungview
Familiarize yourself with the main components of your Lepro CampLaterne:
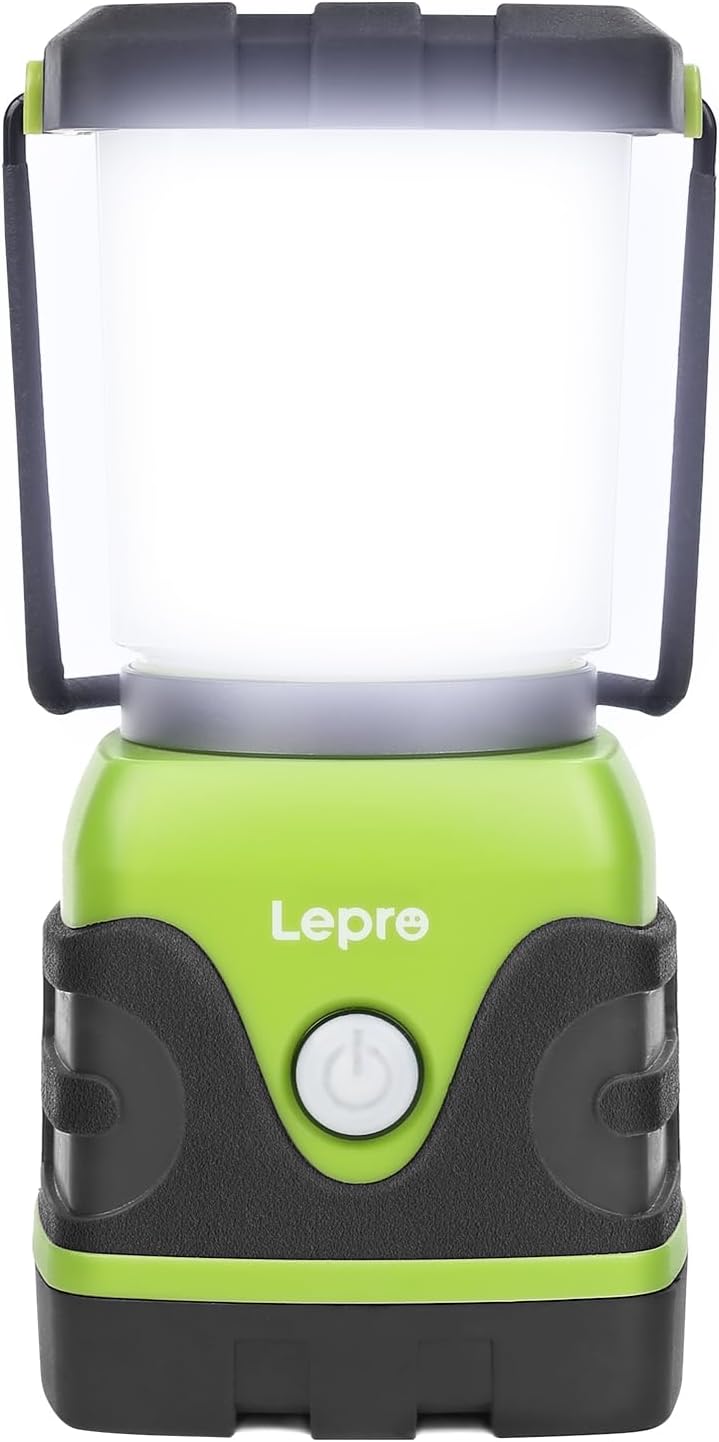
Abbildung 4.1: Vorderseite view of the Lepro 1500LM LED Camping Lantern. The power button is visible on the front, and a metal handle is at the top.
- Netzschalter: Controls power on/off, light modes, and dimming.
- Metallgriff: For carrying or hanging the lantern upright.
- Unterer Haken: Located at the base, allows for inverted hanging.
- Batteriefach: Located at the base, secured by a twist-lock mechanism.
5. Einrichtung: Batterieeinbau
The Lepro 1500LM Camping Lantern requires 3 D-cell alkaline batteries (not included).
- Twist the bottom cap of the lantern counter-clockwise to unlock and remove it.
- Insert three D-cell batteries into the battery compartment, ensuring correct polarity (+ and -) as indicated inside the compartment.
- Align the protruding pole on the bottom cap with the corresponding hole in the battery compartment.
- Place the bottom cap back onto the lantern and twist it clockwise to securely lock it in place.

Figure 5.1: Illustration of battery installation, showing the battery compartment, protruding pole, and counter-clockwise motion for opening.
6. Bedienung
The lantern features a single power button for all lighting controls.
6.1 Ein-/Ausschalten und Lichtmodi
Short press the power button to cycle through the following light modes:
- Tageslichtweiß
- Warmweiß
- Combined (Full Brightness)
- Flashing Red (Emergency Signal)
- Aus
6.2 Helligkeitsanpassung (stufenloses Dimmen)
When the lantern is in any of the white light modes (Daylight White, Warm White, or Combined), press and hold the power button to activate stepless dimming. The brightness will gradually increase or decrease. Release the button when the desired brightness level is reached.

Figure 6.1: Visual representation of the lantern's four light modes and the stepless dimming function.
6.3 Aufhängemöglichkeiten
The lantern offers versatile hanging options:
- Upright Hanging: Use the metal handle at the top to hang the lantern from a hook or branch.
- Inverted Hanging: The bottom cap features a retractable hook. Remove the top diffuser by twisting it counter-clockwise, then use the bottom hook to hang the lantern upside down for broader downward illumination.

Abbildung 6.2: Nahaufnahme views of the lantern's bottom hook and top handle, illustrating its hanging capabilities.
7. Wartung
7.1 Reinigung
- Wischen Sie die Außenseite der Laterne mit einem weichen,amp Tuch.
- Verwenden Sie keine Scheuermittel oder Lösungsmittel, da diese die Oberfläche beschädigen können.
- Ensure the battery compartment is clean and dry before installing batteries.
7.2 Speicherung
- Bewahren Sie die Laterne bei Nichtgebrauch an einem kühlen, trockenen Ort auf.
- Remove batteries if storing for an extended period to prevent leakage and damage.
8. Fehlerbehebung
If you encounter issues with your lantern, refer to the table below for common problems and solutions:
| Problem | Mögliche Ursache | Lösung |
|---|---|---|
| Laterne geht nicht an. | Die Batterien sind leer oder falsch eingelegt. | Replace with new D-cell batteries, ensuring correct polarity. Check that the bottom cap is securely locked. |
| Das Licht ist schwach oder flackert. | Niedriger Batteriestand. | Replace all three D-cell batteries. |
| Cannot change light modes or dim. | Fehlfunktion des Knopfes oder schwacher Akku. | Stellen Sie sicher, dass die Batterien neu sind. Sollte das Problem weiterhin bestehen, wenden Sie sich bitte an den Kundendienst. |
| Water ingress after exposure to rain. | Lantern was submerged or exposed to heavy jets of water beyond IPX4 rating. Bottom cap not securely fastened. | Ensure the bottom cap is always securely fastened. The lantern is water-resistant, not waterproof for submersion. Dry the lantern thoroughly and remove batteries if water is suspected inside. |
9. Spezifikationen
| Besonderheit | Spezifikation |
|---|---|
| Modellnummer | PR330042-US |
| Lichtquelle | LED |
| Helligkeit | Bis zu 1500 Lumen |
| Lichtmodi | Daylight White, Warm White, Combined (Full Brightness), Flashing Red |
| Dimmen | Stepless Dimming (long press) |
| Stromquelle | 3 x D-cell Alkaline Batteries (not included) |
| Akkulaufzeit | Approx. 12 hours at 1500 lumens (up to 16 hours generally) |
| Wasserbeständigkeit | IPX4 (Protected against splashing water from all angles) |
| Material | Plastik |
| Abmessungen (L x B x H) | 3.74 x 3.46 x 7.24 Zoll (9.5 x 8.8 x 18.4 cm) |
| Gewicht (ohne Batterien) | 1.06 Pfund (0.48 kg) |
| Bandtage | 4.5 Volt |
| Wastage | 15 Watt |
10. Garantie und Support
For warranty information or technical support, please refer to the documentation included with your purchase or visit the official Lepro website. If you have any questions or require assistance, please contact Lepro customer service.


