1. Produktüberschreitungview
The FireAngel SW1-R is a mains-powered optical smoke alarm designed to provide early warning of fire. It features a 9V backup battery to ensure continuous protection during power outages. The alarm emits a loud 85dB sound at 3 meters and includes LED visual indicators for clear alerts.
This optical smoke alarm is particularly effective at detecting slow-burning fires that produce thick white smoke, making it suitable for general living areas.
Hauptmerkmale:
- Mains Powered with 9V Battery Backup: Ensures continuous operation even during power failures.
- Optical Smoke Sensor: Detects slow-burning fires and reduces false alarms.
- Interlink Capability: Can be hardwired and interconnected with up to 12 compatible FireAngel smoke (SW1), heat (HW1), or carbon monoxide (CW1) alarms.
- Test-/Stummschalttaste: Allows for easy testing of the alarm and temporary silencing of false alarms.
- Lauter 85dB-Alarm: Provides clear audible warning.
- LED-Anzeigen: Visual alerts for alarm status.
- Sleep Easy Function: Temporarily silences low battery chirps for up to 8 hours.
- Zertifiziert: Meets British Safety Standard EN 14604: 2005.

Abbildung 1: Vorderseite view of the FireAngel SW1-R Mains Powered Optical Smoke Alarm.

Figure 2: FireAngel SW1-R Smoke Alarm highlighting its 9V backup battery, audible/visual alerts, and large test button.
2. Wichtige Sicherheitshinweise
Bitte lesen Sie vor der Installation und Inbetriebnahme alle Anweisungen sorgfältig durch. Bewahren Sie diese Anleitung zum späteren Nachschlagen auf.
- Elektrische Sicherheit: Installation must be carried out by a qualified electrician in accordance with local wiring regulations. Always disconnect the mains electricity supply before installation or maintenance.
- Platzierung: Smoke alarms should be sited at least 300 mm (12 inches) from light fittings and walls.
- Avoidance Areas: This smoke alarm is nicht geeignet for installation in kitchens, bathrooms, garages, or areas with high humidity, dust, or extreme temperatures, as these conditions can lead to false alarms.
- Nicht malen: Never paint the smoke alarm. Paint can block the smoke entry points and interfere with the sensor's operation.
- No Cleaners: Do not use cleaning agents or solvents on the device. Wipe with a dry cloth only.
- Obstruktion: Ensure the alarm is not obstructed by furniture, curtains, or other objects that could prevent smoke from reaching the sensor.
- Regelmäßige Tests: Test the alarm monthly to ensure proper function.

Figure 3: Illustration of recommended placement guidelines for the smoke alarm, showing distance from walls and light fittings, and unsuitable locations.
3. Packungsinhalt
Prüfen Sie beim Öffnen der Verpackung, ob alle Artikel vorhanden und unbeschädigt sind:
- 1x FireAngel SW1-R Smoke Alarm Unit
- 1x Grundplatte
- 1x 9V Battery (for backup)
- 2x Schrauben
- 2x Rawl Plugs
- 1x Bedienungsanleitung (dieses Dokument)
4. Installationsanleitung
Wichtig: Installation should only be performed by a competent person or qualified electrician. Ensure the mains power supply is switched off at the consumer unit before commencing installation.
4.1. Schritte vor der Installation:
- Ort auswählen: Choose a suitable location on the ceiling, adhering to the placement guidelines (refer to Section 2).
- Stromversorgung trennen: Turn off the mains electricity supply to the circuit where the alarm will be installed.
- Notstrombatterie installieren: Open the battery compartment on the alarm unit and insert the supplied 9V battery, observing polarity. Close the compartment securely.
4.2. Mounting the Alarm:
- Bohrpunkte markieren: Hold the base plate against the ceiling at your chosen location and mark the two drilling points.
- Bohrlöcher: Drill holes at the marked points and insert the rawl plugs.
- Grundplatte montieren: Befestigen Sie die Grundplatte mit den mitgelieferten Schrauben an der Decke.
- Verkabelung anschließen: Connect the mains wiring (Live, Neutral, Earth, and Interlink if applicable) to the terminal block provided. Ensure connections are secure and correct. The alarm unit connects to this terminal block.
- Attach Alarm Unit: Align the smoke alarm unit with the base plate and twist clockwise until it clicks securely into place.

Figure 4: Visual guide for easy installation, showing steps like installing the backup battery, mounting the bracket, attaching the alarm, and connecting to mains power.
4.3. Interlinking Multiple Alarms:
The SW1-R can be hardwired and interconnected with up to 12 compatible FireAngel mains-powered smoke (SW1), heat (HW1), or carbon monoxide (CW1) alarms. To interlink, connect the interlink wire between the designated terminals on each alarm's base plate. When one interlinked alarm detects a hazard, all connected alarms will sound simultaneously.
4.4. Überprüfung nach der Installation:
- Strom wiederherstellen: Turn the mains electricity supply back on.
- Testalarm: Press and hold the Test/Silence button for 5 seconds to confirm the alarm is functioning correctly. A loud, high-pitched sound indicates proper operation.
5. Bedienungsanleitung
5.1. Normaler Betrieb:
Under normal conditions, the alarm will periodically flash its LED indicator to show it is powered and monitoring for smoke. If smoke is detected, the alarm will sound a loud siren and the LED will flash rapidly.
5.2. Test/Silence Button:
- Testen: Press and hold the large central Test/Silence button for approximately 5 seconds. The alarm will sound a loud siren, confirming its functionality. Release the button to stop the test. Perform this test monthly.
- Silencing False Alarms: In the event of a nuisance alarm (e.g., from cooking fumes), press and hold the Test/Silence button. This will temporarily silence the alarm for approximately 8 minutes. The alarm will automatically reset after this period. If the smoke source persists, the alarm will reactivate.
5.3. Sleep Easy Function:
If the 9V backup battery is low, the alarm will emit a regular "chirp" sound. To temporarily silence these low battery chirps for up to 8 hours, press the Test/Silence button. This allows for an uninterrupted night's sleep while still maintaining protection. Replace the battery as soon as possible after using this function.
6. Wartung
Regular maintenance ensures the continued reliability and effectiveness of your smoke alarm.
- Monatlicher Test: Press the Test/Silence button monthly to ensure the alarm is functioning correctly.
- Vierteljährliche Reinigung: Vacuum the alarm gently every 3 months using a soft brush attachment to remove dust and debris from the sensing chamber. This helps prevent false alarms and maintains sensor sensitivity.
- Batteriewechsel: Replace the 9V backup battery immediately when the alarm emits low battery chirps that cannot be silenced or if the Sleep Easy function is used.
- Vermeiden Sie Chemikalien: NICHT use cleaners, solvents, or paint on the alarm.
- Cover During DIY: Cover the alarm when performing dusty DIY tasks nearby to prevent dust ingress, then uncover and vacuum thoroughly afterwards.

Figure 5: Visual summary of key maintenance recommendations for the smoke alarm, including monthly testing and quarterly vacuuming.
7. Fehlerbehebung
If your smoke alarm is not operating as expected, refer to the following table for common issues and solutions:
| Problem | Mögliche Ursache | Lösung |
|---|---|---|
| Alarm chirps intermittently | Schwache 9V-Notstrombatterie. | Replace the 9V battery immediately. Use the Sleep Easy function if needed for temporary silence. |
| Alarm sounds without visible smoke (false alarm) | Dust or debris in the sensing chamber; high humidity; cooking fumes; steam. | Press the Test/Silence button to temporarily silence. Vacuum the alarm thoroughly. Relocate the alarm if it's consistently affected by cooking fumes or steam. |
| Der Alarm ertönt während des Tests nicht. | No mains power; flat 9V backup battery; faulty unit. | Check mains power supply. Replace 9V battery. If problem persists, contact customer support. |
| Interlinked alarms do not all sound | Faulty interlink wiring; incompatible alarms; too many alarms interlinked. | Check interlink wiring connections. Ensure all interlinked alarms are compatible FireAngel models. Do not exceed 12 interlinked alarms. |
8. Technische Daten
| Modellnummer | SW1-R |
| Sensortyp | Optisch (Fotoelektrisch) |
| Stromquelle | Mains Powered (230V AC) with 9V DC Battery Backup |
| Alarmlautstärke | 85 dB bei 3 Metern |
| Interlink Capability | Up to 12 compatible FireAngel mains-powered alarms |
| Produktabmessungen (T x B x H) | 4.2 cm (T) x 12.6 cm (B) x 12.6 cm (H) |
| Artikelgewicht | 220 Gramm |
| Betriebstemperatur | Die genaue Produktpalette entnehmen Sie bitte der Produktverpackung. |
| Feuchtigkeitsbereich | Die genaue Produktpalette entnehmen Sie bitte der Produktverpackung. |
| Normen | BS EN 14604: 2005 |
| UPC | 816317004422 |
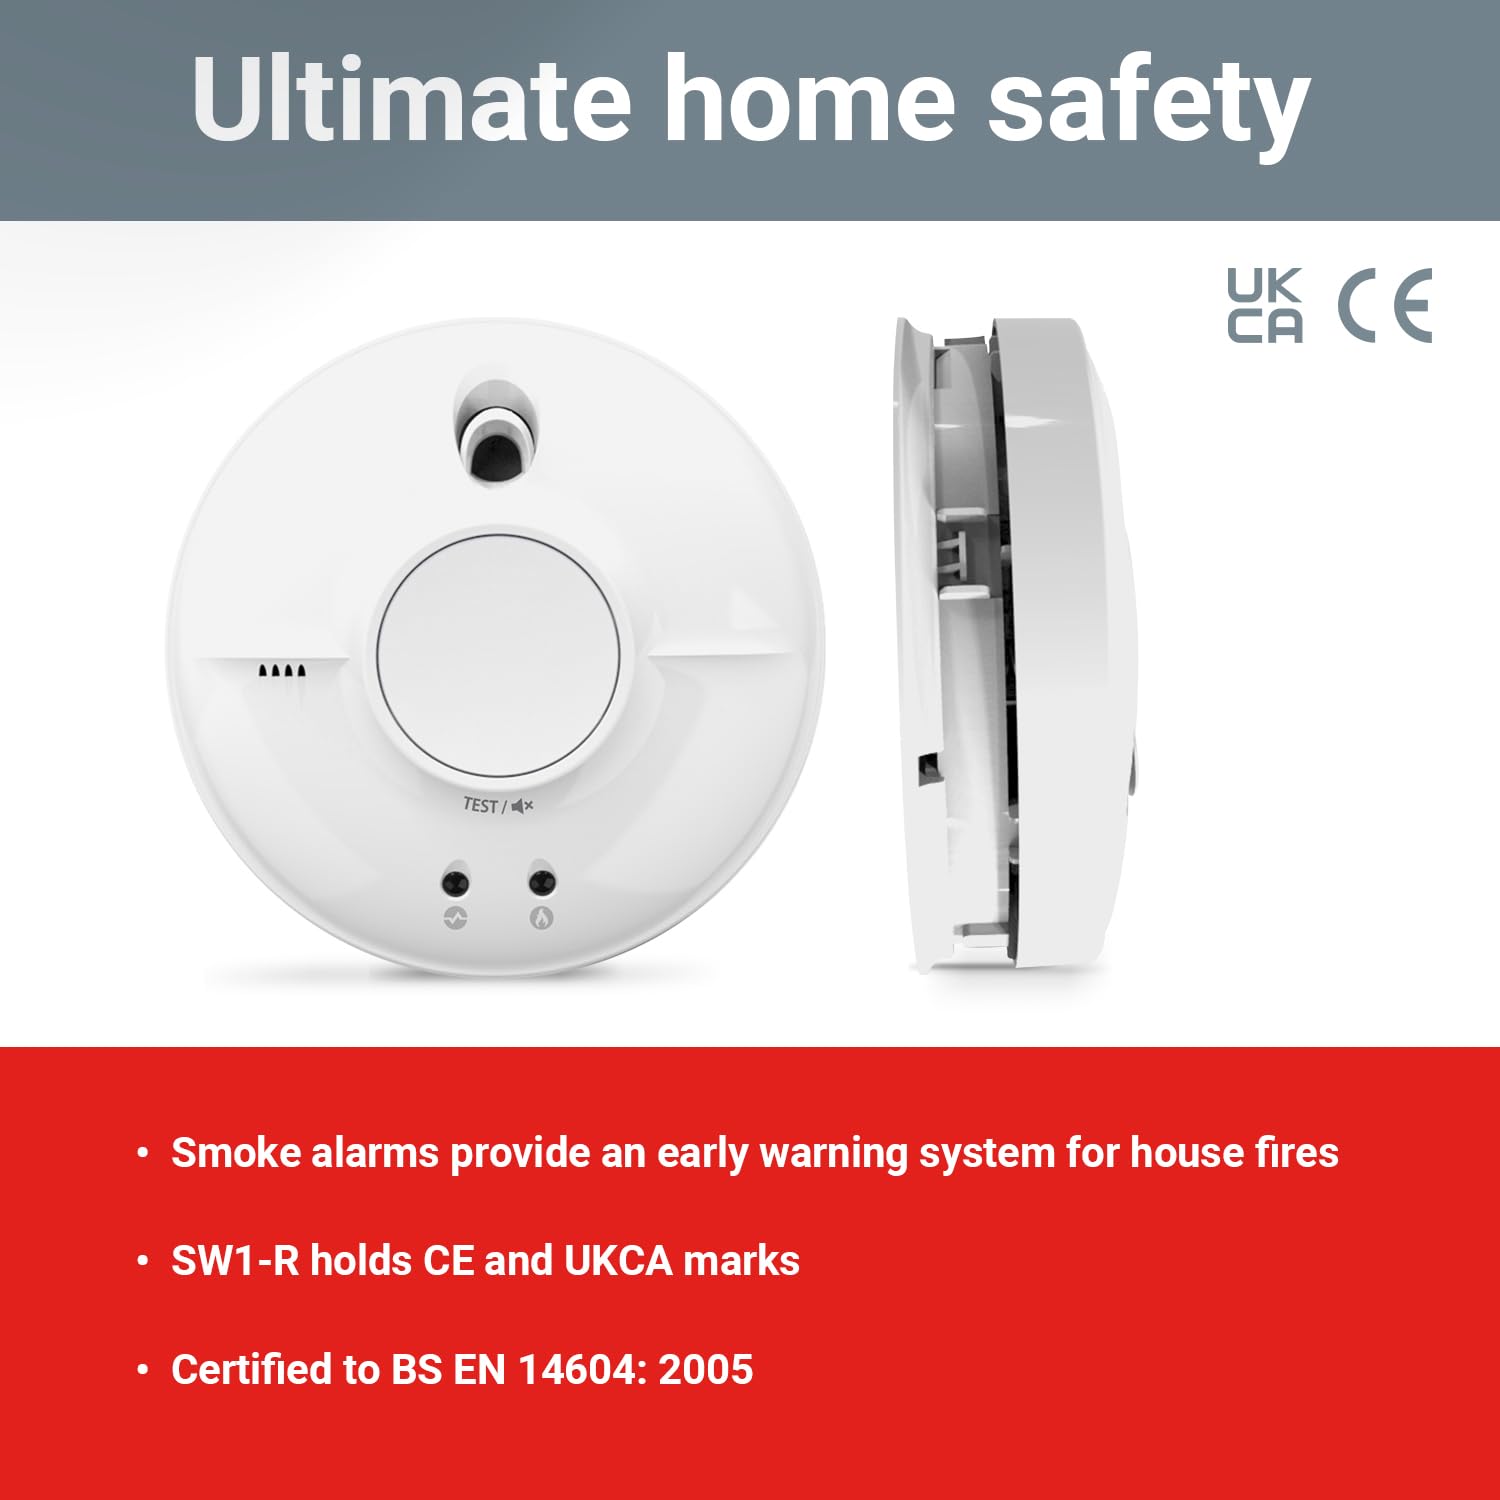
Figure 6: The FireAngel SW1-R Smoke Alarm displaying its UKCA and CE certifications, indicating compliance with safety standards.
9. Garantie und Kundendienst
9.1. Garantieinformationen:
The FireAngel SW1-R Mains Smoke Alarm comes with a 5 Jahr Garantie Diese Garantie gilt ab Kaufdatum und deckt Material- und Verarbeitungsfehler bei normalem Gebrauch ab. Bitte bewahren Sie Ihren Kaufbeleg für Garantieansprüche auf.
The warranty does not cover damage caused by misuse, accidental damage, unauthorized modifications, or failure to follow the instructions in this manual.
9.2. Kundensupport:
For technical assistance, warranty claims, or further information regarding your FireAngel SW1-R smoke alarm, please contact FireAngel customer support. Refer to the FireAngel official webDie aktuellsten Kontaktdaten finden Sie auf der Website oder der Produktverpackung.
WebWebsite: www.fireangel.co.uk (Examp(der tatsächliche Link kann je nach Region variieren)


