1. Einleitung
This manual provides detailed instructions for the setup, operation, and maintenance of your Radiomaster TX16S MKII MAX Radio Control System. Please read this manual thoroughly before using the device to ensure safe and optimal performance.
2. Produktüberschreitungview und Funktionen
The Radiomaster TX16S MKII MAX is an advanced radio control system designed for precision and reliability. It features AG01 CNC Hall Gimbals and supports both ExpressLRS and Multi-Protocol 4in1 modules.
Hauptmerkmale:
- Verbesserte interne Schaltkreise und optimierte Stromversorgung.
- Neue Ladeschaltung mit integriertem Verpolungsschutz.
- Optimized charge IC allowing up to 2.2A internal USB-C charge current.
- Audiobuchse auf der Rückseite für den Kopfhörerausgang.
- V4.0 Gimbal mit verbesserter Zentrierung und Temperaturstabilität (Gleiche Schaltung wie AG01).
- Optional high/low rear grips for improved ergonomics.
- Verbesserte S1/S2-Drehknöpfe mit deutlicher Mittelrastung.
- Verbesserte LS/RS-Schieber mit geschmeidigerem Lauf und besserer Mittelrastung.
- Neu gestaltete Batterieabdeckung für besseren Batteriezugang.
- Überarbeitete Karosserie mit verbesserter Passform und Verarbeitung.
- Die Trainerbuchse wurde auf eine Standard-TRS-Buchse mit 3.5 mm Durchmesser umgerüstet.
- Hinten wurde eine DIY-Buchse für individuelle Modifikationen hinzugefügt.
- Verbesserte interne Kunststoffe für längere Lebensdauer.
- Eingebaute ExpressLRS-Rucksack- und 4-in-1-Versionen.
- Support for EdgeTX and OpenTX (EdgeTX installed by default, touch screen enabled).
- AG01 Gimbals: Fully CNC milled for ultimate precision with quad ball bearings, featuring front-accessible tension and travel adjustment.
- External Module Bay: Natively supports Team Black Sheep MicroTX modules in CRSFmode with LUA scripts. Internal 4-in-1 Multi-protocol module allows switching between internal RF and Crossfire via software.
The TX16S MKII MAX is available in 4in1 and ELRS versions.
Produktvideo überview:
Video: Overview of the TX15 Max V5.0 16CH 2.4G RC Transmitter, highlighting its advanced features and capabilities.
3. Komponenten und Bedienelemente
Familiarize yourself with the various components and controls of your Radiomaster TX16S MKII MAX radio controller.
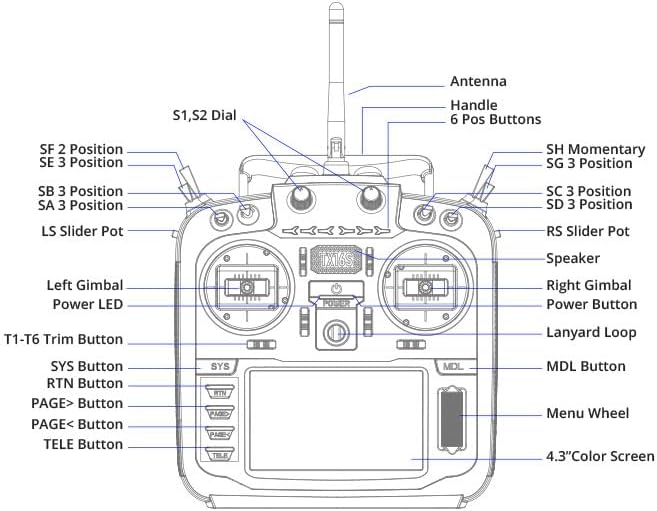
Image: Front panel diagram of the Radiomaster TX16S MKII MAX, illustrating the location and labels of its various switches, gimbals, buttons, and screen.
- Antenne: Zur Signalübertragung.
- Handhaben: Zum Tragen des Senders.
- S1, S2 Dial: Rotary dials for various functions.
- 6 Pos Buttons: Six programmable position buttons.
- SF 2 Position, SE 3 Position, SB 3 Position, SA 3 Position, SH Momentary, SG 3 Position, SC 3 Position, SD 3 Position: Various 2- and 3-position switches for control.
- LS Slider Pot, RS Slider Pot: Left and Right slider potentiometers.
- Left Gimbal, Right Gimbal: Precision control sticks.
- Betriebs-LED: Zeigt den Stromstatus an.
- Netzschalter: Zum Ein-/Ausschalten des Geräts.
- Lanyard-Schlaufe: Befestigungspunkt für einen Nackenriemen.
- T1-T6 Trim Button: Trim buttons for fine-tuning controls.
- SYS Button, RTN Button, PAGE> Button, PAGE< Button, TELE Button, MDL Button: Navigations- und Funktionsknöpfe.
- Menu Wheel: Rotary wheel for menu navigation.
- 4.3-Zoll-Farbbildschirm: TFT full-color touch display for interface and settings.
- Lautsprecher: Für Audio-Feedback.
4. Einrichtung
4.1. Einlegen der Batterie
The TX16S MKII MAX uses a 7.4V Li-Ion or Li-Po battery. Ensure the battery is fully charged before installation.
- Öffnen Sie die Batteriefachabdeckung auf der Rückseite des Senders.
- Connect the battery's balance lead (JST-XH) and power lead (XT30) to the corresponding ports inside the compartment.
- Carefully place the battery into the compartment, ensuring wires are not pinched.
- Schließen Sie den Batteriefachdeckel fest.
Video: Demonstration of installing a 6200mAh battery into a Radiomaster TX16S transmitter, showing the connection of the battery leads and securing the compartment cover.
Video: A detailed look at the Radiomaster 5000mAh battery, its connectors (JST-XH and XT30), and its compatibility with TX12, TX16S, and TX15 MAX transmitters, including installation steps.
4.2. Erstes Einschalten
After installing the battery, press and hold the power button until the screen illuminates and the system boots up. Follow any on-screen prompts for initial setup.
5. Bedienungsanleitung
5.1. Gimbal Adjustments
The AG01 CNC Hall Gimbals offer precise control. Tension and travel adjustments are front-accessible for easy fine-tuning to your preference. Refer to the diagram for gimbal locations.
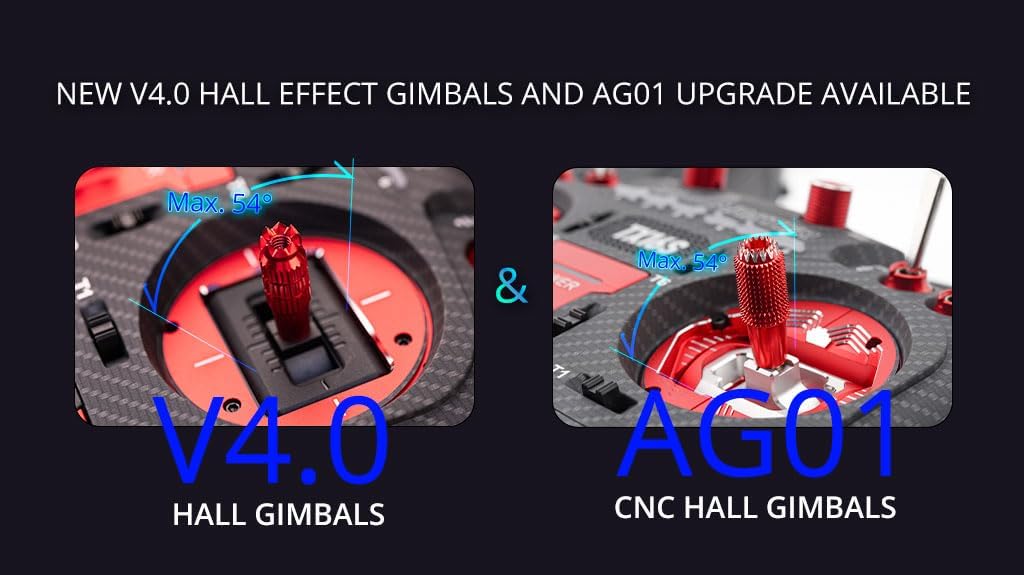
Image: A visual comparison highlighting the V4.0 Hall Gimbals and the upgraded AG01 CNC Hall Gimbals, emphasizing their precision and adjustable features.
5.2. Bildschirmnavigation
The 4.3-inch TFT full-color touch display allows for intuitive navigation through menus and settings. Use the touch screen or the Menu Wheel and associated buttons (SYS, RTN, PAGE>, PAGE<, TELE, MDL) to access and modify parameters.

Image: Close-up of the Radiomaster TX16S MKII MAX's 4.3-inch IPS color display and the improved S1/S2 knobs with clear center detents, demonstrating ease of programming.
5.3. Module Bay Usage
The JR compatible module bay allows for external RF module expansion. The internal 4-in-1 Multi-protocol module enables seamless switching between internal RF and external modules like Crossfire via software settings.
5.4. Konnektivität
The TX16S MKII MAX features a USB-C port for charging, simulator connectivity, and firmware updates. An SD card slot is also available for storing models, scripts, sounds, and themes.

Abbildung: Seite view of the Radiomaster TX16S MKII MAX, highlighting the UART Port, Charging Port, and SD Card Slot for various connectivity options.
5.5. Ergonomie
The radio controller is designed for comfort and control. It includes optional high/low rear grips for improved ergonomics and features improved S1/S2 knobs and LS/RS Sliders for a smoother feel and better center detents.

Image: A visual comparison of raised and flat grips for the Radiomaster TX16S MKII MAX, demonstrating options for improved ergonomic comfort during use.
6. Wartung
- Halten Sie den Sender sauber und frei von Staub und Schmutz. Verwenden Sie zum Reinigen ein weiches, trockenes Tuch.
- Bewahren Sie den Sender an einem kühlen, trockenen Ort fern von direkter Sonneneinstrahlung und extremen Temperaturen auf.
- Überprüfen Sie regelmäßig alle Schalter, Kardanaufhängungen und Tasten auf einwandfreie Funktion.
- Stellen Sie sicher, dass die Antenne fest angebracht und nicht beschädigt ist.
- Periodically check for and install firmware updates to ensure optimal performance and access to new features.
- Always charge the battery using appropriate charging devices and follow safety guidelines.
7. Fehlerbehebung
- Sender schaltet sich nicht ein: Überprüfen Sie den Akkuanschluss und den Ladezustand. Stellen Sie sicher, dass der Netzschalter richtig gedrückt ist.
- Kein Signal zum Empfänger: Verify that the transmitter and receiver are properly bound. Check the RF module settings (internal 4in1 or external). Ensure the antenna is correctly positioned.
- Probleme mit dem Gimbal oder den Schaltern: Check physical connections and ensure no debris is obstructing movement. Calibrate gimbals if necessary through the system settings.
- Bildschirm reagiert nicht: Perform a soft reset by powering off and on. If issues persist, check for firmware updates.
- Probleme mit Firmware-Updates: Ensure a stable USB connection and sufficient battery charge. Follow the specific firmware update instructions provided by Radiomaster.
8. Spezifikationen
| Artikel | Spezifikation |
|---|---|
| Größe | 287x129x184mm |
| Gewicht | 750g (ohne Batterie) |
| Übertragungsfrequenz | 2.400 GHz bis 2.480 GHz |
| Sendermodul | Internal 4-in-1 multi-protocol module (CC2500 CYRF6936 A7105 NRF2401) OR Internal ELRS (SX1280) |
| SD-Karte | Standardmäßig 256 MB, maximal 8 GB |
| Antennengewinn | 2db (Sendeleistung einstellbar) |
| Arbeitsstrom | 400 mA |
| Arbeitsvolumentage | 6.6-8.4 V Gleichstrom |
| Radio-Firmware | EdgeTX |
| Modul-Firmware | Multiprotocol-Module (4IN1) -OR- ExpressLRS (ELRS) |
| Kanäle | Bis zu 16 Kanäle (je nach Receiver) |
| Anzeige | 4.3 Zoll TFT Vollfarb-Touchdisplay mit einer Auflösung von 480 * 272 |
| Kardangelenk | V4.0 Hall sensor with Aluminium fascia; Option 2: AG01 CNC Hall sensor |
| Modulschacht | JR-kompatibler Modulschacht |
| Upgrade-Methode | Unterstützt USB-C-Online-/SD-Karten-Offline-Upgrade |
9. Lieferumfang
The Radiomaster TX16S Mark II Max package includes:
- 1 * TX16S Mark II Max Funkfernsteuerung
- 1 * 18650 Tray
- 1 * USB-C-Kabel
- 1 * Displayschutzfolie
- 1 Paar flache Griffe
- 1 * TX16S Key Chain
10. Garantie und Support
Informationen zur Garantie und zum technischen Support finden Sie auf der offiziellen Radiomaster-Website. webBesuchen Sie unsere Website oder kontaktieren Sie Ihren Händler. Bewahren Sie Ihren Kaufbeleg für eventuelle Garantieansprüche auf.
Besuchen Sie die RADIOMASTER Store Für weitere Produkte und Informationen.


