1. Einleitung
Thank you for choosing the ASD 12 Inch Smart RGBW Flush Mount Ceiling Light. This fixture combines a stylish minimalist design with efficient, versatile lighting solutions. Featuring multicolor RGBW capabilities, smart app control, and remote operation, it offers a wide range of lighting effects for your space. This manual provides essential information for safe installation, effective operation, and proper maintenance of your new lighting fixture.

Figure 1.1: ASD 12 Inch Smart RGBW Flush Mount Ceiling Light with accessories.
3. Packungsinhalt
Vergewissern Sie sich vor Beginn der Installation, dass alle Komponenten vorhanden sind:
- ASD 12 Inch Smart RGBW Flush Mount Ceiling Light Fixture (4 units)
- Fernbedienung
- Befestigungsmaterial (Schrauben, Drahtklemmen)
- Bedienungsanleitung
4. Spezifikationen
| Besonderheit | Detail |
|---|
| Marke | ASD |
| Modellname | DACHBODEN |
| Teilenummer | A-LFM12D20SRGBW-N-4p |
| Farbe | 12" | Nickel | RGBW |
| Material | Alloy Steel, Acrylic |
| Stil | Modern |
| Technische Daten | 11.3 Zoll L x 11.3 Zoll B x 3.4 Zoll H |
| Spezifische Verwendungen | Nur für den Innenbereich geeignet. |
| Stromquelle | Festverdrahtet |
| Lichtquellentyp | LED |
| Ausführung | Lackiert |
| Schirmmaterial | Plastik |
| Bandtage | 120 Volt |
| Wastage | 20 Watt |
| Montagetyp | bündig Berg |
| Durchschnittliches Leben | 50,000 Stunden |
| Besondere Merkmale | 1064/1220LM, Remote Control, RGBW, Smart App, CCT Adjustable 2700-6500K |

Abbildung 4.1: Produktabmessungen und Hauptmerkmale.
5. Installation
Follow these steps to install your ASD Smart RGBW Flush Mount Ceiling Light:
- Vorbereitung für die Installation: Turn off power at the circuit breaker before starting. Ensure the mounting surface is clean and stable.
- Entfernen Sie die Linse: Gently remove the lens from the fixture by rotating it clockwise. This will expose the mounting holes and wiring connections.
- Montieren Sie die Vorrichtung: Attach the fixture's base to the electrical outlet box using the provided screws. Ensure it is securely fastened.
- Drahtverbindungen: Connect the wires: Black to Black (Live), White to White (Neutral), and Ground to Ground. Secure all connections with wire nuts. Carefully tuck all wires back into the outlet box.
- Bringen Sie das Objektiv an: Once wiring is complete and secure, attach the lens by aligning it with the fixture and rotating it counter-clockwise until it locks into place.
- Strom wiederherstellen: Schalten Sie den Strom am Leistungsschalter wieder ein.
- Download ASD SMART App: For smart control features, download the "ASD SMART" application from your smartphone's app store. Scan the QR codes below or click the links to download.
Google Play Store (Android)
Apple App Store (iOS) - Add Fixture to App: Follow the in-app instructions to add your new ceiling light to the ASD SMART app. This typically involves putting the light into pairing mode and connecting it to your Wi-Fi network.

Figure 5.1: Initial installation steps: removing the lens and wiring.
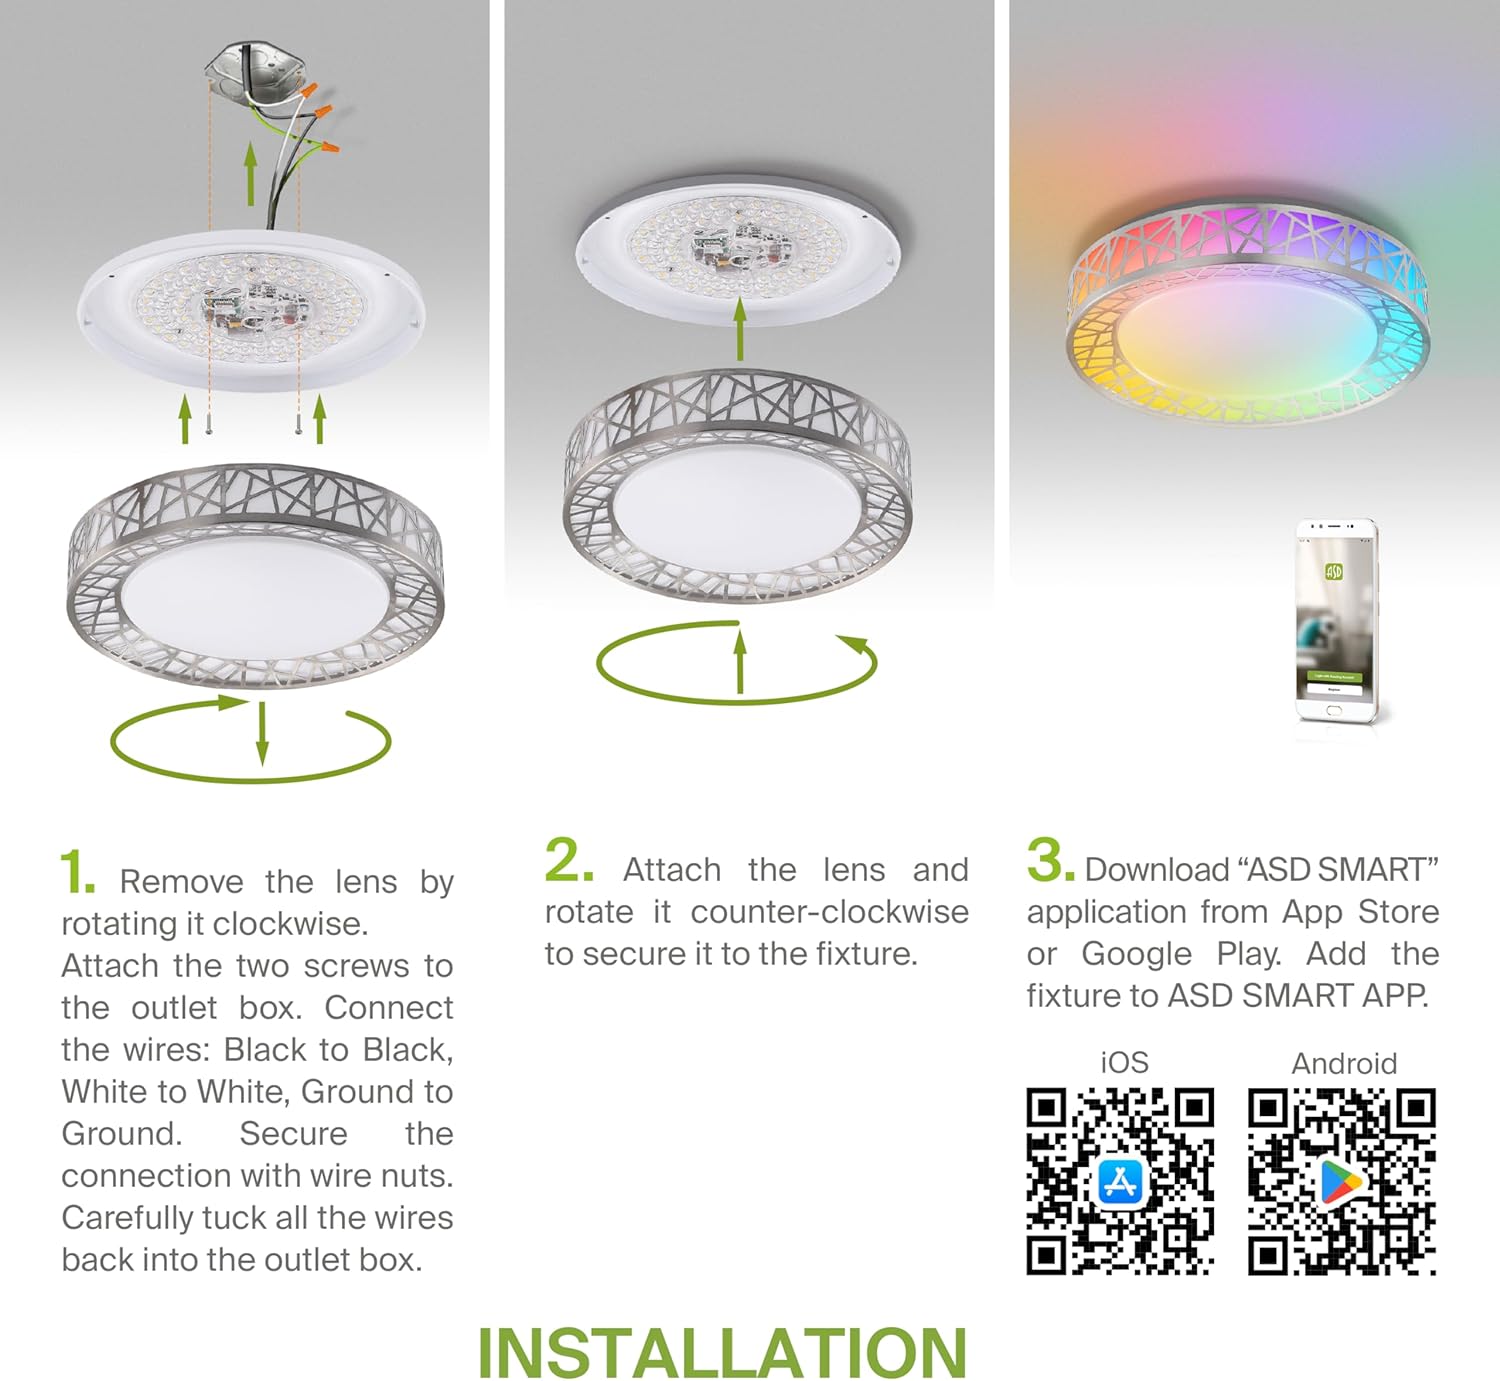
Figure 5.2: Complete installation overview including app download.
6. Bedienungsanleitung
Your ASD Smart RGBW Flush Mount Ceiling Light offers multiple control methods:
6.1-Fernbedienung
Die mitgelieferte Fernbedienung ermöglicht folgende Basisfunktionen:
- Ein/Aus: Das Licht ein- oder ausschalten.
- Dimmen: Adjust brightness levels smoothly.
- CCT-Anpassung: Change color temperature (e.g., from warm white to cool white).
- RGB-Farbauswahl: Cycle through or select specific RGB colors.
6.2 ASD SMART App Control
The ASD SMART app provides full control and advanced features:
- 16.7 Millionen Farben: Choose any color from the full RGBW spectrum.
- Smooth Dimming & CCT: Precisely adjust brightness and color temperature (2700K-6500K).
- Lichtmuster: Select pre-set or custom lighting scenes and effects.
- Gruppierung: Control multiple fixtures simultaneously.
- Terminplanung: Set timers for lights to turn on/off or change settings automatically.

Figure 6.1: RGBW color capabilities.

Figure 6.2: Control via remote and smart app.

Figure 6.3: Seamless dimming functionality.
6.3 Sprachsteuerung (Alexa & Google Assistant)
The fixture is compatible with Amazon Alexa and Google Assistant for convenient voice commands:
- Ensure your ASD SMART app is linked to your Alexa or Google Home account.
- Use commands such as "Alexa, turn on the living room light" or "Hey Google, set the bedroom light to blue."

Abbildung 6.4: Kompatibilität mit Alexa und Google Assistant.
7. Wartung
Um die Langlebigkeit und optimale Leistung Ihrer Deckenleuchte zu gewährleisten:
- Reinigung: Vor der Reinigung die Stromzufuhr unterbrechen. Die Leuchte mit einem weichen, trockenen Tuch abwischen. Keine Scheuermittel oder Lösungsmittel verwenden.
- Lampenwechsel: This fixture uses integrated LED technology and does not require bulb replacement.
8. Fehlerbehebung
Sollten Sie Probleme mit Ihrer Deckenleuchte haben, beachten Sie bitte die folgenden häufigen Probleme und Lösungen:
| Problem | Mögliche Ursache | Lösung |
|---|
| Licht geht nicht an | Kein Strom, lose Verkabelung, defekter Schalter | Prüfen Sie den Sicherungsautomaten. Stellen Sie sicher, dass alle Drahtverbindungen fest sitzen. Testen Sie den Wandschalter. |
| Fernbedienung funktioniert nicht | Dead battery, out of range, interference | Replace remote battery. Ensure you are within range. Remove any obstructions. |
| App cannot connect to light | Incorrect Wi-Fi password, light not in pairing mode, 5GHz Wi-Fi network | Verify Wi-Fi password. Reset light to pairing mode (refer to app instructions). Ensure you are on a 2.4GHz Wi-Fi network. |
| Sprachsteuerung reagiert nicht | App not linked to voice assistant, incorrect device name | Check linking in ASD SMART app and voice assistant app. Verify device name in voice assistant app. |
9. Garantie und Support
ASD bietet eine 5 Jahr eingeschränkte Garantie for this product, guaranteeing top quality and safety. The fixture is ETL certified, ensuring compliance with North American safety standards.
For technical support, warranty claims, or any questions not covered in this manual, please contact ASD customer service. Refer to the product packaging or the official ASD webWebsite für Kontaktinformationen.


