1. Einleitung
This manual provides essential information for setting up, operating, maintaining, and troubleshooting your NIMO 15.6-inch FHD Business Laptop. Please read this guide thoroughly to ensure optimal performance and longevity of your device. Keep this manual for future reference.
2. Lieferumfang
Prüfen Sie, ob alle Artikel in der Verpackung vorhanden sind:
- 1 x Nimo N154 Laptop
- 1 x Typ-C 65W PD Schnellladegerät
- 1 x Benutzerhandbuch (dieses Dokument)
- Windows 11 Home (vorinstalliert)
3. Produktüberschreitungview
Familiarize yourself with the components and ports of your NIMO laptop.
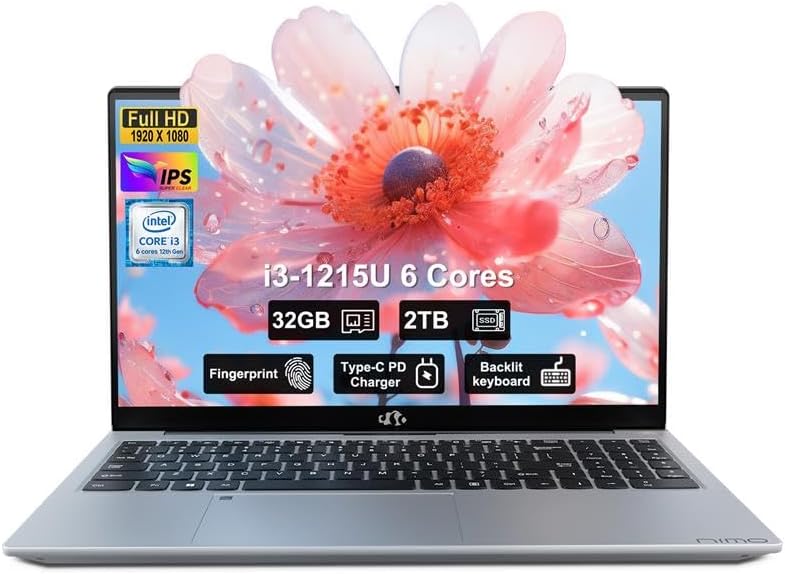
Bild: Vorderseite view of the NIMO 15.6-inch FHD Business Laptop, showcasing die Anzeige und die Tastatur.
3.1. Anschlüsse und Stecker
The NIMO N154 laptop features a variety of ports for connecting peripherals and external devices.

Image: Diagram illustrating the various ports on the left and right sides of the NIMO laptop, including USB, HDMI, Type-C, and audio jack.
- Linke Seite:
- Kensington Lock: For securing your laptop.
- Headphone Combo Jack: For audio output and microphone input.
- USB 3.0 Port (x2): For high-speed data transfer.
- USB 2.0 Port (x1): For connecting standard USB devices.
- Micro SD Card Reader: For expanding storage or transferring files von Speicherkarten.
- Rechte Seite:
- Type-C Port (Charge Only): For connecting the 65W PD charger.
- USB 3.0 Port (x1): For high-speed data transfer.
- HDMI Port: For connecting to external displays.
- Type-C Port (Multifunction): Supports data transfer and display output.
- Charge LED Indicator: Shows charging status.
4. Einrichtung
4.1. Erstes Einschalten und Laden
- Auspacken: Nehmen Sie den Laptop und sämtliches Zubehör vorsichtig aus der Verpackung.
- Strom anschließen: Plug the 65W Type-C PD Fast Charger into a power outlet and then connect the Type-C connector to the designated "Charge Only" Type-C port on the laptop.
- Akku aufladen: Allow the laptop to charge for at least 30 minutes before initial use, or until the charge LED indicates a full charge.
- Einschalten: Open the laptop lid and press the power button, typically located on the top right of the keyboard or side.

Image: The 65W Type-C PD Fast Charger, illustrating its compact design and universal compatibility.
4.2. Windows 11-Einrichtung
Follow the on-screen instructions to complete the Windows 11 initial setup:
- Wählen Sie Ihre Region und Ihr Tastaturlayout.
- Stellen Sie eine Verbindung zu einem Wi-Fi-Netzwerk her.
- Melden Sie sich mit Ihrem Microsoft-Konto an oder erstellen Sie ein neues.
- Richten Sie eine PIN für die schnelle Anmeldung ein.
- Review und die Datenschutzeinstellungen akzeptieren.
5. Bedienungsanleitung
5.1. Fingerabdruckleser
The integrated fingerprint sensor allows for secure and quick login without passwords.
- Aufstellen: Navigate to Windows Settings > Accounts > Sign-in options > Fingerprint recognition (Windows Hello).
- Fingerabdruck registrieren: Follow the on-screen prompts to register your fingerprint. You may need to scan your finger multiple times from different angles.
- Verwendung: To log in, simply place your registered finger on the fingerprint sensor when prompted.

Image: Close-up of the laptop's touchpad area showing the fingerprint reader, and a separate image of the webKamera mit Sichtschutz.
5.2. Tastatur mit Hintergrundbeleuchtung
The backlit keyboard enhances visibility in low-light conditions.
- Hintergrundbeleuchtung umschalten: Use the dedicated function key (often Fn + Fx, where Fx is a key with a keyboard backlight icon) to cycle through backlight brightness levels or turn it off. Refer to your keyboard for the specific key combination.
5.3. WebCamera Privacy Shield
The laptop includes a physical webcam privacy shield for enhanced security.
- Aktivieren/Deaktivieren: Slide the physical switch located next to the webcam to cover or uncover the camera lens.
5.4. Externe Displays anschließen
You can extend your workspace by connecting an external monitor or projector.
- Kabel anschließen: Use an HDMI cable to connect your external display to the laptop's HDMI port, or a compatible Type-C to DisplayPort/HDMI adapter for the multifunction Type-C port.
- Anzeige konfigurieren: Drücken Windows-Taste + P to open the Project menu. Select your preferred display mode (e.g., Duplicate, Extend, Second screen only).
6. Wartung
6.1. Reinigung Ihres Laptops
- Bildschirm: Benutzen Sie ein weiches, fusselfreies Tuch, dampMit Wasser oder einem Bildschirmreiniger abspülen. Flüssigkeit nicht direkt auf den Bildschirm sprühen.
- Tastatur und Gehäuse: Verwenden Sie ein weiches, trockenes Tuch. Bei hartnäckigem Schmutz ein leicht dämpfendes Tuch verwenden.amp Man kann ein mit milder Seifenlauge getränktes Tuch verwenden, wobei darauf zu achten ist, dass keine Flüssigkeit in die Öffnungen eindringt.
- Häfen: Verwenden Sie Druckluft, um Staub vorsichtig aus den Anschlüssen zu entfernen.
6.2. Batteriepflege
- Vermeiden Sie häufiges vollständiges Entladen des Akkus.
- Bewahren Sie den Laptop an einem kühlen, trockenen Ort auf, wenn er längere Zeit nicht benutzt wird.
- Setzen Sie den Laptop keinen extremen Temperaturen aus.
6.3. Software-Updates
- Um die Stabilität und Sicherheit Ihres Systems zu gewährleisten, sollten Sie regelmäßig nach Windows-Updates suchen und diese installieren. Gehen Sie dazu auf Einstellungen > Windows Update.
- Halten Sie die Gerätetreiber für eine optimale Leistung auf dem neuesten Stand.
7. Fehlerbehebung
In diesem Abschnitt werden häufig auftretende Probleme behandelt.
7.1. Laptop lässt sich nicht einschalten
- Stellen Sie sicher, dass das Ladegerät sowohl mit dem Laptop als auch mit einer funktionierenden Steckdose fest verbunden ist.
- Überprüfen Sie die Funktionsfähigkeit der Steckdose, indem Sie ein anderes Gerät anschließen.
- Allow the laptop to charge for at least 30 minutes if the battery is completely drained.
- Try a hard reset by holding the power button for 15-20 seconds.
7.2. Anzeigeprobleme (Kein Bild, Flimmern)
- If an external monitor is connected, disconnect it to see if the laptop's screen works.
- Adjust screen brightness using the function keys (e.g., Fn + F5/F6).
- Starten Sie den Laptop neu.
- If connected to an external display, ensure the cable is properly seated and try a different cable or port.
7.3. Probleme mit der WLAN-Verbindung
- Ensure Wi-Fi is enabled in Windows Settings > Network & Internet > Wi-Fi.
- Starten Sie Ihren Router und Ihr Modem neu.
- Vergiss das Netzwerk und verbinde dich neu.
- Aktualisieren Sie Ihre WLAN-Treiber.
7.4. Langsame Leistung
- Schließen Sie unnötige Anwendungen, die im Hintergrund laufen.
- Überprüfen Sie im Task-Manager (Strg+Umschalt+Esc) Prozesse, die viel CPU-, RAM- oder Festplattenleistung verbrauchen.
- Stellen Sie sicher, dass auf Ihrer SSD ausreichend freier Speicherplatz vorhanden ist.
- Run a disk cleanup and defragmentation (for HDD, though this is SSD).
- Auf Schadsoftware oder Viren scannen.
8. Spezifikationen
Detailed technical specifications for the NIMO N154 Laptop.

Image: Diagram illustrating the Intel Core i3-1215U processor with details on cores, threads, power consumption, and Turbo Boost frequency.

Image: Visual representation of 32GB DDR4 RAM and 2TB PCIe 4.0 SSD, highlighting dual RAM channel capability.
| Besonderheit | Spezifikation |
|---|---|
| Modellname | NIMO N154 |
| Bildschirmgröße | 15.6 Zoll |
| Bildschirmauflösung | 1920 x 1080 Pixel (FHD IPS) |
| Prozessor | Intel Core i3-1215U (6-core, 8-thread, up to 4.4GHz) |
| RAM | 32 GB DDR4 (3200 MHz) |
| Lagerung | 2 TB PCIe SSD |
| Grafik-Coprozessor | Intel Integrated Graphics |
| Betriebssystem | Windows 11 Home |
| Kabelloser Typ | 802.11a/b/g/n/ac (Wi-Fi 6) |
| USB-Anschlüsse | 2x USB 3.0, 1x USB 2.0, 2x Type-C (1x Charge Only, 1x Multifunction) |
| HDMI-Anschluss | 1 x HDMI 2.1 |
| Besondere Merkmale | Tastatur mit Hintergrundbeleuchtung, Fingerabdruckleser, HD-Audio, Speicherkartensteckplatz, Ziffernblock WebCamera Privacy Shield |
| Akkulaufzeit (Durchschnitt) | 5 Stunden |
| Artikelgewicht | 3.8 Pfund |
| Produktabmessungen (L x B x H) | 14.07 x 8.98 x 0.76 Zoll |
| Farbe | Silber |
9. Garantie und Support
Nimo Direct Inc. is committed to customer satisfaction.
- Herstellergarantie: Your NIMO laptop is covered by a comprehensive 2-Year Manufacturer's Warranty. This warranty covers defects in materials and workmanship under normal use.
- Rückgaberecht: We offer 90-Day Hassle-Free Returns. If you are not satisfied with your purchase, you may return it within 90 days of receipt.
- Kundendienst: Our dedicated US support team is available to provide swift issue resolution or immediate replacements. For assistance, please refer to the contact information provided on the NIMO official webWebsite oder Ihre Kaufdokumentation.

Image: Illustration of NIMO's after-sales support, including partial US assembly, 90-day free returns, 2-year after-sales support, and 24/7 customer service.


