1. Einleitung
Thank you for choosing the CUTPOIY 8-in-1 Heat Press Machine. This versatile heat transfer machine is designed for applying images and designs onto a wide range of materials and items, including T-shirts, hats, ceramic plates, mugs, coasters, mouse pads, puzzles, and more. This manual provides essential information for safe operation, setup, maintenance, and troubleshooting to ensure optimal performance and longevity of your device.
2. Sicherheitshinweise
- Always read all instructions before operating the machine.
- Stellen Sie sicher, dass die Maschine auf einer stabilen, hitzebeständigen Oberfläche steht.
- Keep hands and body parts clear of the heating elements during operation to prevent burns. The machine operates at high temperatures.
- Do not operate the machine in wet conditions or near water.
- Sorgen Sie für ausreichende Belüftung im Arbeitsbereich, um Wärme und Dämpfe abzuführen.
- Ziehen Sie den Netzstecker, wenn das Gerät nicht benutzt wird oder vor Reinigungs- und Wartungsarbeiten.
- Versuchen Sie nicht, die Maschine selbst zu verändern oder zu reparieren. Wenden Sie sich an qualifiziertes Servicepersonal.
- Außerhalb der Reichweite von Kindern und Haustieren aufbewahren.
3. Packungsinhalt
Bitte überprüfen Sie nach dem Auspacken, ob alle folgenden Komponenten enthalten sind:
- Heiße Stamping Machine (Main Unit) x1
- Small Baking Pan Assembly x1
- Large Baking Pan Assembly x1
- Baking Cap Component x1
- Large Conical Coaster x1
- Thin Baked Coaster x1
- Thick Baking Coaster x1
- Small Baking Coaster x1

Ein Overhead view of the CUTPOIY 8-in-1 Heat Press Machine, showcasing the main platen press and various interchangeable attachments for mugs, hats, and plates, along with accessories like heat-resistant gloves.
4. Produktüberschreitungview & Komponenten
Familiarize yourself with the main parts of your heat press machine to ensure correct operation and maintenance.

A technical diagram illustrating the main components of the heat press machine, including the pressure grip, smart control panel, heating plate, high-temperature resistant silicone pad, and various baking pan and coaster attachments. Key dimensions like the 38x38cm platen size are also indicated.
- Pressure Grip: Used to lower and raise the heating plate.
- Pressure Grip Modulator: Adjusts the downward pressure applied by the heating plate.
- Intelligentes Bedienfeld: Features an intelligent LCD display for setting and monitoring temperature and time.
- Insurance Power Switch: Hauptstromregler für das Gerät.
- Heizplatte: The upper platen that heats up to transfer designs. It has a high-temperature resistant anti-stick layer for easy cleaning.
- High Temperature Resistant Silicone Pad: Located on the lower platform, providing a stable and heat-resistant base for items.
- Austauschbare Aufsätze: Includes various assemblies for mugs, hats, and plates, allowing for diverse applications.
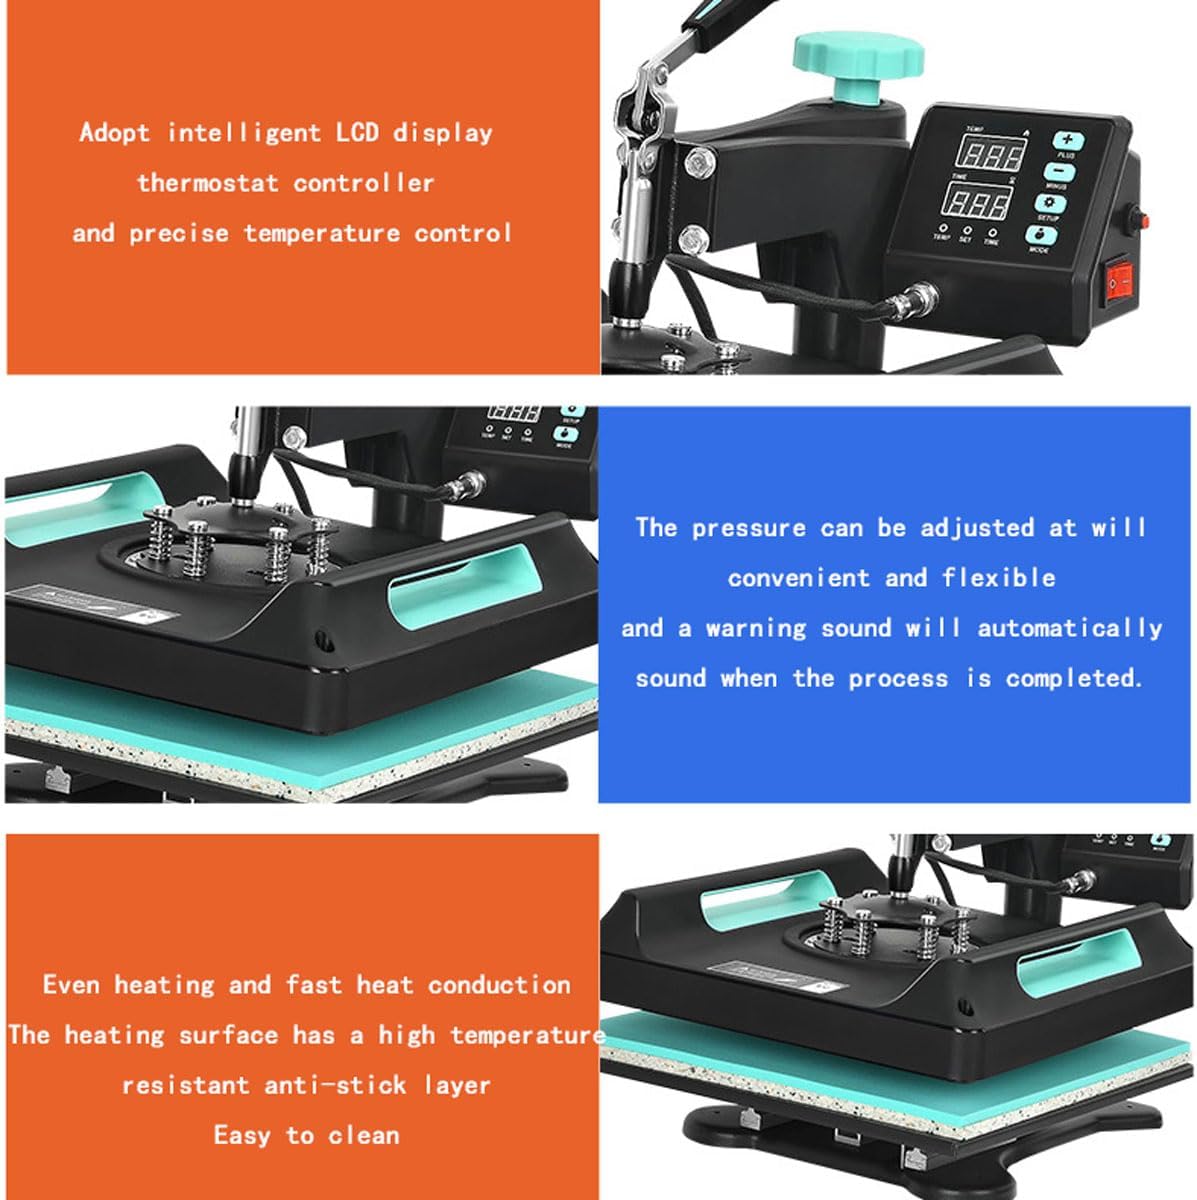
This image displays three detailed sections of the heat press: the intelligent LCD display for temperature and time control, the adjustable pressure mechanism with an automatic warning sound, and the evenly heated, non-stick heating surface for easy cleaning.
5. Einrichtung
- Auspacken: Nehmen Sie alle Komponenten vorsichtig aus der Verpackung. Prüfen Sie sie auf Transportschäden.
- Platzierung: Position the heat press machine on a sturdy, level, and heat-resistant workbench or table. Ensure there is adequate space around the machine for ventilation and safe operation.
- Stromanschluss: Schließen Sie das Netzkabel an eine geerdete Steckdose an. Stellen Sie sicher, dass die Lautstärketage matches the machine's requirements (110V/220V).
- Attach Platen/Attachment: Depending on your project, attach the appropriate platen (e.g., T-shirt platen, mug press, hat press, plate press) to the main unit. Follow the specific instructions for each attachment to ensure it is securely fastened.
6. Bedienungsanleitung
This section outlines the general steps for operating your heat press machine. Specific settings (temperature, time, pressure) will vary based on the material and transfer paper used.
6.1 Grundlegende Bedienungsschritte
- Einschalten: Flip the Insurance Power Switch to the 'ON' position. The LCD display will illuminate.
- Temperatur einstellen: Use the control panel to set the desired temperature. The machine supports a range of 0°C-250°C (0-482°F) with a maximum temperature of 450°C (842°F). You can switch between Fahrenheit and Celsius as needed.
- Zeit einstellen: Use the control panel to set the desired pressing time (0-999 seconds).
- Vorheizen: Allow the machine to preheat until it reaches the set temperature. The integrated dual LCD display will continuously track the temperature.
- Druck anpassen: Use the Pressure Grip Modulator to adjust the downward pressure. The pressure should be firm and even across the platen.
6.2 Wärmeübertragungsprozess

A visual guide outlining the five steps for heat pressing: saving the image, printing with a thermal transfer printer, preparing the machine and item, placing the item for stamping and setting time, and waiting for the safety indicator light to complete the production.
- Prepare Image: Create or select the image you wish to transfer. Ensure it is mirrored if required by your transfer paper.
- Print Image: Print the image onto suitable thermal transfer paper using a compatible printer (e.g., sublimation printer).
- Prepare Machine and Item: Once the machine is preheated, place your item (T-shirt, mug, etc.) onto the lower platen. Ensure it is flat and smooth. You may pre-press the item for a few seconds to remove moisture and wrinkles.
- Positionswechsel: Place the printed transfer paper onto the item, image side down (or as per transfer paper instructions). Secure it with heat-resistant tape if necessary.
- Drücken: Lower the heating plate using the pressure grip. The timer will begin counting down. Once the preset time is reached, an automatic warning sound will alert you, and the temperature will remain constant.
- Artikel entfernen: Carefully lift the heating plate. Wait for the safety indicator light to go out or for the item to cool slightly before removing the transfer paper (hot peel or cold peel, depending on paper type).

The CUTPOIY Heat Press Machine is shown on a wooden table, surrounded by custom-printed t-shirts and hats, demonstrating its application in textile printing.
7. Wartung
- Reinigung der Heizplatte: The heating surface has a high-temperature resistant anti-stick layer. Allow the machine to cool completely before cleaning. Use a soft, damp cloth to wipe away any residue. Do not use abrasive cleaners or sharp objects that could damage the non-stick coating.
- Reinigung des Silikonpads: The integrated high-temperature silicone pad on the lower platform can be wiped clean with a damp Tuch.
- Regelmäßige Inspektion: Periodically check all cables and connections for wear or damage. Ensure all screws and fasteners are tight.
- Lagerung: Bewahren Sie das Gerät bei Nichtgebrauch an einem sauberen, trockenen Ort, fern von direkter Sonneneinstrahlung und extremen Temperaturen auf.
8. Fehlerbehebung
Dieser Abschnitt behandelt häufig auftretende Probleme. Sollten Ihre Probleme hier nicht aufgeführt sein, wenden Sie sich bitte an den Kundensupport.
- Maschine lässt sich nicht einschalten: Prüfen Sie den Anschluss des Netzkabels und stellen Sie sicher, dass der Netzschalter eingeschaltet ist. Prüfen Sie, ob die Steckdose funktioniert.
- Ungleichmäßige Erwärmung: Ensure the heating plate is clean and free of debris. Verify that the pressure is evenly distributed across the platen.
- Transfer Not Adhering Properly: Check that the correct temperature, time, and pressure settings are used for your specific material and transfer paper. Ensure the item is pre-pressed to remove moisture.
- Angezeigte Fehlercodes: If an error code appears, power off the machine, wait a few minutes, and power it back on. If the error persists, consult customer support.
- Anbauteile passen nicht: Ensure you are using the correct attachment for the desired item and that it is installed according to the instructions.
9. Spezifikationen
| Besonderheit | Spezifikation |
|---|---|
| Produktname | Heiße StampMaschine |
| Zeitraum | 0-999 Sekunden |
| Temperaturbereich | 0 °C–250 °C (0–482 °F) |
| Maximaltemperatur | 450 °C (842 °F) |
| Ironing Board Size | 38 x 38 cm (15 x 15 Zoll) |
| Bandtage | 110 V / 220 V |
| Leistung | 1000 W |
| Sicherheitszeit | 8 Sekunden |
10. Garantie und Support
For warranty information, technical support, or service inquiries, please contact CUTPOIY customer service. Refer to your purchase documentation for specific warranty terms and contact details. Do not attempt to open or repair the machine yourself, as this may void your warranty and pose safety risks.


