1. Einleitung
The OMBAR N1 is a high-performance rear view mirror dash camera system designed to enhance driving safety and provide comprehensive video recording. It features dual cameras for front 4K and rear 2.5K recording, advanced driver-assistance systems (ADAS), blind spot detection (BSD), lane change assist (LCA), GPS tracking, parking monitoring, and Wi-Fi connectivity for easy file Management.

Image 1.1: OMBAR N1 Mirror Dash Cam and companion mobile application interface.
2. Packungsinhalt
Bitte überprüfen Sie, ob alle unten aufgeführten Artikel in Ihrem Paket enthalten sind. Sollten Artikel fehlen oder beschädigt sein, kontaktieren Sie bitte unseren Kundenservice.

Image 2.1: All components included in the OMBAR N1 Mirror Dash Cam package.
- 1 x OMBAR N1 4K Mirror Dash Cam
- 1 x 2.5K Rear Camera with Screws and Adhesive Mount
- 1 x 12ft Type-C Power Cable with Car Charger
- 1 x 20 Fuß Rückfahrkamerakabel
- 1 x externe GPS-Antenne
- 1 x 64GB MicroSD-Karte
- 1 x Blendschutzfolie
- 1 x OMBAR User Manual
- 5 x Kabelklemmen
- 4 x Gurte
- 1 x Werkzeug Wachsen
- 1 x Reinigungstücher
3. Einrichtung und Installation
3.1. Montage der Dashcam
- Attach to Rear View Spiegel: Secure the N1 Mirror Dash Cam over your existing rear view mirror using the provided straps. Ensure it is firmly attached and centered for optimal viewing.
- Adjust Front Camera Lens: The front camera lens can be adjusted to capture the desired field of view.
3.2. Einbau der Rückfahrkamera
- Montageort wählen: Install the rear camera on the rear windshield or near the license plate. Ensure the view ist ungehindert.
- Rückkamerakabel anschließen: Route the 20ft rear camera cable from the main dash cam unit to the rear camera. Connect the cable securely.
- Rückfahrkamera einstellen View: The rear camera display can be adjusted for mirror flip and vertical flip settings to match your installation orientation.

Image 3.1: Adjustable rear camera display options for mirror and vertical flipping.
3.3. Connecting Power and GPS
- MicroSD-Karte einlegen: Insert the provided 64GB MicroSD card into the designated slot on the dash cam.
- GPS-Antenne anschließen: Plug the external GPS antenna into the dash cam and mount it on the dashboard or windshield where it has a clear view des Himmels.
- Stromanschluss: Connect the Type-C power cable to the dash cam and plug the car charger into your vehicle's 12V power outlet.
3.4. Applying Anti-Glare Protective Film
The anti-glare protective film helps minimize reflections and enhances contrast for improved visibility. Carefully apply the film to the dash cam screen, ensuring no air bubbles.

Image 3.2: The anti-glare protective film reduces reflections and improves screen clarity.
4. Bedienungsanleitung
4.1. Grundlegende Bedienung
- Ein-/Ausschalten: The dash cam will automatically power on and begin recording when the vehicle starts, and power off when the ignition is turned off.
- Bildschirmanzeige: The 12-inch IPS display provides a wide field of view. Brightness, lens angle, and field of view can be adjusted via the touchscreen interface.

Image 4.1: Adjustable screen settings for optimal viewErfahrung.
4.2. Aufnahmemodi
- Loop-Aufnahme: The dash cam records video in segments (1, 3, or 5 minutes). When the MicroSD card is full, the oldest unlocked recordings are automatically overwritten.
- Notfallaufnahme: In case of a collision, the built-in G-sensor automatically locks the current video segment to prevent it from being overwritten. This can also be triggered manually or via voice command.

Image 4.2: Emergency recording methods ensure critical footage is saved.
4.3. Parkmonitor
The 24-hour parking monitor provides surveillance when your vehicle is parked. This feature requires a hardwire kit (sold separately, ASIN: B0DQK1QW7ZM) for continuous power.

Image 4.3: The 24-hour parking monitor provides security for your vehicle.
4.4. Sprachsteuerung
The dash cam supports various voice commands for hands-free operation. Examples include "Take photo," "Start recording," "Turn on WiFi," "Turn off display," and "Show rear camera."

Image 4.4: Voice control allows for hands-free operation of the dash cam.
4.5. WLAN- und App-Steuerung
Connect the dash cam to your smartphone via 5.8GHz Wi-Fi using the OMBAR app. This allows for live viewAufnahme, Download und Weitergabe von aufgezeichneten Lebensmittelntage. The Wi-Fi range is approximately 25ft (about 1.5 parking spaces) and does not support remote live view.

Image 4.5: The OMBAR app facilitates video management via 5.8GHz Wi-Fi.
5. Erweiterte Funktionen
5.1. ADAS (Advanced Driver Assistance System)
The ADAS feature provides real-time alerts to help prevent accidents. This includes:
- Frontalkollisionswarnung: Alerts when approaching a vehicle too quickly.
- Spurverlassungswarnung: Notifies if the vehicle drifts out of its lane.
- Fußgängerkollisionswarnung: Detects pedestrians in the vehicle's path.
- Forward Vehicle Start Warning: Alerts when traffic ahead begins to move.
- Close Range Warning: Warns of objects in close proximity.
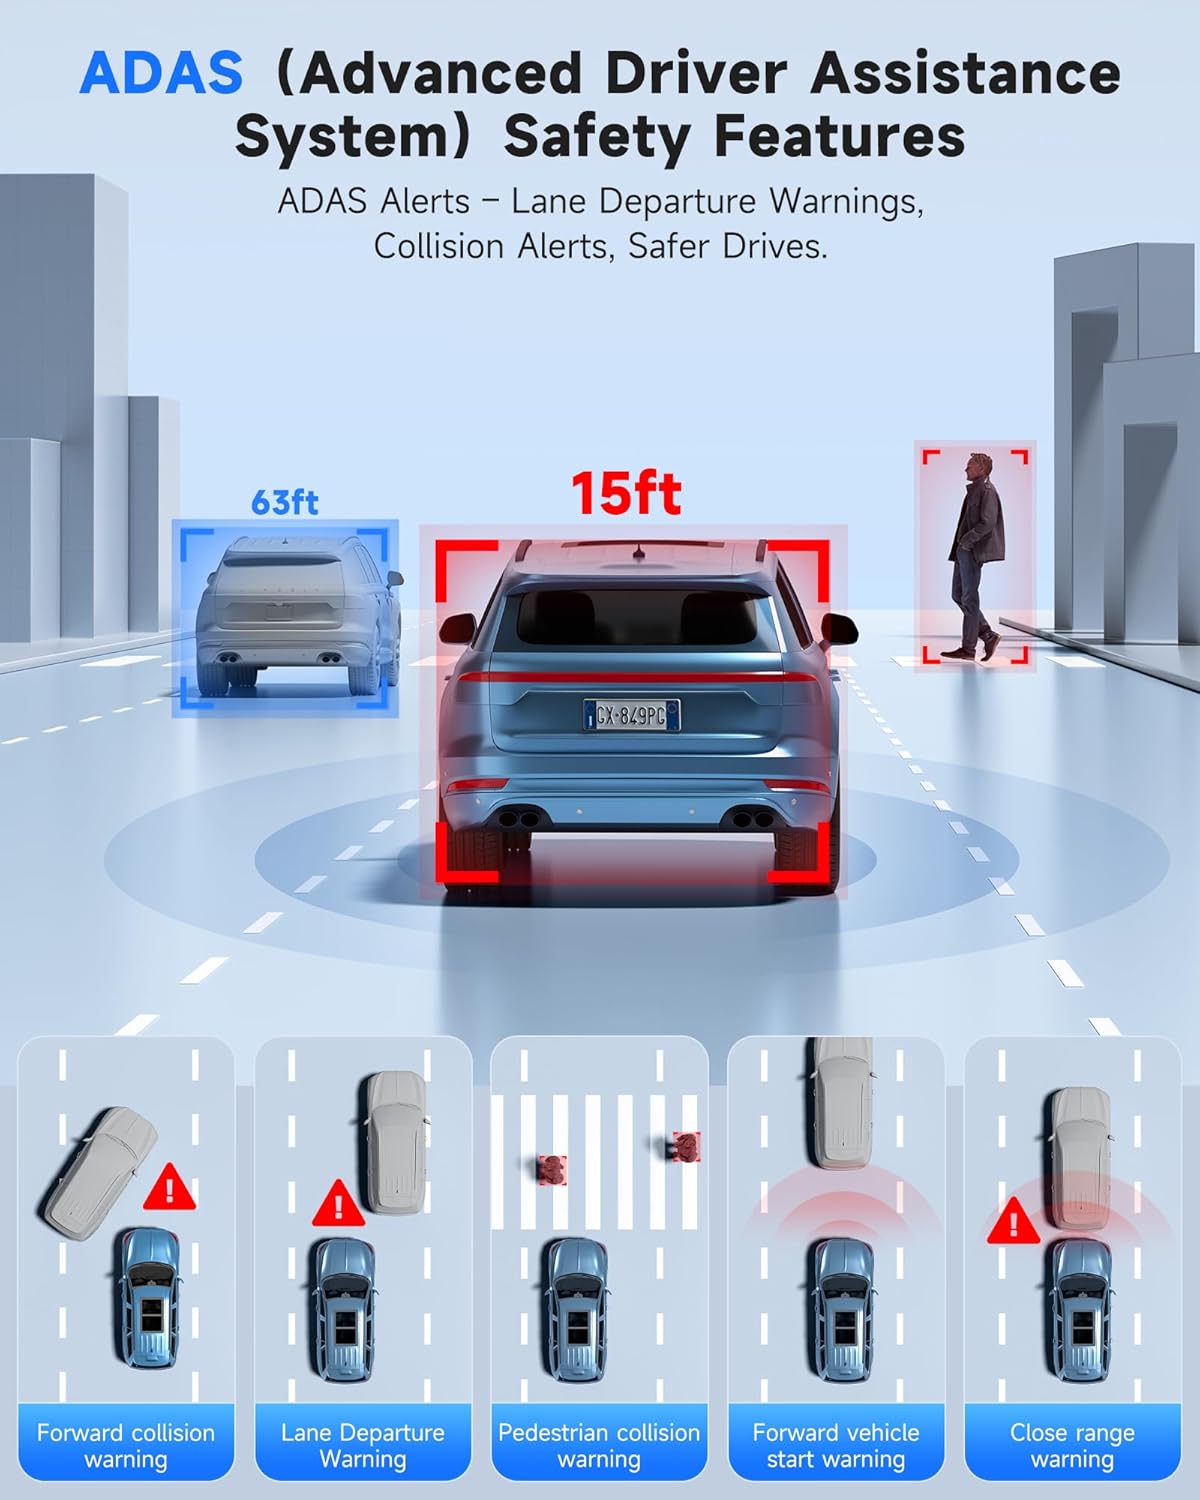
Image 5.1: ADAS provides multiple safety alerts for a safer driving experience.
5.2. BSD (Blind Spot Detection) & LCA (Lane Change Assist)
These features provide 360° protection by monitoring your vehicle's sides and rear for approaching vehicles.
- Totwinkelüberwachung: Alerts to vehicles in your blind spots.
- Spurwechselassistent: Warns if a lane change is unsafe due to approaching vehicles.

Image 5.2: BSD and LCA provide warnings for vehicles in blind spots and during lane changes.
5.3. Built-in GPS & Route Tracking
The integrated GPS module records your driving route, speed, and location data, which can be reviewed via the OMBAR app or dedicated PC software.

Image 5.3: GPS tracking records route and speed data for review.
5.4. Nachtsicht
Advanced HDR technology and sensor capabilities ensure clear video recording even in low-light conditions, capturing details like license plates at night.

Image 5.4: Night vision capabilities provide clear footage in Umgebungen mit wenig Licht.
6. Wartung
- Reinigung: Use a soft, dry cloth to clean the dash cam screen and lenses. Avoid abrasive cleaners.
- Pflege der MicroSD-Karte: Format the MicroSD card regularly (e.g., once a month) to ensure optimal performance and prevent data corruption. Use only high-quality MicroSD cards.
- Firmware-Updates: Check the OMBAR website or app periodically for firmware updates to ensure your dash cam has the latest features and improvements.
7. Fehlerbehebung
| Problem | Mögliche Ursache | Lösung |
|---|---|---|
| Die Dashcam lässt sich nicht einschalten. | Keine Stromversorgung; defektes Kabel. | Check power cable connection to car charger and dash cam. Ensure car's 12V outlet is functional. |
| Die Aufnahme stoppt oder friert ein. | MicroSD card full or corrupted; low-quality MicroSD card. | Format the MicroSD card. Replace with a high-speed, high-endurance MicroSD card if issues persist. |
| GPS-Signal nicht gefunden. | GPS-Antenne blockiert oder nicht angeschlossen. | Ensure GPS antenna is mounted with a clear view of the sky and securely connected. |
| Probleme mit der WLAN-Verbindung. | Incorrect password; out of range. | Verify Wi-Fi password. Ensure device is within 25ft of the dash cam. |
| Der Bildschirm ist zu dunkel/zu hell. | Helligkeitseinstellungen. | Adjust screen brightness via the touchscreen settings. |
8. Spezifikationen
| Besonderheit | Detail |
|---|---|
| Modellname | N1 |
| Auflösung der Frontkamera | 4K (3840x2160) bei 30 Bildern pro Sekunde |
| Auflösung der Rückkamera | 2.5K (2560x1440) bei 30 Bildern pro Sekunde |
| Anzeige | 12-Zoll-IPS-Touchscreen |
| Konnektivität | 5.8GHz Wi-Fi, USB, Memory SD Card |
| Besondere Merkmale | Built-In WiFi, Built-In GPS, G-Sensor, ADAS, Blind Spot Detection, Lane Change Assist, Parking Monitor, Reverse Assist, Touch Screen, App Control, Voice Control, Loop Recording, Built-In Microphone, Built-In Speaker, Built-In Supercapacitor, HDR, Night Vision |
| Lagerung | Unterstützt MicroSD-Karten (64 GB im Lieferumfang enthalten) |
| Betriebstemperatur | -20°F bis 176°F (-28°C bis 80°C) |
| Technische Daten | 0.1 x 0.5 x 0.5 Zoll |
| Artikelgewicht | 2.38 Pfund |
| Montagetyp | Hinterenview Spiegelhalterung |
| Fahrzeug-Servicetyp | Bus, Pkw, Minivan, LKW |

Image 8.1: The dash cam is designed for reliable operation in extreme temperatures.
9. Garantie und Support
- Garantie: The OMBAR N1 Mirror Dash Cam comes with a 1-year manufacturer's warranty.
- Rückgaberecht: A 30-day return policy is applicable from the date of purchase.
- Kundendienst: For technical assistance or warranty claims, please contact OMBAR customer support at support@ombars.com. Support is typically available within 24 hours.


