1. Einleitung
The BWT Aquameter HF 3/8" is a digital water meter designed for high-flow water systems, including main water lines, commercial kitchens, and multi-machine setups. It accurately tracks water consumption, displaying remaining filter capacity on an integrated LCD screen to facilitate timely filter replacements. This battery-powered unit (CR2032) offers flexible installation without the need for external wiring. It is compatible with BWT Bestmax and Besttaste filters, ensuring consistent water quality and equipment protection.
2. Sicherheitshinweise
- Lesen Sie vor Installation und Betrieb alle Anweisungen sorgfältig durch.
- Um Wasserschäden zu vermeiden, stellen Sie sicher, dass alle Verbindungen sicher und dicht sind.
- Do not expose the Aquameter to extreme temperatures or direct sunlight.
- Only use the specified CR2032 battery for power.
- Die Installation sollte im Zweifelsfall von qualifiziertem Fachpersonal durchgeführt werden.
- Observe the flow direction arrow on the sensor during installation.
3. Packungsinhalt
Überprüfen Sie, ob alle Komponenten im Paket vorhanden sind:
- BWT Aquameter HF display unit
- Flow sensor (3/8" connections)
- Anschlusskabel
- CR2032 battery (may be pre-installed or separate)
- Dichtscheiben

Image 3.1: BWT Aquameter HF components.
4. Produktüberschreitungview
The BWT Aquameter HF consists of two main parts: the display unit and the flow sensor.
4.1 Anzeigeeinheit
The display unit features an LCD screen for showing remaining capacity and two control buttons:
- PROG-Taste: Used for entering programming mode and adjusting settings.
- Reset-Knopf: Used to reset the meter after a filter change or to confirm settings. A long press (min 3 sec) is typically required for reset.
4.2 Durchflusssensor
The flow sensor measures the water passing through it. It has 3/8" connections and an arrow indicating the correct direction of water flow. The sensor connects to the display unit via a cable.
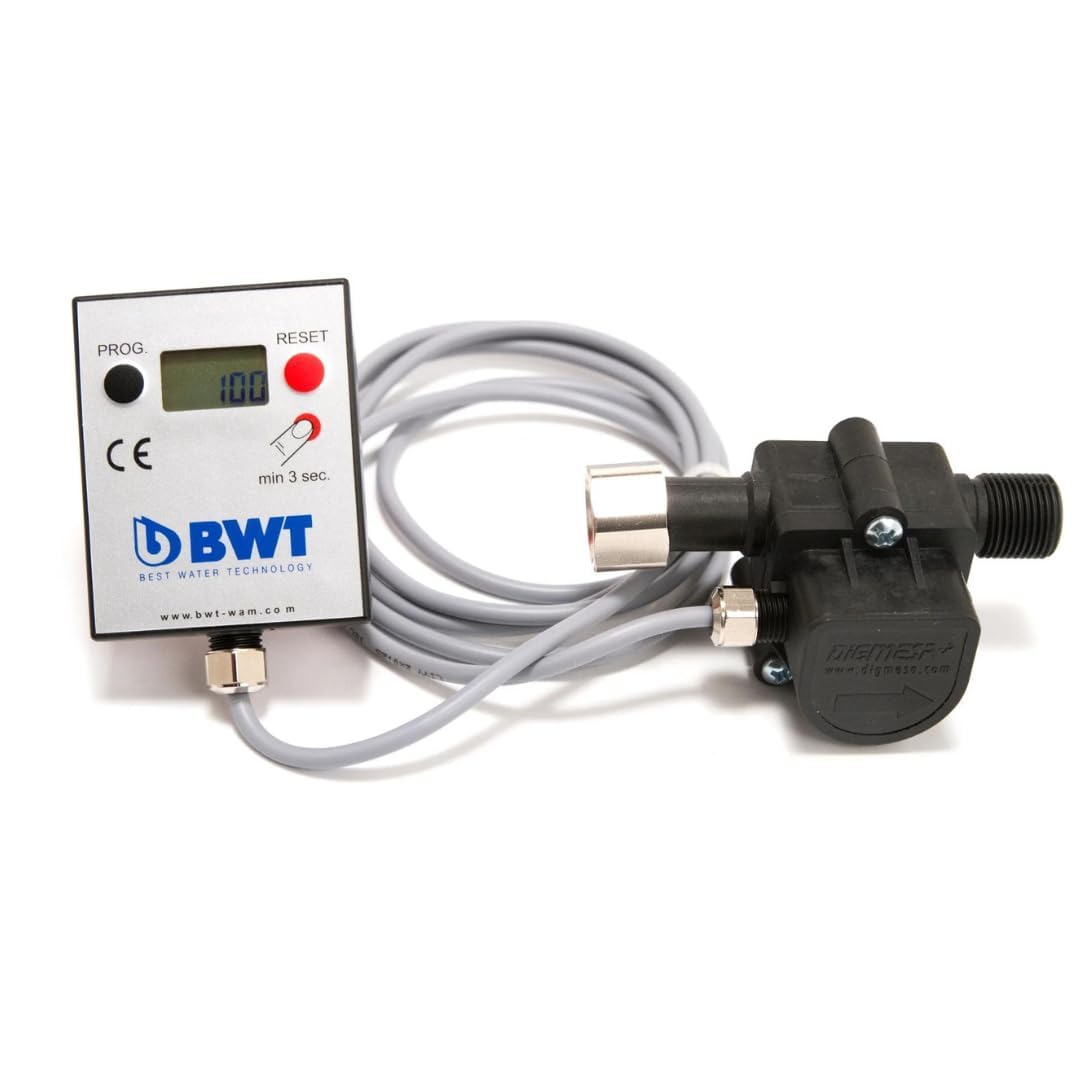
Image 4.1: BWT Aquameter HF display unit and flow sensor.
5. Einrichtung
5.1 Einlegen der Batterie
- Suchen Sie das Batteriefach auf der Rückseite des Anzeigegeräts.
- Öffnen Sie die Fachabdeckung.
- Legen Sie eine CR2032-Batterie ein und achten Sie dabei auf die richtige Polarität (+/-).
- Schließen Sie den Batteriefachdeckel fest.
5.2 Flow Sensor Installation
- Identify the water line where the Aquameter will be installed. Ensure the water supply is turned off before proceeding.
- Cut the water line and prepare the 3/8" connections.
- Insert the sealing washers into the sensor connections.
- Connect the flow sensor into the water line, ensuring the arrow on the sensor points in the direction of water flow. Tighten connections securely to prevent leaks.
- Connect the cable from the flow sensor to the designated port on the display unit.
5.3 Montage der Anzeigeeinheit
The display unit can be mounted on a wall or cabinet using appropriate fasteners (not included). Choose a location that is easily accessible for viewing und Programmierung.

Abbildung 5.1: Beispielample installation of the Aquameter display unit.

Image 5.2: Aquameter and filter installed in an under-sink setup.
5.4 Erste Programmierung
After installation, program the Aquameter according to your specific filter and water hardness settings. Refer to your filter's documentation for its rated capacity.
- Halten Sie die PROG button until the display enters programming mode.
- Verwenden Sie die PROG button to cycle through settings (e.g., total filter capacity in liters).
- Verwenden Sie die ZURÜCKSETZEN button to adjust the value for the selected setting.
- Repeat for all necessary settings, such as water hardness if your filter requires this input.
- Once all settings are configured, press and hold the PROG button again to save and exit programming mode.
6. Betrieb
6.1 Ablesen des Displays
The LCD display shows the remaining capacity of your water filter in liters. As water flows through the sensor, this value will decrease. When the capacity reaches a low level or zero, it indicates that a filter change is due.
6.2 Resetting the Meter
After replacing your water filter, the Aquameter must be reset to its full capacity. To do this:
- Ensure the new filter is installed correctly.
- Halten Sie die ZURÜCKSETZEN mindestens 3 Sekunden lang gedrückt halten.
- The display will show the full programmed capacity, indicating a successful reset.
7. Wartung
7.1 Filterwechsel
Replace your water filter cartridge when the Aquameter indicates that the remaining capacity is low or depleted. Follow the specific instructions provided with your BWT filter cartridge for replacement procedures.
7.2 Batteriewechsel
When the display becomes dim or stops functioning, it is time to replace the CR2032 battery. Follow the battery installation steps in Section 5.1.
7.3 Reinigung
Wipe the exterior of the display unit with a soft, damp Tuch. Keine Scheuer- oder Lösungsmittel verwenden.
8. Fehlerbehebung
- Anzeige ist leer: Check or replace the CR2032 battery. Ensure the battery is inserted with correct polarity.
- No flow reading: Verify that the flow sensor is installed correctly with the arrow pointing in the direction of water flow. Check for any blockages in the water line or sensor. Ensure the sensor cable is securely connected to the display unit.
- Falsche Messwerte: Re-check the programming settings (filter capacity, water hardness) as described in Section 5.4. Ensure the correct filter type is being used for the programmed settings.
- Lecks an den Verbindungen: Turn off water supply immediately. Check all connections for proper tightening and ensure sealing washers are correctly seated and not damaged.
9. Spezifikationen
| Besonderheit | Spezifikation |
|---|---|
| Modellnummer | 812495 |
| Material | Acrylnitril-Butadien-Styrol (ABS) |
| Product Dimensions (Display Unit) | 2.4"T x 4.8"B x 4.1"H |
| Artikelgewicht | 7.2 Unzen |
| Zertifizierung durch externe Prüfer | NSF |
| Durchflussrate | 100–700 liters/hour (l/h) |
| Anschlussgröße | 3/8" |
| Akku-Typ | CR2032 |
10. Gewährleistung
For specific warranty details regarding your BWT Aquameter HF, please refer to the warranty information provided with your purchase documentation or contact your authorized BWT dealer. Keep your proof of purchase for warranty claims.
11. Unterstützung
Should you require technical assistance, have questions about installation, or need further information about BWT products, please visit the official BWT website or contact your local BWT distributor. You can find more information at www.bwt.com.


