Einführung
This manual provides detailed instructions for the setup, operation, maintenance, and troubleshooting of your VGN F1 Pro Max Wireless Gaming Mouse. Please read this manual thoroughly before using the product to ensure optimal performance and longevity.

Image: VGN F1 Pro Max Wireless Gaming Mouse, showcasing its ergonomic design and white finish.
Packungsinhalt
Überprüfen Sie, ob alle Artikel im Paket vorhanden sind:
- VGN F1 Pro Max Maus
- USB-Typ-A-Empfänger
- USB-C-zu-USB-A-Kabel im Paracord-Stil
- USB-Verlängerungsadapter
- Mausgriffband
- Benutzerhandbuch (dieses Dokument)

Image: Contents of the VGN F1 Pro Max Mouse package, including the mouse, cables, receiver, and grip tape.
Produkt überview
Familiarize yourself with the various components of your VGN F1 Pro Max mouse:

Image: Diagram illustrating the various buttons and features of the VGN F1 Pro Max mouse, including the LED indicator, scroll wheel, left/right/forward/backward buttons, DPI button, optical sensor, power switch, receiver storage slot, and feet.
- Links/Rechts-Tasten: Standardmäßige Mausklickfunktionen.
- Scrollrad: Für Scroll- und Mittelklickfunktionen.
- Vorwärts-/Rückwärtstasten: Side buttons for navigation, customizable via software.
- DPI-Taste: Located on the underside, used to cycle through DPI settings.
- Stromschalter: On/Off switch on the underside.
- Optischer Sensor: PAW 3395 sensor for tracking movement.
- Aufbewahrungsfach für Empfänger: Compartment on the underside to store the USB receiver.
- USB-C-Anschluss: Zum Laden und für kabelgebundene Verbindungen.
Aufstellen
1. Aufladen der Maus
Before initial use, fully charge the mouse. Connect the USB-C end of the provided cable to the mouse and the USB-A end to a powered USB port on your computer or a USB charger. The LED indicator will show charging status.
- Oranges Licht: Ladevorgang läuft.
- Grünes Licht: Battery level normal (fully charged or sufficient charge).
- Rotlicht: Akku schwach, bitte bald wieder aufladen.
2. Drahtlose Verbindung (2.4 GHz)
- Locate the USB Type-A receiver. It may be stored in the slot on the underside of the mouse.
- Plug the USB receiver into an available USB-A port on your computer. For optimal signal, use the included USB Extension Adapter to position the receiver closer to the mouse.
- Schalten Sie die Maus mit dem Netzschalter an der Unterseite ein.
- Your computer should automatically detect the mouse.
3. Connecting Wired
To use the mouse in wired mode, connect the USB-C end of the provided cable directly to the mouse and the USB-A end to your computer. The mouse will function immediately and charge simultaneously.
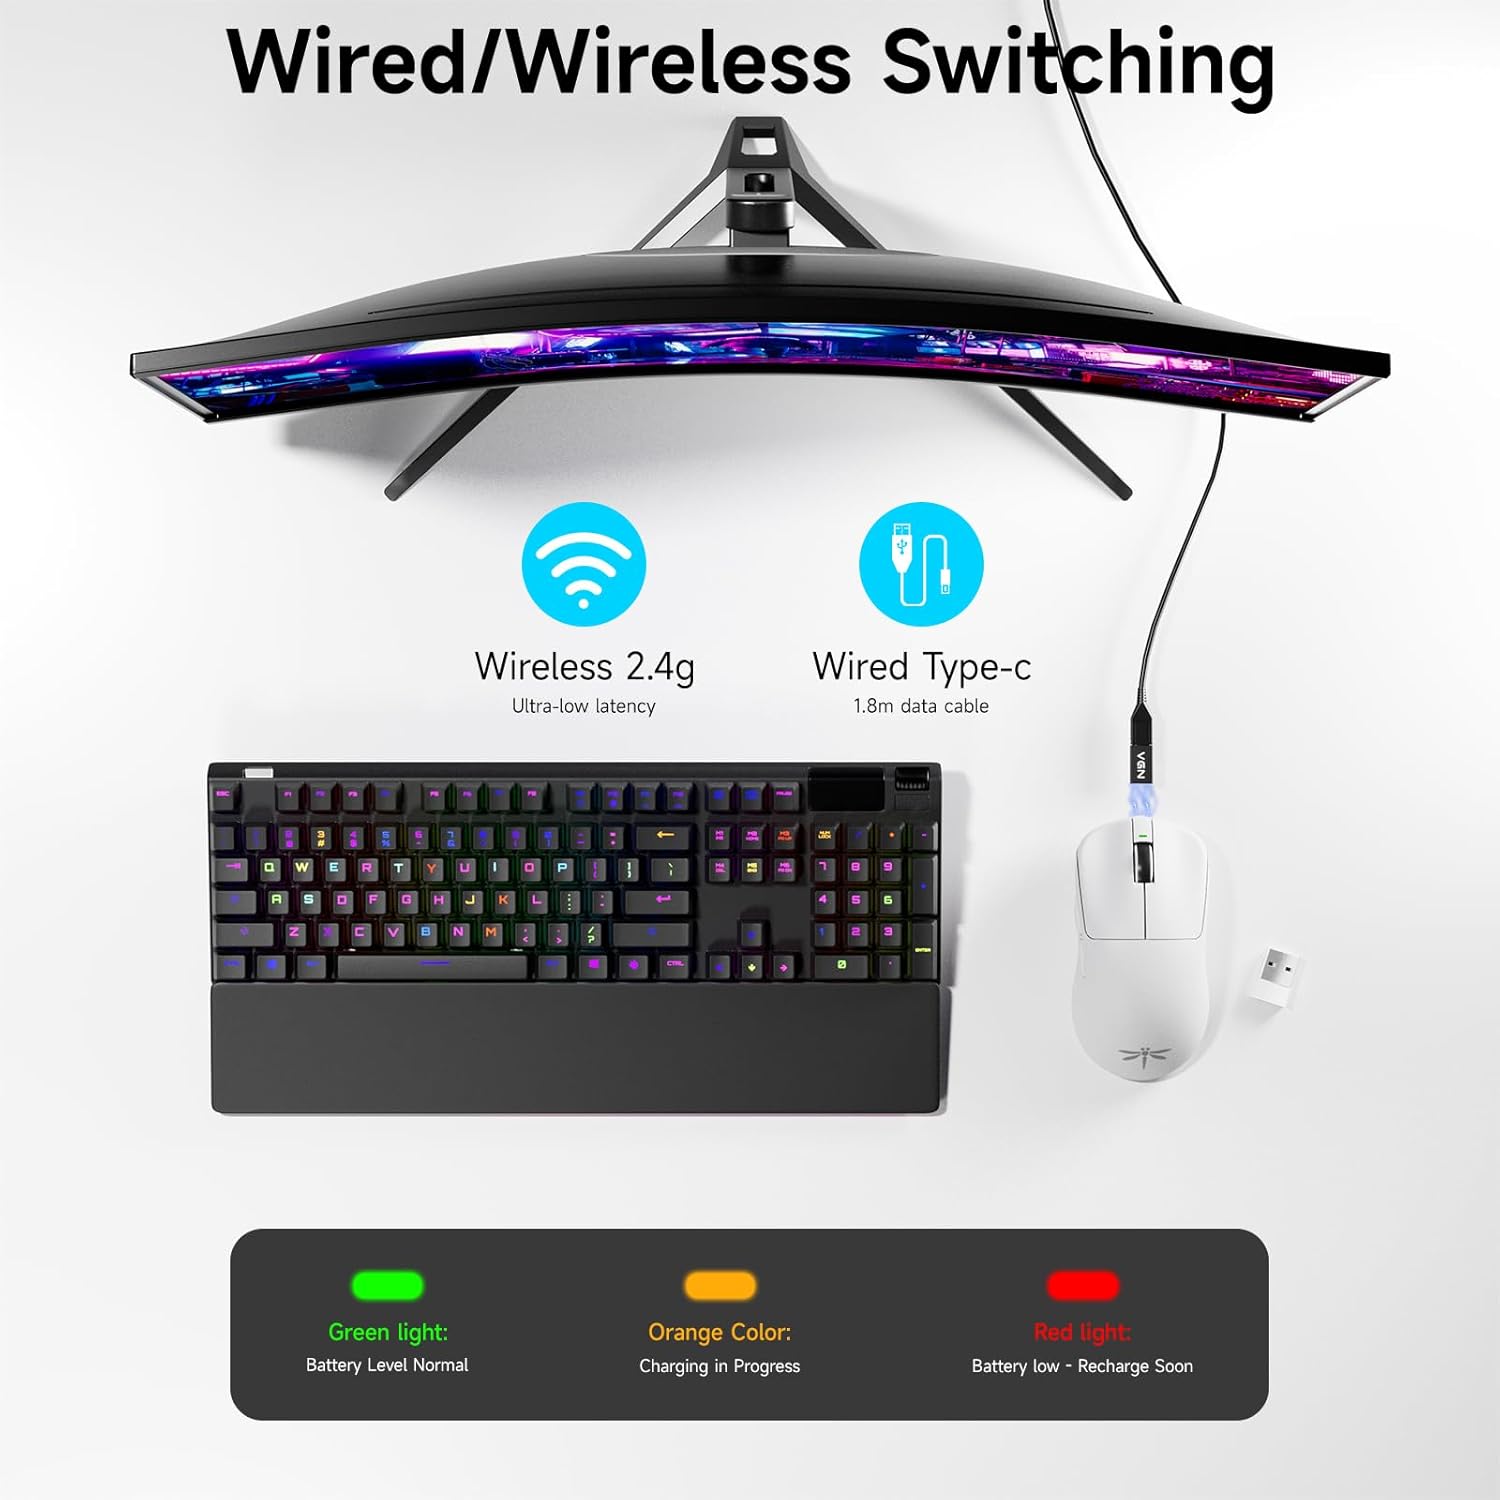
Image: Diagram showing the VGN F1 Pro Max mouse connected via 2.4GHz wireless with a dongle and via USB-C cable for wired mode, along with battery indicator lights.
4. Installing VGN HUB Driver (Optional for Customization)
For advanced customization of buttons, DPI settings, and polling rate, download and install the VGN HUB driver software from the official VGN website. This software allows you to remap buttons, create macros, and fine-tune performance settings.
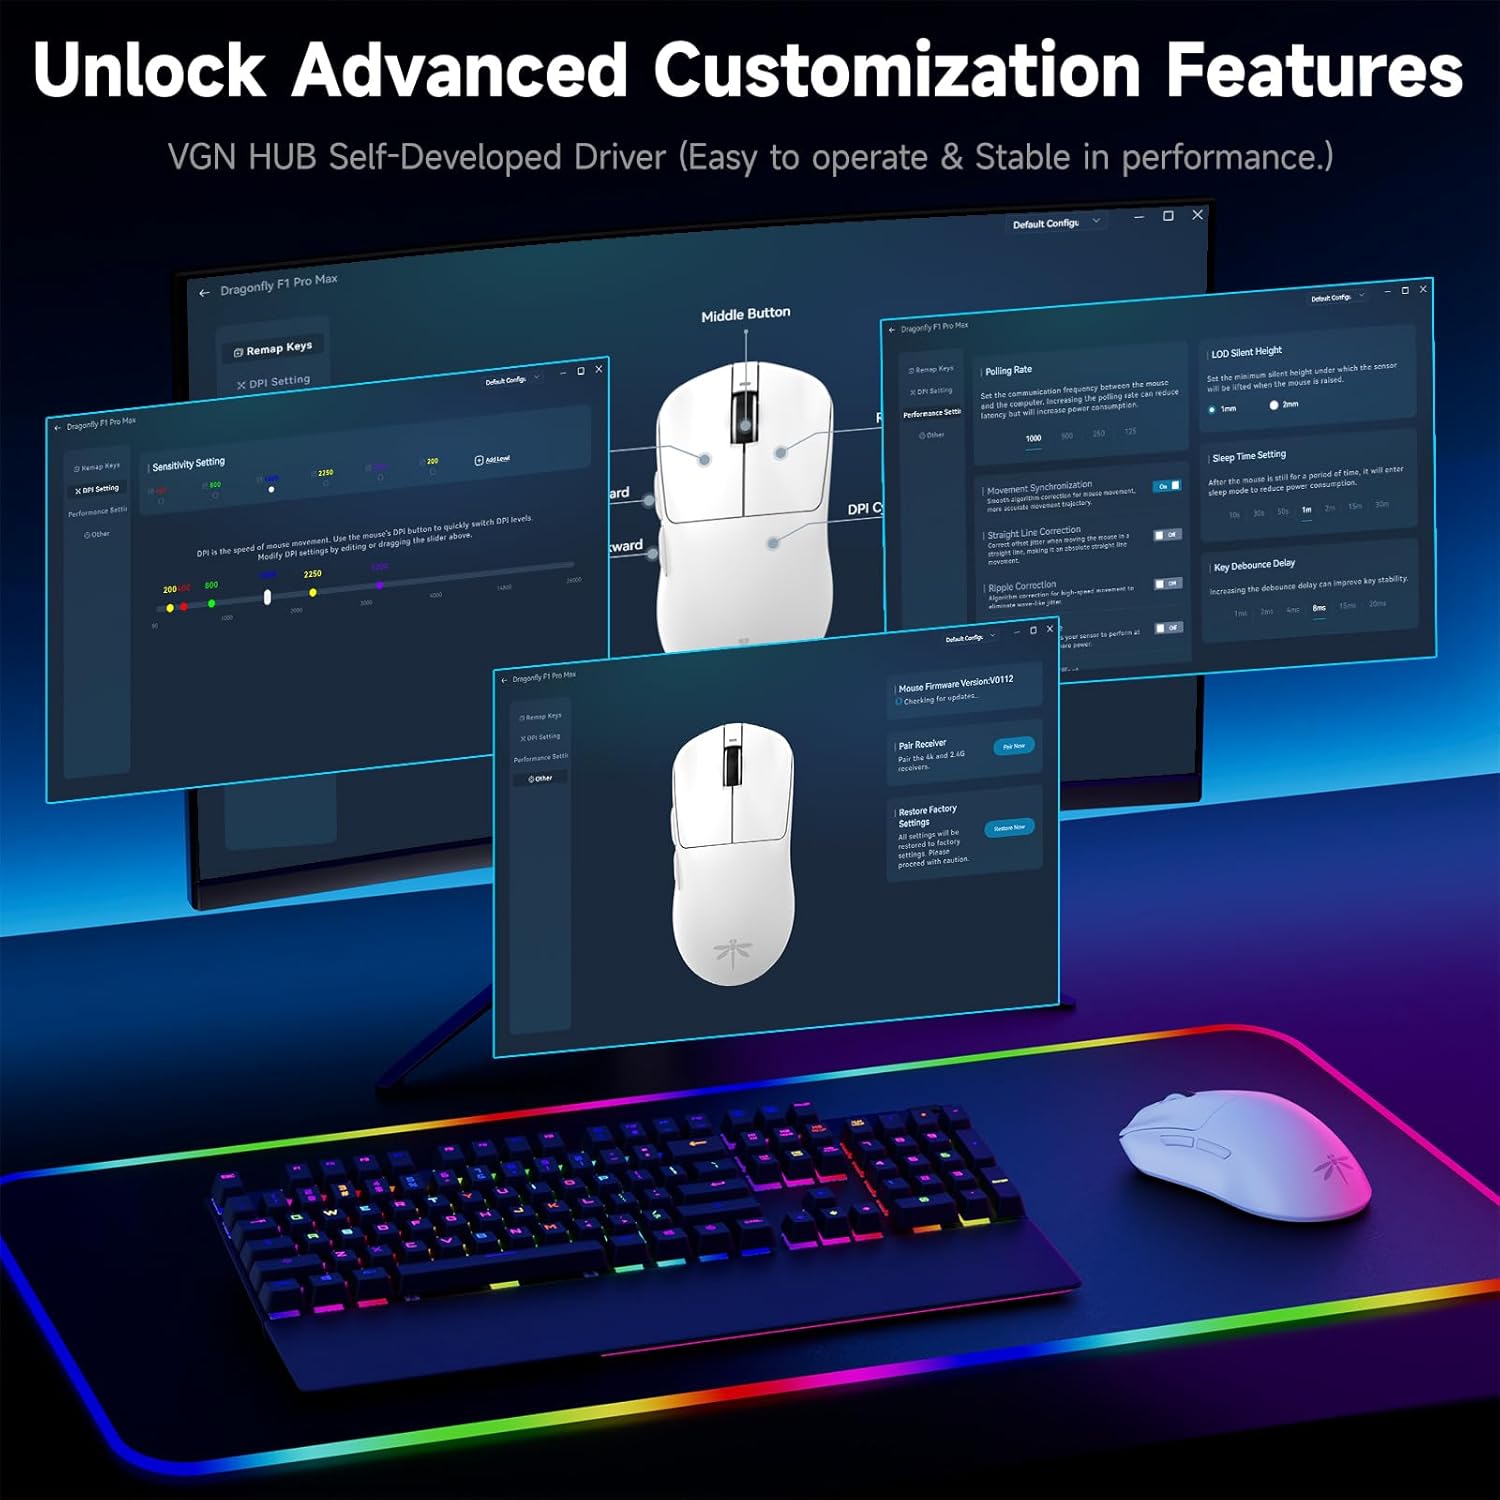
Image: Screenshot of the VGN HUB software interface, demonstrating options for button remapping, DPI settings, and performance adjustments.
5. Applying Mouse Grip Tape (Optional)
The package includes optional grip tape. You can apply this tape to the sides or buttons of the mouse for enhanced grip and comfort, according to your preference.
Bedienungsanleitung
Ein-/Ausschalten
Use the physical switch on the underside of the mouse to turn it on or off. Turning off the mouse when not in use conserves battery life.
DPI-Anpassung
The mouse features an adjustable DPI range from 50 to 26,000. Press the DPI button on the underside of the mouse to cycle through preset DPI levels. The LED indicator may change color or flash to indicate the current DPI setting. Fine-tuning and custom DPI steps can be configured using the VGN HUB software.

Image: Illustration of the VGN F1 Pro Max mouse highlighting its adjustable DPI range from 50 to 26,000.
Abfragerate
The mouse supports a polling rate of 1000Hz by default. An additional receiver (often included or available separately) may be required to achieve a 4000Hz polling rate. The polling rate can be adjusted via the VGN HUB software.
Programmierbare Tasten
The VGN F1 Pro Max features 6 programmable buttons. These buttons can be customized using the VGN HUB software to assign specific functions, macros, or key bindings according to your preferences.
Batteriestatusanzeige
The LED indicator near the scroll wheel provides visual feedback on the battery status:
- Grün: Normaler Akkustand.
- Orange: Ladevorgang läuft.
- Rot: Low battery, requires recharging.
Automatic Sleep and Energy Saving
To conserve battery, the mouse will enter a light sleep mode after 1 minute of inactivity and a deep sleep mode after 5 minutes of inactivity. Moving the mouse or pressing any button will wake it up.
Wartung
Reinigung der Maus
Regularly clean your mouse to maintain performance and hygiene. Use a soft, dry, lint-free cloth to wipe the surface. For stubborn dirt, slightly dampBefeuchten Sie das Tuch mit Wasser oder einer milden Reinigungslösung. Vermeiden Sie die Verwendung von scharfen Chemikalien oder Scheuermitteln.
Sensorwartung
Ensure the optical sensor on the underside of the mouse remains clean and free of dust or debris. Use a cotton swab or compressed air to gently clean the sensor area if tracking issues occur.
Batteriepflege
To prolong battery life, avoid fully discharging the mouse frequently. Recharge the mouse when the red LED indicator appears. Store the mouse in a cool, dry place when not in use for extended periods.

Image: Illustration emphasizing the VGN F1 Pro Max mouse's 200-hour battery life, indicating long usage between charges.
Fehlerbehebung
Maus reagiert nicht
- Stellen Sie sicher, dass die Maus eingeschaltet ist.
- Batteriestand prüfen; gegebenenfalls aufladen.
- For wireless connection, ensure the USB receiver is securely plugged into a working USB port and is within range. Try a different USB port.
- For wired connection, ensure the USB-C cable is securely connected to both the mouse and the computer. Try a different USB port or cable.
- Starten Sie Ihren Computer neu.
Intermittent Connectivity or Lag
- Ensure the USB receiver is not obstructed and is close to the mouse. Use the USB Extension Adapter if needed.
- Avoid placing the receiver near other wireless devices or sources of electromagnetic interference (e.g., Wi-Fi routers, other wireless peripherals).
- Stellen Sie sicher, dass die Maus vollständig aufgeladen ist.
DPI or Button Customization Issues
- Ensure the VGN HUB software is correctly installed and updated to the latest version.
- Verify that the mouse is connected to the computer when attempting to apply settings via the software.
- Save changes within the software after making adjustments.
Technische Daten
| Marke | VGN |
| Modellnummer | F1 Pro Max |
| Konnektivitätstechnologie | 2.4-GHz-Funkverbindung, USB-C-Kabelverbindung |
| Bewegungserkennungstechnologie | Optischer Sensor (PAW 3395) |
| DPI-Bereich | 50 - 26,000 DPI (einstellbar) |
| IPS-Tracking-Geschwindigkeit | 650 IPS |
| Abfragerate | 1000Hz (up to 4000Hz with additional receiver) |
| Schaltflächen | 6 programmierbare Tasten |
| Schaltertyp | Kailh Black Gold Mamba (100 Million Clicks) |
| Akkulaufzeit | Bis zu 200 Stunden |
| Artikelgewicht | 55 g (1.94 Unzen) |
| Technische Daten | 4.8 x 2.5 x 0.1 Zoll |
| Kompatibilität | Windows, Mac, Linux, Chrome OS, PS/Xbox/Steam Deck |

Image: Close-up of a Kailh Black Gold Mamba switch, highlighting the durable components used in the mouse buttons.
Garantie und Support
VGN provides comprehensive support for its products:
- Garantie: A 12-month warranty covers inherent product issues from the date of purchase.
- Technische Unterstützung: Lifetime technical assistance is available for all VGN products.
- Kundendienst: A 24/7 online support team is available to assist with any damage, malfunctions, or missing parts. Please contact VGN customer service for assistance.
For further assistance, please visit the official VGN webBesuchen Sie die Website oder kontaktieren Sie direkt deren Kundendienst.


