1. Einleitung
Thank you for choosing the Novodesk AZ5130 6-in-1 Automatic Vacuum Sealer Machine. This manual provides essential information for the safe and efficient operation, maintenance, and troubleshooting of your new appliance. Please read these instructions thoroughly before first use and retain them for future reference.

Image 1.1: The Novodesk AZ5130 Vacuum Sealer in operation, sealing food for preservation.
2. Wichtige Sicherheitshinweise
Beim Gebrauch von Elektrogeräten sollten zur Verringerung der Gefahr von Bränden, Stromschlägen und Verletzungen immer grundlegende Sicherheitsvorkehrungen getroffen werden. Dazu gehören die folgenden:
- Lesen Sie alle Anweisungen, bevor Sie dieses Gerät verwenden.
- Do not operate the appliance with a damaged power cord or plug. If the cord or plug is damaged, contact customer support for assistance.
- Das Gerät, das Netzkabel und der Stecker dürfen nicht in Wasser oder andere Flüssigkeiten getaucht werden.
- Dieses Gerät ist nicht für den Gebrauch durch Personen (einschließlich Kinder) mit eingeschränkten physischen, sensorischen oder geistigen Fähigkeiten oder Mangel an Erfahrung und Wissen bestimmt, es sei denn, sie werden von einer für ihre Sicherheit verantwortlichen Person beaufsichtigt oder erhalten Anweisungen zur Verwendung des Geräts.
- Bei der Benutzung von Geräten durch oder in der Nähe von Kindern ist eine genaue Aufsicht erforderlich.
- Ziehen Sie den Stecker aus der Steckdose, wenn Sie das Gerät nicht verwenden und bevor Sie es reinigen. Lassen Sie das Gerät abkühlen, bevor Sie Teile anbringen oder abnehmen und bevor Sie es reinigen.
- Verwenden Sie keine Aufsätze, die nicht vom Hersteller empfohlen werden.
- Nicht im Freien verwenden.
- Nicht auf oder in die Nähe eines heißen Gas- oder Elektrobrenners oder in einen beheizten Ofen stellen.
- Always ensure the lid is properly latched before operating.
- Use only vacuum sealer bags designed for vacuum sealing.
3. Packungsinhalt
Carefully unpack your Novodesk AZ5130 Vacuum Sealer and check that all items are present and in good condition. If any items are missing or damaged, please contact customer support.
- 1 x Novodesk AZ5130 Vacuum Sealer Machine
- 1 x Netzkabel
- 1 x Vacuum Hose (for external vacuuming)
- 2 x Sealing Foam Gaskets (replacement)
- 6 vorgeschnittene Staubsaugerbeutel (3.9" x 7.8")
- 6 vorgeschnittene Staubsaugerbeutel (7.8" x 11.8")

Image 3.1: All components included in the Novodesk AZ5130 Vacuum Sealer package.
4. Produktüberschreitungview
Familiarize yourself with the various parts and functions of your vacuum sealer.

Image 4.1: Control panel and function buttons of the vacuum sealer.
Funktionen des Bedienfelds:
- Process Indicator Light: Illuminates to show operating status.
- Trockenmodus: For vacuum sealing dry foods like nuts and grains.
- Feuchtmodus: For vacuum sealing foods with a small amount of liquid.
- Pulsfunktion: Allows manual control of the vacuum process, ideal for fragile foods.
- Dichtungsfunktion: Seals bags without vacuuming.
- Stopptaste: Stoppt den aktuellen Vorgang.
Image 4.2: Internal components of the vacuum sealer.
Schlüsselkomponenten:
- Vakuumkammer: Bereich, in dem die Luft aus dem Beutel entfernt wird.
- Silicone Strip: Helps create a tight seal.
- Dichtungsband: Heats to create the bag seal (4mm wide).
- Foam Seal Ring: Ensures proper vacuum.
- Cover Slaps: Prevents the vacuum bag from coming out of the vacuum chamber.
- External Sliding Cutter: Integrated cutter for custom bag sizes.
- External VAC Port: For connecting the vacuum hose to jars and containers.
5. Einrichtung
Before first use, ensure the appliance is clean and dry. Place the vacuum sealer on a flat, stable surface.
Erste Einrichtungsschritte:
- Connect the power cord to the appliance and then to a suitable electrical outlet.
- Prepare your vacuum bag with food, ensuring the open end is clean and dry. Leave at least 2-3 inches of space between the food and the top of the bag.
6. Bedienungsanleitung
6.1. Basic Vacuum Sealing (Dry & Moist Modes)
Follow these steps for standard vacuum sealing of food bags:
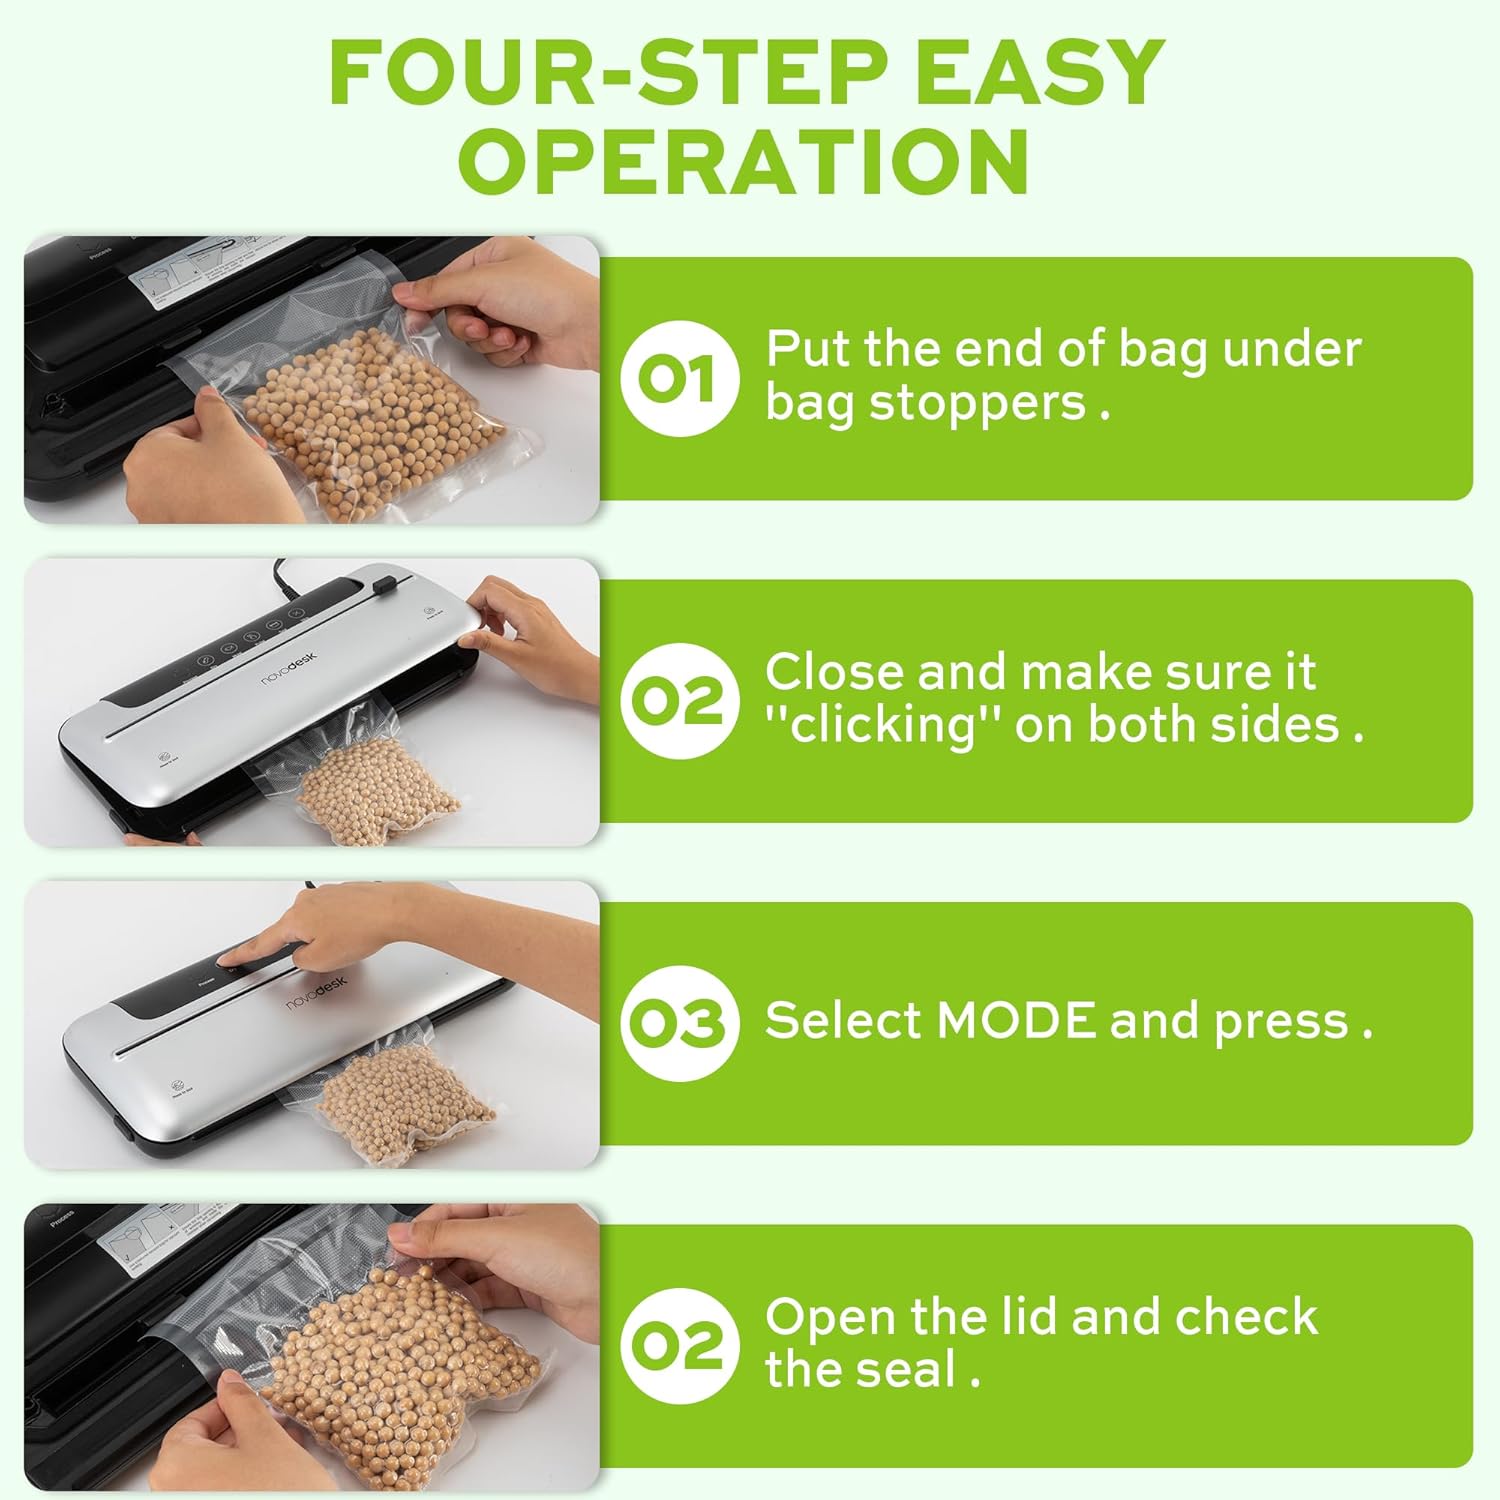
Image 6.1: Four-step easy operation for vacuum sealing.
- Bereiten Sie die Tasche vor: Place the open end of the vacuum bag under the bag stoppers, ensuring it is flat and centered within the vacuum chamber.
- Mach den Deckel zu: Firmly close the lid of the vacuum sealer. Press down on both sides until you hear a "clicking" sound, indicating that the lid is securely latched.
- Auswahlmodus: Choose the appropriate mode for your food:
- Drücken Sie die Trocken button for dry foods.
- Drücken Sie die Feucht button for moist foods.
- Überprüfen Sie das Siegel: Once the process is complete and the indicator light turns off, open the lid and remove the sealed bag. Inspect the seal to ensure it is airtight.
6.2. Pulsfunktion
The Pulse function provides manual control over the vacuum process, which is ideal for delicate or fragile foods that could be crushed by full vacuum pressure.
- Follow steps 1 and 2 from "6.1. Basic Vacuum Sealing".
- Halten Sie die Impuls Drücken Sie diesen Knopf. Die Maschine beginnt mit dem Staubsaugen.
- Lassen Sie den Impuls button when the desired vacuum level is reached.
- Drücken Sie die Siegel Knopf zum Verschließen des Beutels.
- Öffnen Sie den Deckel und entnehmen Sie den verschlossenen Beutel.
6.3. Nur-Siegel-Funktion
Use the Seal function to create a seal without vacuuming, useful for making custom-sized bags from a roll or resealing snack bags.
- Legen Sie das offene Ende des Beutels auf den Verschlussstreifen.
- Den Deckel fest schließen, bis er einrastet.
- Drücken Sie die Siegel Knopfdruck. Die Maschine erhitzt und versiegelt den Beutel.
- Once the sealing process is complete, open the lid and remove the sealed bag.
6.4. External Vacuum Function (for Jars/Containers)
Your vacuum sealer includes an external vacuum hose for use with compatible vacuum-sealable jars, containers, and wine stoppers.

Image 6.2: Using the external vacuum system with various containers.
- Prepare your vacuum-sealable jar or container with food. Ensure the lid is properly placed.
- Insert one end of the vacuum hose into the external VAC port on the vacuum sealer.
- Insert the other end of the vacuum hose into the port on your vacuum-sealable jar or container.
- Close the lid of the vacuum sealer (no bag needed inside).
- Drücken Sie die External VAC button (if available, otherwise use Dry/Moist mode to activate vacuum pump). The machine will begin to remove air from the container.
- Once the vacuum process is complete, remove the hose. The container should now be sealed.
6.5. Using the External Sliding Cutter
The integrated sliding cutter allows you to create custom-sized bags from a roll of vacuum sealer material.
- Place the vacuum bag roll across the cutting area.
- Slide the cutter blade across the bag material to achieve the desired length.
7. Wartung und Reinigung
Regelmäßige Reinigung und Wartung gewährleisten die Langlebigkeit und optimale Leistung Ihres Vakuumiergeräts.
Reinigungshinweise:
- Ziehen Sie vor der Reinigung immer den Stecker aus der Steckdose.
- Wischen Sie das Äußere der Maschine mit einem weichen, damp Tuch. Keine Scheuer- oder Lösungsmittel verwenden.
- Reinigen Sie die Vakuumkammer und den Dichtungsbereich mit einem geeigneten Mittel.amp cloth. Ensure no food particles or liquids remain.
- The foam seal rings can be removed for cleaning if necessary. Wash with mild soap and water, rinse thoroughly, and allow to air dry completely before reinserting.
- Stellen Sie sicher, dass alle Teile vollständig trocken sind, bevor Sie das Gerät einlagern oder wieder verwenden.
Lagerung:
Store the vacuum sealer in a clean, dry place. For best results, store with the lid unlatched to prevent compression of the foam seal rings, which can affect sealing performance over time.
8. Fehlerbehebung
Sollten Sie Probleme mit Ihrem Vakuumiergerät haben, beachten Sie bitte die folgenden häufigen Probleme und Lösungen:
| Problem | Mögliche Ursache | Lösung |
|---|---|---|
| Maschine lässt sich nicht einschalten. | Keine Stromversorgung. | Check if the power cord is securely plugged into the outlet and the machine. Test the outlet with another appliance. |
| Die Maschine erzeugt ein Vakuum, dichtet aber nicht ab. | Sealing strip or foam gasket is dirty/damaged. Bag is not positioned correctly. | Clean the sealing strip and foam gaskets. Ensure the bag is flat and centered over the sealing strip. Replace gaskets if damaged. |
| Die Maschine dichtet ab, erzeugt aber kein Vakuum. | Lid not properly latched. Foam gaskets are dirty or worn. Bag has holes or is not suitable. | Ensure the lid is firmly closed and latched on both sides. Clean or replace foam gaskets. Use proper vacuum sealer bags and check for damage. |
| Das Vakuum ist schwach oder unbeständig. | Foam gaskets are dirty or worn. Too much liquid in the bag (for Dry mode). | Clean or replace foam gaskets. Use Moist mode for foods with liquid, or pre-freeze liquids. |
| Der Beutel schmilzt beim Versiegeln. | Sealing time too long (unlikely for automatic models). | Ensure you are using appropriate vacuum sealer bags. If issue persists, contact customer support. |
If the problem persists after attempting these solutions, please contact Novodesk customer support for further assistance.
9. Spezifikationen
| Marke | Novodesk |
| Modellnummer | AZ5130 |
| Leistung / Wattage | 120 Watt |
| Bandtage | 120 V |
| Material | Acrylnitril-Butadien-Styrol (ABS) |
| Artikelgewicht | 980 g (2.16 Pfund) |
| Farbe | Silbrig |
| Betriebsmodus | Automatisch |
| Maximale Saugleistung | 75KPa |
| Breite des Dichtungsstreifens | 4 mm |
10. Garantie und Support
Novodesk products are manufactured to high-quality standards. For information regarding warranty coverage, product support, or to purchase replacement parts, please refer to the warranty card included with your product or visit the official Novodesk website. If you have any questions or require assistance, please contact Novodesk customer service.

