1. Einleitung
This instruction manual provides detailed guidance for assembling and operating your ROBOTIME DIY Miniature House Kit, specifically the Christmas Candy Stand model RBT-DS043. This kit is designed for individuals aged 14 and up, offering an engaging building experience to create a festive miniature display.
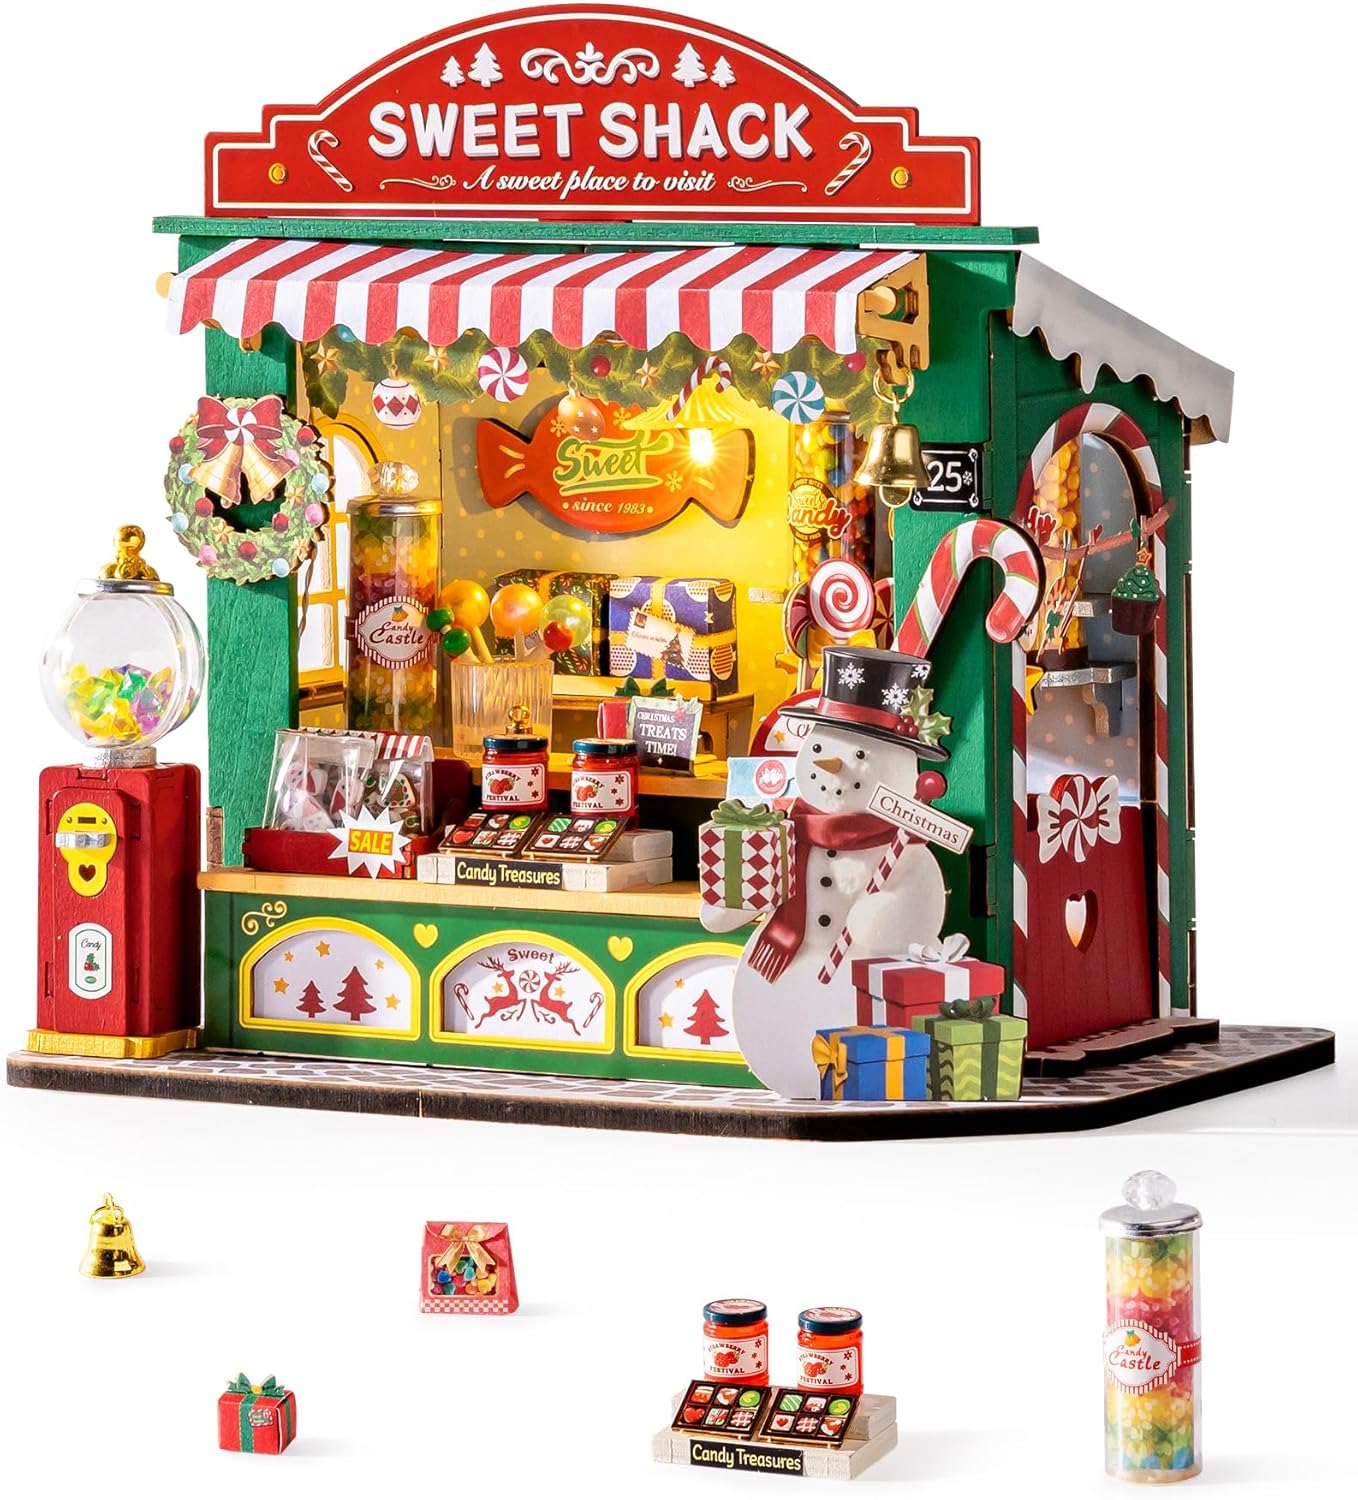
Figure 1: Completed Christmas Candy Stand Miniature Kit.
This image displays the fully assembled ROBOTIME Christmas Candy Stand, showcasing its intricate details, festive decorations, and miniature candy items. The stand features a "Sweet Shack" sign, a red and white striped awning, a snowman figure, and various tiny candy jars and gifts.
2. Sicherheitshinweise
Bitte lesen und verstehen Sie alle Sicherheitshinweise, bevor Sie mit der Montage beginnen.
- Dieses Produkt enthält Kleinteile und ist wegen Erstickungsgefahr nicht für Kinder unter 3 Jahren geeignet.
- Recommended age for assembly is 14 years and up.
- Exercise caution when handling sharp tools (e.g., scissors, craft knife) if used during assembly.
- Batterien für Kleinkinder unzugänglich aufbewahren. Bei Verschlucken sofort einen Arzt aufsuchen.
- Entsorgen Sie Verpackungsmaterialien ordnungsgemäß.
3. Packungsinhalt
Prüfen Sie vor Beginn der Montage, ob alle Komponenten vorhanden sind. Das Set beinhaltet:
- Pre-cut wooden sheets for structural components.
- Paper cutouts and stickers for decorative elements.
- Various miniature plastic figures and accessories (e.g., candy jars, gifts, bells).
- LED light components and battery box (requires 2 AAA batteries, not included).
- Instruction manual with clear illustrations.
- Doppelseitiges Klebeband.
- Small tools (e.g., tweezers) may be included.

Abbildung 2: Inhalt des Kits (Übersicht)view.
This image shows the various components included in the ROBOTIME Christmas Candy Stand kit, such as wooden sheets, paper elements, small accessories, and the instruction booklet, laid out before assembly.
4. Aufbau und Montage
Folgen Sie den nummerierten Schritten in der beiliegenden Montageanleitung für eine detaillierte Montage. Der allgemeine Ablauf umfasst Folgendes:
- Vorbereitung:
- Sorgen Sie für eine gut beleuchtete, ebene Arbeitsfläche.
- Unpack all components and organize them by type or sheet number.
- Gather necessary tools: scissors, craft knife (optional, for precision cuts), and 2 AAA batteries for the LED lights.
- Bauteilausbau:
Carefully punch out or cut the wooden pieces from their sheets. Be gentle with delicate parts to prevent breakage.
- Strukturelle Montage:
Assemble the main structure of the candy stand by slotting the wooden pieces together as indicated in the manual. The kit is designed for a glue-free assembly, but for enhanced durability, especially for long-term display, a small amount of craft glue (not included) can be applied to joints.
- Dekorative Elemente:
Attach paper cutouts, stickers, and miniature accessories using the provided double-sided tape. For smaller or more intricate details, additional craft glue may provide a stronger hold.

Figure 3: Assembly in Progress.
This image illustrates the hands-on assembly process, showing various pre-cut components and the instruction booklet, highlighting the detailed nature of the kit.
- LED-Lichtinstallation:
- Locate the LED light components and the battery box.
- Legen Sie 2 AAA-Batterien in das Batteriefach ein und achten Sie dabei auf die richtige Polarität.
- Integrate the LED lights into the designated areas of the miniature stand as per the instructions. Secure the wiring and battery box discreetly.
- Letzter Schliff:
Place all remaining miniature items and ensure all parts are securely attached.

Figure 4: Detailed Miniature Accessories.
Dieses Bild bietet eine Nahaufnahme views of various miniature accessories, including candy jars, lollipop cups, and jam jars, demonstrating the intricate details that enhance the finished model.
5. Bedienungsanleitung (LED-Leuchten)
The Christmas Candy Stand features built-in LED lights to enhance its festive appearance.
- Einlegen der Batterie: Ensure 2 AAA batteries are correctly installed in the battery box (refer to Section 4, Step 4 for details).
- Ein-/Ausschalten: Locate the switch on the battery box. Flip the switch to the "ON" position to illuminate the LED lights. Flip it to "OFF" to turn them off.
- Platzierung: The battery box is typically placed discreetly within the stand. Ensure it is accessible for switching the lights on and off.
6. Wartung
To ensure the longevity and appearance of your miniature house kit, follow these maintenance guidelines:
- Reinigung: Gently dust the model with a soft, dry brush or cloth. Avoid using water or cleaning solutions, as they may damage the wooden and paper components.
- Lagerung: Store the assembled model in a dry place away from direct sunlight and extreme temperatures to prevent warping or fading.
- Batteriepflege: If the LED lights will not be used for an extended period, remove the AAA batteries from the battery box to prevent leakage and potential damage.
- Handhabung: Handle the model with care, as some delicate parts may be fragile.
7. Fehlerbehebung
In der folgenden Tabelle finden Sie häufig auftretende Probleme und deren Lösungen:
| Problem | Mögliche Ursache | Lösung |
|---|---|---|
| Die LED-Leuchten schalten sich nicht ein. |
|
|
| Die Teile passen nicht richtig zusammen. |
|
|
| Decorative elements fall off. |
|
|
| Battery box is not secure. |
|
|
8. Spezifikationen
| Besonderheit | Detail |
|---|---|
| Technische Daten | 6.7 x 4.5 x 6.3 Zoll (17 x 11.4 x 16 cm) |
| Artikelgewicht | 1.1 Pfund |
| Modellnummer | RBT-DS043 |
| Empfohlenes Alter | Ab 14 Jahren |
| Montagezeit (ca.) | 2 hours (as per manufacturer, actual time may vary) |
| Anzahl der Komponenten | 170 pieces (as per manufacturer) |
| Stromquelle für LED | 2 x AAA-Batterien (nicht im Lieferumfang enthalten) |
| Hauptmaterialien | Wood, Paper, Plastic |

Figure 5: Key Product Information.
This infographic summarizes key product details including recommended age (14+), number of pieces (170), estimated assembly time (2 hours), presence of LED lights, and a difficulty rating.
9. Garantie und Support
ROBOTIME is committed to providing quality products. For any missing parts, assembly assistance, or product-related inquiries, please contact ROBOTIME customer service. Specific warranty details may vary by region and retailer. Please retain your proof of purchase.
For customer support, refer to the contact information provided on the product packaging or the official ROBOTIME webWebsite.


