1. Einleitung
This manual provides detailed instructions for the installation, operation, and maintenance of your Suptek MD9442 Dual Monitor Arm Desk Mount and MD9401 Single Monitor Mount Stand. Please read this manual thoroughly before installation to ensure correct setup and safe operation. Keep this manual for future reference.
2. Sicherheitshinweise
- Vor der Installation sicherstellen, dass alle Komponenten vorhanden und unbeschädigt sind. Nicht verwenden, wenn Teile fehlen oder defekt sind.
- Verify that the mounting surface (desk) can safely support the combined weight of the mount and your monitors.
- Do not exceed the maximum weight capacity specified for each mount.
- Tighten all screws firmly, but do not overtighten to avoid stripping threads or damaging the desk.
- Keep children away from the installation area. Small parts may be a choking hazard.
- Sollten Sie Zweifel am Installationsprozess haben, konsultieren Sie einen qualifizierten Fachmann.
3. Packungsinhalt
Please check that all parts are included in your package. Components may vary slightly between the dual (MD9442) and single (MD9401) monitor mounts.
- Monitor Arm(s)
- Schreibtisch Clamp (C-Klasseamp)
- Grommet Base (optional installation)
- Montagestange
- VESA-Platten
- Hardware-Set (Schrauben, Unterlegscheiben, Inbusschlüssel)
- Kabelmanagement-Clips
4. Einrichtung und Installation
Both the MD9442 Dual Monitor Arm and MD9401 Single Monitor Mount Stand offer two installation options: C-clamp and Grommet Base. Ensure your desk thickness is suitable (up to 4 inches for C-clamp).
4.1. Wählen Sie Ihre Installationsmethode
Entscheiden Sie, ob die C-Cl-Verbindung verwendet werden soll.amp for edge mounting or the grommet base for through-hole mounting. The grommet base requires a minimum desk hole diameter of 1.65 inches (42mm).

This image illustrates the dimensions of the dual monitor mount, including the minimum desk hole diameter of 1.65 inches (42mm) required for grommet installation.
4.2. C-Clamp Installation (Recommended for most desks)
- Befestigen Sie die C-clamp to the bottom of the mounting pole.
- Positionieren Sie die C-Clamp on the edge of your desk and tighten the knob until the mount is securely fastened.
- Ensure the mount is stable and does not wobble.

This image shows the dual monitor arm securely installed on a desk using the C-clamp Verfahren.
4.3. Grommet Base Installation (For desks with a pre-drilled hole)
- Zerlegen Sie die C-Cl-Verbindung.amp wenn es bereits am Mast befestigt ist.
- Insert the mounting pole through the grommet hole in your desk.
- Secure the grommet base plate and tighten the nut from underneath the desk until the mount is stable.
4.4. Anbringen von Monitorarmen und VESA-Platten
- Slide the monitor arm(s) onto the mounting pole at your desired height. Tighten the height adjustment screw.
- Attach the VESA plate to the back of your monitor using the provided screws. Ensure the VESA pattern (75x75mm or 100x100mm) matches your monitor.
- Carefully slide the monitor with the attached VESA plate onto the arm's mounting head. Secure it with the locking mechanism.
- Repeat for the second monitor if using the MD9442 dual arm.

This image demonstrates two monitors mounted on the dual arm, highlighting VESA compatibility (75x75mm/100x100mm) and maximum weight capacity of 22lbs per monitor.
5. Bedienungsanleitung
Once installed, your Suptek monitor mount allows for various adjustments to achieve an ergonomic viewErfahrung.
5.1. Höhenverstellung
Lösen Sie die Klammeramp on the mounting pole to slide the monitor arm(s) up or down. Retighten the clamp firmly at the desired height.

This image shows a single monitor being adjusted vertically along the pole to an ergonomic height.
5.2. Neigungseinstellung
Der Monitor lässt sich nach oben oder unten neigen, um Blendeffekte zu reduzieren und die optimale Sicht zu gewährleisten. viewwinkeln.
- MD9442 (Dual): Tilt range of ±90° (up and down).
- MD9401 (Single): Tilt range of ±45° (up and down).

Dieses Bild bietet einen visuellen Überblickview of the various adjustments, including tilt, rotation, and swivel.
5.3. Schwenkverstellung
Schwenken Sie den Monitor nach links oder rechts, um Ihren Bildschirm freizugeben oder Ihre Einstellungen anzupassen. view, um die Position zu ändern.
- MD9442 (Dual): Swivel range of ±90° (left and right).
- MD9401 (Single): Swivel range of ±45° (left and right).
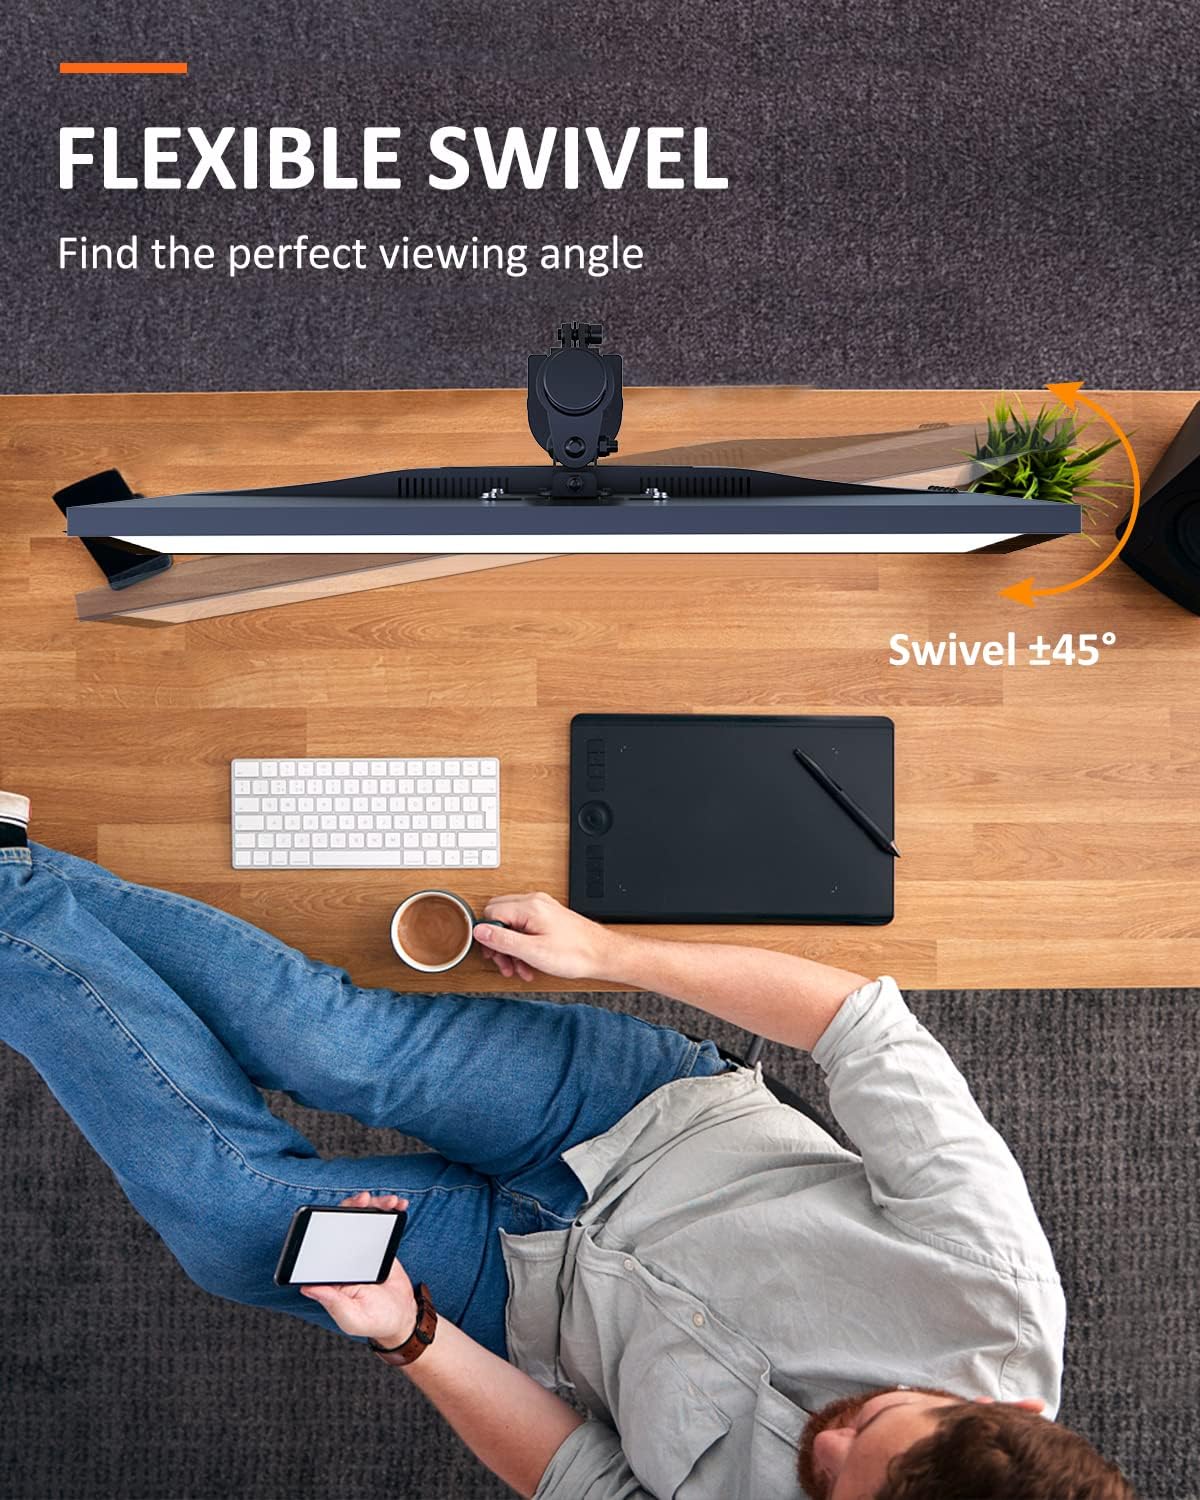
This image shows the flexible swivel capability of the single monitor mount, allowing for easy adjustment of the viewing-Winkel.
5.4. Bildschirmdrehung
Rotate your monitor 360° for landscape or portrait orientation.
- MD9442 (Dual): 360° Drehung.
- MD9401 (Single): 360° Drehung.

This image illustrates the 360° screen rotation feature, allowing monitors to be used in both landscape and portrait modes.
5.5. Kabelmanagement
Utilize the integrated cable management clips or channels on the arm(s) and pole to route and organize your monitor cables for a tidy workspace.
6. Wartung
- Überprüfen Sie regelmäßig alle Schrauben und Verbindungen, um sicherzustellen, dass sie fest und sicher sind.
- Reinigen Sie die Halterung mit einem weichen, fusselfreien Tuch.amp Mit einem Tuch abwischen. Vermeiden Sie scheuernde Reiniger oder Lösungsmittel.
- Ensure that cables are not pinched or under excessive tension.
7. Fehlerbehebung
- Die Halterung ist instabil: Stellen Sie sicher, dass die C-Clamp or grommet base is tightened securely to the desk. Verify the desk surface is flat and sturdy.
- Monitor sags or won't hold position: Check that the VESA plate is properly attached to the monitor and the arm. Ensure the weight of the monitor does not exceed the mount's capacity. Adjust tension screws on the arm joints if available (refer to specific model diagrams if provided).
- Anpassungsschwierigkeiten: Loosen adjustment screws slightly before attempting to move the monitor, then retighten. Do not force adjustments.
8. Spezifikationen
| Besonderheit | MD9442 (Dual Monitor Arm) | MD9401 (Single Monitor Mount) |
|---|---|---|
| Kompatibilität mit Bildschirmgrößen | Up to 27 inches per screen | 13 bis 32 Zoll |
| Gewichtskapazität | Up to 22 lbs (10 kg) per screen | Bis zu 22 kg (10 Pfund) |
| VESA-Kompatibilität | 75x75mm, 100x100mm | 75x75mm, 100x100mm |
| Drehung | 360° | 360° |
| Neigung | ±90° (up/down) | ±45° (up/down) |
| Schwenken | ±90° (links/rechts) | ±45° (links/rechts) |
| Installationsoptionen | C-Klamp, Grommet Base (fits desk up to 4" thickness) | |
9. Garantie und Support
Suptek products are designed for durability and performance. For warranty information or technical support, please refer to the product packaging or contact Suptek customer service through their official website. Please have your model number (MD9442 or MD9401) and purchase information ready when contacting support.


