Einführung
Vielen Dank für Ihren Einkauf.asing the Douk Audio P7 Vacuum Tube Phono Preamplifier. This device is designed to enhance your audio experience by providing a high-quality pre-amplifikation stage for turntables and other audio sources, featuring vacuum tube warmth, balanced XLR output, and precise tone controls. Please read this manual thoroughly before operation to ensure proper setup and optimal performance.
Was ist in der Box?
- 1x Douk Audio P7 Preamp Einheit
- 2x PSVANE ECC83 Tubes
- 1x DC 12V Netzteil
- 1x Benutzerhandbuch

Image: The Douk Audio P7 package contents, showing the main unit, two PSVANE ECC83 tubes, a DC 12V power adapter, and the user manual.
Sicherheitshinweise
- Setzen Sie dieses Gerät weder Regen noch Feuchtigkeit aus.
- Das Gerät darf nicht auseinandergebaut werden. Alle Wartungsarbeiten dürfen nur von qualifiziertem Fachpersonal durchgeführt werden.
- Sorgen Sie für eine ausreichende Belüftung rund um das Gerät, um eine Überhitzung zu vermeiden.
- Use only the provided power adapter. Using an incorrect adapter may damage the unit and void the warranty.
- Außerhalb der Reichweite von Kindern aufbewahren.
- Vermeiden Sie es, das Gerät in der Nähe von Wärmequellen oder in direktem Sonnenlicht aufzustellen.
Produkt überview
Layout der Vorder- und Rückseite
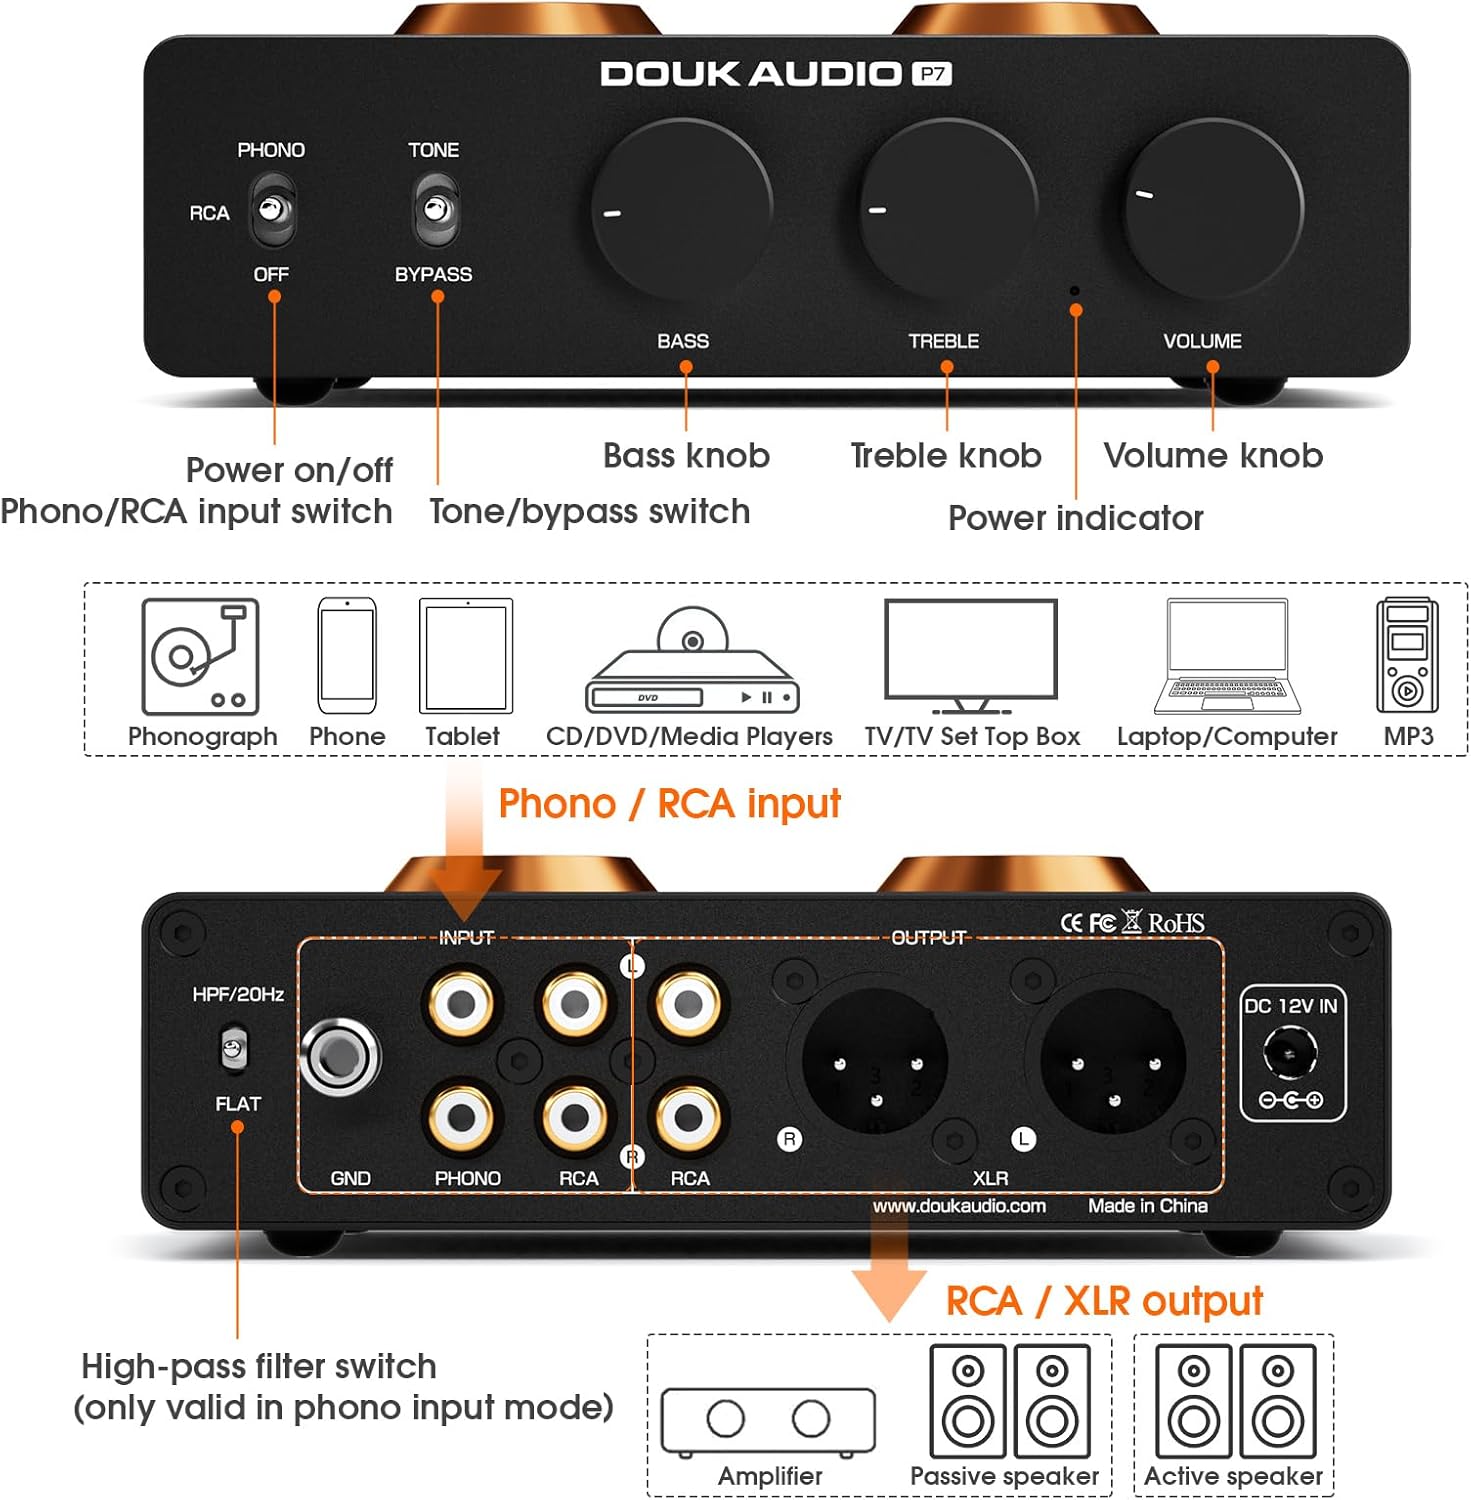
Image: A comprehensive diagram illustrating the front and rear panels of the Douk Audio P7, highlighting the location and function of each control, input, and output.
Bedienelemente auf der Vorderseite:
- Ein-/Ausschalter: Schaltet das Gerät ein und aus.
- Phono/RCA Input Switch: Selects between Phono (turntable) and RCA (line-level) inputs.
- Tone/Bypass Switch: Engages or bypasses the Bass and Treble tone controls.
- Bass-Knopf: Passt den Tieftonbereich an.
- Höhenregler: Passt den Hochfrequenzgang an.
- Lautstärkeregler: Steuert die Gesamtausgangslautstärke.
- Betriebsanzeige: Leuchtet, wenn das Gerät eingeschaltet ist.
Anschlüsse an der Rückseite:
- High-Pass Filter (HPF) Switch: Activates a 20Hz high-pass filter (only for Phono input).
- GND-Anschluss: Ground connection for turntables.
- PHONO Input (RCA L/R): Connects to a turntable with MM cartridge.
- RCA-Eingang (L/R): Connects to line-level audio sources (CD player, TV, phone, etc.).
- RCA-Ausgang (L/R): Standard unbalanced audio output.
- XLR Output (L/R): Balanced audio output for reduced noise and improved dynamic range.
- DC 12 V IN: Stromanschluss für den mitgelieferten 12-V-Gleichstromadapter.
Aufstellen
1. Rohrinstallation
Carefully insert the two PSVANE ECC83 tubes into their respective sockets on the top of the unit. Ensure the pins align correctly with the socket holes and gently push down until the tubes are seated firmly. Do not force them.

Bild: Eine detaillierte view of two PSVANE ECC83 vacuum tubes, ready for installation into the preampschwerer.
2. Audioquellen anschließen
- For Turntables (MM Cartridge): Connect your turntable's RCA output cables to the PHONO input (L/R) on the rear panel. Connect the turntable's ground wire to the GND terminal on the P7.
- For Line-Level Sources (CD Player, Phone, TV, etc.): Connect your audio source's RCA output cables to the RCA input (L/R) on the rear panel.
3. Verbindung zu einem AmpVerstärker/Lautsprecher
- Using RCA Output: Connect the P7's RCA Output (L/R) to the RCA input of your ampVerstärker oder Aktivlautsprecher.
- Using Balanced XLR Output: For optimal noise reduction and dynamic range, connect the P7's XLR Output (L/R) to the balanced XLR input of your ampVerstärker oder Aktivlautsprecher.

Bild: Eine detaillierte view of the Douk Audio P7's rear panel, focusing on the balanced XLR output connections.
4. Stromanschluss
Connect the provided DC 12V power adapter to the DC 12V IN port on the rear panel of the P7, then plug the adapter into a wall outlet.
Bedienungsanleitung
1. Ein-/Ausschalten
Press the Power On/Off switch on the front panel to turn the unit on. The power indicator light will illuminate. Press it again to turn off the unit.
2. Eingabeauswahl
Use the Phono/RCA Input Switch on the front panel to select the appropriate input source:
- Eingestellt auf TELEFON for turntables.
- Eingestellt auf Cinch for line-level devices.
3. Lautstärkeregelung
Adjust the Volume Knob on the front panel to achieve your desired listening level. Start with a low volume and gradually increase it.
4. Tone Control and Bypass
The P7 features Bass and Treble controls for sound customization. Use the Tone/Bypass Switch to engage or disengage these controls:
- Eingestellt auf TON to enable the Bass and Treble knobs. Adjust them to your preference.
- Eingestellt auf BYPASS for a pure, unaltered audio signal, bypassing the tone control circuit.

Image: The front panel controls of the Douk Audio P7, illustrating the Bass, Treble, and Volume knobs, and the Tone/Bypass switch.
5. High-Pass Filter (HPF)
The High-Pass Filter (HPF) switch on the rear panel is only active when the Phono input is selected. It cuts off subsonic noise below 20Hz, which can improve sound clarity and reduce distortion from turntable rumble.
- Eingestellt auf HPF/20Hz to activate the filter.
- Eingestellt auf WOHNUNG to disable the filter.

Image: The rear panel of the Douk Audio P7, showing the High-Pass Filter switch with its two settings: HPF/20Hz and FLAT.
Röhrenaustausch
The PSVANE ECC83 tubes are designed to be easily swappable, allowing for tube rolling to tailor the sound to your preference. To replace tubes:
- Ensure the unit is powered off and unplugged from the wall outlet.
- Allow the tubes to cool down completely if the unit has been in use.
- Gently pull the existing tubes straight up from their sockets. Avoid twisting or bending.
- Carefully insert the new ECC83 tubes, aligning the pins with the socket holes. Push down gently until they are seated firmly.
- Reconnect power and test the unit.
Wartung
- Reinigung: Reinigen Sie die Außenseite des Geräts mit einem weichen, trockenen Tuch. Verwenden Sie keine flüssigen Reiniger oder Lösungsmittel.
- Belüftung: Ensure the ventilation holes on the unit are not obstructed to maintain proper airflow.
- Lagerung: Bei längerer Nichtbenutzung sollte das Gerät an einem kühlen, trockenen Ort, fern von direkter Sonneneinstrahlung und extremen Temperaturen aufbewahrt werden.
Fehlerbehebung
| Problem | Mögliche Ursache | Lösung |
|---|---|---|
| Kein Strom | Power adapter not connected; Power outlet faulty; Unit switched off. | Überprüfen Sie die Stromanschlüsse; Versuchen Sie eine andere Steckdose; Stellen Sie sicher, dass der Netzschalter eingeschaltet ist. |
| Keine Tonausgabe | Incorrect input selected; Cables not connected properly; Volume too low; AmpVerstärker/Lautsprecher aus. | Select correct input (Phono/RCA); Check all audio cable connections; Increase volume; Ensure ampVerstärker/Lautsprecher sind eingeschaltet. |
| Humming/Buzzing noise (Phono) | Turntable ground not connected; Ground loop; HPF not engaged. | Connect turntable ground wire to GND terminal; Try engaging HPF; Ensure all components are properly grounded. |
| Verzerrter Ton | Volume too high; Faulty cables; Damaged tubes. | Reduce volume; Replace audio cables; Inspect tubes for damage or try new tubes. |
| Tone controls not working | Tone/Bypass switch set to BYPASS. | Set Tone/Bypass switch to TONE. |
Technische Daten
| Besonderheit | Detail |
|---|---|
| Modellnummer | SUC-P7 |
| Technische Daten | 4.88 x 6.1 x 1.65 Zoll |
| Artikelgewicht | 1.56 Pfund |
| Eingabetypen | MM Phono, RCA Line-level |
| Ausgabetypen | RCA, Balanced XLR |
| Schläuche | 2x PSVANE ECC83 |
| High-Pass-Filter | 20Hz (Phono input only) |
| Klangregelung | Bass & Treble (with Bypass function) |
| Hersteller | Douk Audio |
Garantie und Support
Douk Audio Produkte sind auf Zuverlässigkeit und Leistung ausgelegt. Informationen zu Garantie und technischem Support finden Sie auf der offiziellen Douk Audio Website. webBesuchen Sie unsere Website oder kontaktieren Sie Ihren Händler. Bewahren Sie Ihren Kaufbeleg als Kaufnachweis für Garantieansprüche auf.
For further assistance, you may visit the Douk Audio store on Amazon: Douk Audio Store


