1. Einleitung
This manual provides instructions for the SOVMIKU Vicohome 2K AI Solar Security Camera and 5G Wi-Fi Indoor Camera. These cameras offer advanced surveillance features including 2K resolution, AI motion detection, two-way audio, and flexible storage options. The solar-powered outdoor camera provides continuous operation, while the indoor camera offers versatile monitoring with dual-band Wi-Fi connectivity.
Please read this manual carefully before using the product to ensure proper installation and operation.
2. Packungsinhalt
Überprüfen Sie, ob alle Artikel in Ihrem Paket vorhanden sind:
- Camera body (Solar Outdoor or 5G Wi-Fi Indoor model)
- Wandhalterung
- Solar panel (for outdoor model)
- USB-Kabel
- Benutzerhandbuch
- Schrauben und Dübel
- SIM card & SD card (if included with specific model)

Abbildung 2.1: Bspample of package contents for a SOVMIKU camera.
3. Einrichtung
3.1 App-Download und Kontoerstellung
Laden Sie die kostenlose "Vicohome" App from Google Play Store (for Android) or Apple App Store (for iOS). Follow the in-app instructions to create an account and log in.
3.2 Kameraladung
Before initial use, fully charge the camera battery using the provided USB cable and a standard 5V 1A charger. For solar-powered models, ensure the solar panel is connected and placed in direct sunlight.

Figure 3.1: Solar panel connected to the camera for continuous charging.
3.3 Installation der microSD-Karte (optional)
To store recordings locally, insert a microSD card (up to 128GB, not included) into the designated slot on the camera. Ensure the camera is powered off before inserting or removing the card.

Figure 3.2: Installing a microSD card for local storage.
3.4 Wi-Fi-Verbindung
The cameras support dual-band Wi-Fi (2.4GHz and 5GHz). Follow the in-app instructions to connect your camera to your home Wi-Fi network. Ensure your router is within range and provides a stable signal.

Figure 3.3: Dual-band Wi-Fi compatibility for flexible network connection.
3.5 Kamerainstallation
Mount the camera using the provided bracket and screws. For solar-powered outdoor cameras, ensure the solar panel is positioned to receive maximum direct sunlight throughout the day. Avoid shaded areas.

Figure 3.4: Outdoor camera dimensions and weather resistance.

Figure 3.5: Two-way audio feature in use.
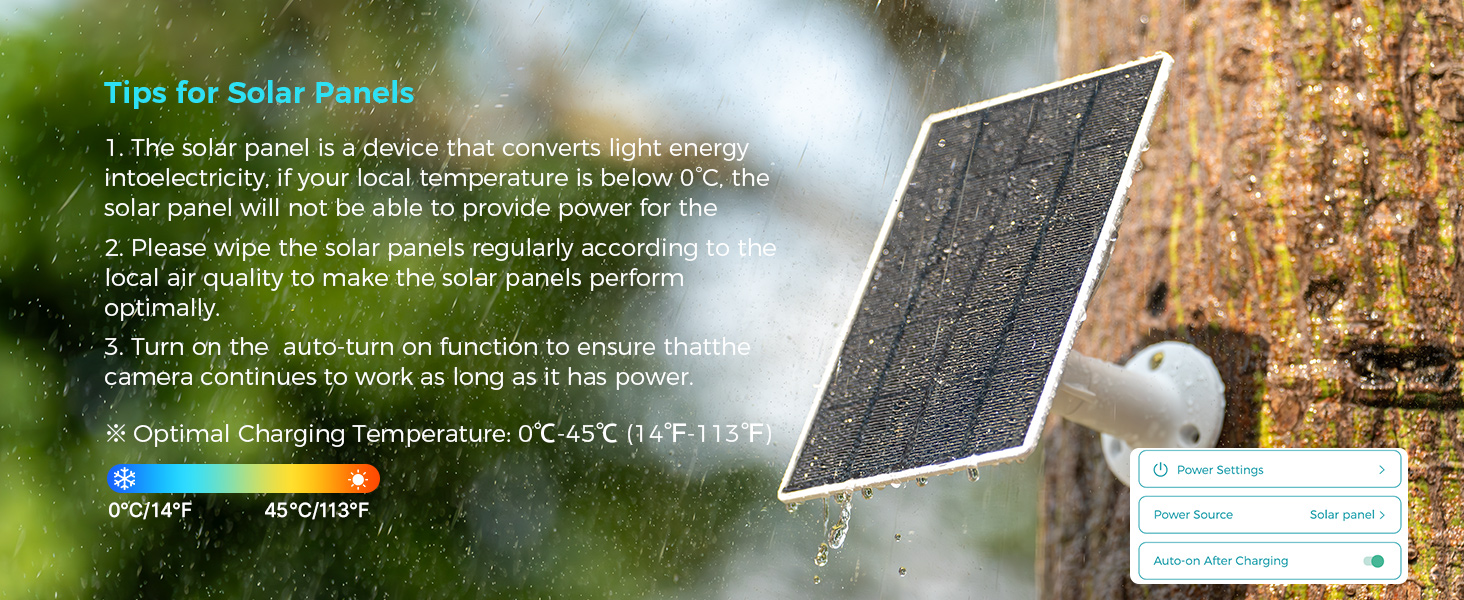
Figure 3.6: Outdoor camera designed for durability in various weather conditions.
4. Bedienungsanleitung
4.1 Live View und Mehrkameraüberwachung
Open the Vicohome App to view live feeds from your cameras. The app allows simultaneous viewing of up to four cameras without an NVR. Click the second button in the top right corner of the app to access this feature.

Figure 4.1: Vicohome App interface showing multiple camera feeds.
4.2 Bewegungserkennung und -verfolgung
The camera is equipped with a High Tolerance CMOS and PIR Sensor for accurate motion detection. When motion is detected, the device will automatically track the movement and send push notifications to your phone. For the CB2 camera, an emergency SOS call can be initiated with one click.

Figure 4.2: Motion tracking in action, highlighting detected movement.

Figure 4.3: Motion detection alerts on a smartwatch.
4.3 Zwei-Wege-Audio
Utilize the two-way audio feature to communicate through the camera. This allows you to speak to visitors or deter intruders remotely via the Vicohome App.

Figure 4.4: Engaging in two-way communication via the camera.
4.4 Night Vision and Alerts
The cameras provide color night vision for clear images in low-light conditions. When motion is detected at night, the camera can activate a flashlight and an audible siren to deter unwanted activity.

Figure 4.5: Flashlight and audible alarm activation upon motion detection.
4.5 Speicheroptionen (lokal & Cloud)
Recordings can be stored locally on a microSD card (up to 128GB) or securely in the cloud. Cloud storage offers encrypted backup, ensuring your recordings are safe even if the camera is compromised.

Figure 4.6: Flexible local and encrypted cloud storage solutions.
4.6 Multi-User and Multi-Device Support
The Vicohome App supports connecting up to 50 devices. You can share camera access with up to 10 different users, setting specific permissions for each. Up to three accounts can view gleichzeitig mit der Kamera.

Figure 4.7: Ecosystem of Vicohome devices managed through a single app.
5. Wartung
5.1 Pflege von Solarmodulen
Regularly wipe the solar panels to remove dust and debris, ensuring optimal charging efficiency. Install the solar panel in a location that receives maximum direct sunlight.

Figure 5.1: Proper solar panel placement and settings for optimal charging.
5.2 Optimal Charging Temperature
The optimal charging temperature for the solar panel is 0°C to 45°C (14°F to 113°F). If the local temperature is below 0°C, the solar panel may not provide power effectively.
Figure 5.2: Tips for maintaining solar panel performance.
5.3 Allgemeine Reinigung
Reinigen Sie Objektiv und Gehäuse der Kamera mit einem weichen, trockenen Tuch. Vermeiden Sie die Verwendung aggressiver Chemikalien oder scheuernder Materialien, die das Gerät beschädigen könnten.
6. Fehlerbehebung
6.1 Verbindungsprobleme
- Kamera verbindet sich nicht mit WLAN: Ensure your Wi-Fi network is 2.4GHz or 5GHz (depending on camera model compatibility) and the signal is strong. Restart your router and the camera.
- Fernbedienung viewing not working: Check your internet connection. Ensure the Vicohome App has necessary network permissions on your smartphone.
6.2 Stromversorgungsprobleme
- Solar camera not charging: Verify the solar panel is clean and positioned in direct sunlight. Check the cable connection between the solar panel and the camera. Ensure the auto-on after charging function is enabled in the app settings.
- Batterie entlädt sich schnell: Reduce motion detection sensitivity or frequency of recordings. Ensure the camera is receiving adequate sunlight for solar charging.
6.3 Probleme mit der Bild-/Videoqualität
- Unscharfe Bilder: Clean the camera lens. Ensure there is sufficient lighting.
- Night vision not clear: Ensure there are no obstructions blocking the infrared lights.
6.4 SIM Card Questions (for LTE models, if applicable)
Some models may support SIM cards for 4G connectivity. If you have an LTE model:
- Can I use my own SIM card? Yes, this camera supports Verizon, T-Mobile, and AT&T SIM cards.
- Can the SIM card be used on a phone? No, the SIM card is exclusively for Sovmiku cameras.
Figure 6.1: Common questions and answers regarding camera connectivity.
7. Spezifikationen
| Besonderheit | Beschreibung |
|---|---|
| Videoauflösung | 2K (3 Megapixel) |
| Wi-Fi-Konnektivität | 2.4GHz & 5GHz Dual-Band |
| Lagerung | MicroSD-Karte (bis zu 128 GB), Cloud-Speicher |
| Bewegungserkennung | AI Human/Pet/Vehicle Detection, PIR Sensor |
| Nachtsicht | Farb-Nachtsicht |
| Audio | Zwei-Wege-Audio |
| Wetterbeständigkeit | IP65 (for outdoor models) |
| Betriebstemperatur | -10 °C bis 45 °C (14 °F bis 113 °F) |
| Pan/Tilt (for specific models) | 355° Schwenken, 90° Neigen |
| Stromquelle | Battery Powered, Solar Charging (for outdoor models) |

Figure 7.1: Camera features including 2K resolution and PIR motion detection.

Figure 7.2: High-resolution imaging capabilities.
8. Garantie und Support
8.1 180-Day Exchange Policy
SOVMIKU offers a 180-day exchange policy. If you are not satisfied with the product, you may submit a request for a solution within 24 hours.
8.2 Support kontaktieren
For technical assistance or customer service, please contact us via email:
E-Mail: Sovmiku@163.com
We aim to provide the best solution within 24 hours.

Abbildung 8.1: Kontaktinformationen für Support.


