1. Einleitung
This manual provides essential information for the proper setup, operation, and maintenance of your Pisichen 24-inch 2K QHD 2560x1440 IPS Touchscreen Monitor. Please read this manual thoroughly before using the product to ensure optimal performance and safety.
The Pisichen 24-inch monitor features a 2K QHD (2560x1440) resolution IPS panel, a 100Hz refresh rate, and 10-point multi-touch functionality, designed for both productivity and entertainment.
2. Packungsinhalt
Bitte prüfen Sie, ob alle unten aufgeführten Artikel in Ihrer Produktverpackung enthalten sind. Sollten Artikel fehlen oder beschädigt sein, kontaktieren Sie bitte unseren Kundenservice.
- Pisichen 24-inch 2K QHD Touchscreen Monitor
- Monitorständer (Fuß und Hals)
- DP-Kabel
- HDMI-Kabel
- USB B Touch Cable
- USB-CC-Kabel
- Gleichstromadapter
- Benutzerhandbuch (dieses Dokument)

Abbildung 2.1: Included accessories with the Pisichen 24-inch monitor.
3. Einrichtungsanweisungen
3.1. Zusammenbau des Monitorständers
- Nehmen Sie die Monitor- und Standfußkomponenten vorsichtig aus der Verpackung.
- Befestigen Sie den Stativhals am Monitorpanel. Achten Sie darauf, dass er sicher einrastet oder mit den mitgelieferten Schrauben fixiert ist.
- Attach the stand base to the stand neck. Tighten the thumb screw at the bottom of the base to secure it.
- Stellen Sie den zusammengebauten Monitor auf eine stabile, ebene Fläche.
3.2. Mit einem Gerät verbinden
The monitor offers multiple connectivity options. Choose the appropriate cable for your device.
- HDMI-Verbindung: Verbinden Sie ein Ende des HDMI-Kabels mit dem HDMI-Anschluss Ihres Computers oder Geräts und das andere Ende mit dem HDMI-Anschluss des Monitors.
- USB-C-Anschluss: Connect one end of the USB-C cable to a compatible USB-C port on your computer or device (which supports video output) and the other end to the USB-C port on the monitor. This connection can also provide power and data.
- DisplayPort (DP)-Anschluss: Connect one end of the DP cable to the DisplayPort on your computer or device and the other end to the DP port on the monitor.
- USB B for Touch Function: For touch functionality with a PC, connect the included USB B Touch Cable from the USB-B port on the monitor to a standard USB-A port on your computer. This is essential for enabling touch input.

Abbildung 3.1: Universal connectivity options for the monitor.
3.3. Einschalten
- Connect the DC Power Adapter to the power input port on the monitor.
- Stecken Sie das Netzteil in eine Wandsteckdose.
- Press the power button on the monitor (location may vary, typically on the back or bottom right) to turn it on.
4. Bedienungsanleitung
4.1. Grundlegende Bedienung
- Ein-/Ausschalten: Drücken Sie die Einschalttaste, um den Monitor ein- oder auszuschalten.
- Auswahl der Eingangsquelle: Use the monitor's OSD (On-Screen Display) menu buttons to select the desired input source (HDMI, USB-C, DP).
- OSD-Menünavigation: The monitor features physical buttons (usually on the back or bottom) to access and navigate the OSD menu. These buttons typically include Menu, Up, Down, and Exit/Select.
4.2. Touch-Funktionalität
The Pisichen monitor supports 10-point multi-touch input, allowing for intuitive interaction with your content. To enable touch functionality:
- Ensure the USB B Touch Cable is connected from the monitor's USB-B port to your computer's USB-A port.
- Your operating system should automatically detect the touch input device. No additional drivers are typically required for Windows.

Abbildung 4.1: Direct touch control on the monitor.
Touch Compatibility
The touch function is widely compatible with various devices. Refer to the compatibility chart below for optimal performance.

Abbildung 4.2: Touch compatibility for various devices.
Notiz: Some devices, including certain gaming consoles (PS3/4/5, Xbox, Steam Deck) and mobile devices (iPhone, iPad, Switch, Fire TV), do not support the touch functionality of this monitor due to platform-specific restrictions.
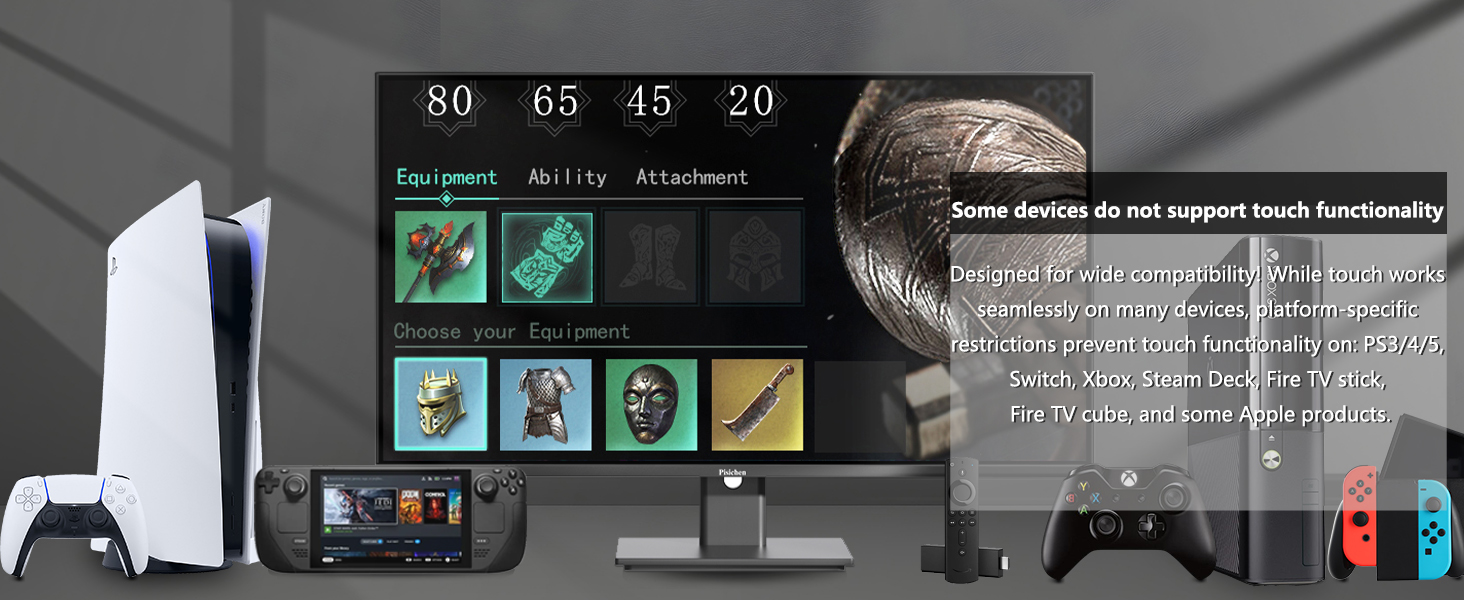
Abbildung 4.3: Devices where touch functionality is not supported.
5. Anzeigeeinstellungen
Access the OSD menu to adjust various display settings for optimal viewing.
- Auflösung: The monitor supports a native resolution of 2560x1440 (2K QHD). Ensure your device's display settings are configured to this resolution for the sharpest image.
- Aktualisierungsrate: The monitor operates at a 100Hz refresh rate, providing smoother visuals compared to standard 60Hz monitors.
- Helligkeit Kontrast: Adjust these settings to suit your environment and personal preference. The monitor features 400 cd/m² brightness and a 1500:1 contrast ratio.
- Farbeinstellungen: Fine-tune color temperature, gamma, and other color parameters. The IPS panel ensures wide viewWinkel und genaue Farbwiedergabe.
- Merkmale für Augenkomfort: The monitor includes Flicker-Free technology and Low Bluelight modes to reduce eye strain during extended use.

Abbildung 5.1: Visual comparison of 2K QHD vs. Full HD resolution.

Abbildung 5.2: IPS panel benefits: True Color, True Vision from Any Angle.

Abbildung 5.3: Advanced Eye-Comfort features.
6. Wartung
6.1. Monitor reinigen
- Vor der Reinigung den Monitor immer ausschalten und das Netzkabel abziehen.
- Mit einem weichen, fusselfreien Tuch leichtampMit Wasser oder einem milden, nicht scheuernden Bildschirmreiniger abspülen.
- Wischen Sie den Bildschirm und die Außenflächen vorsichtig ab. Vermeiden Sie übermäßigen Druck.
- Verwenden Sie keinen Alkohol, ammoniakhaltige Reiniger oder Scheuermittel, da diese die Bildschirmoberfläche beschädigen können.
6.2. Speicherung
If storing the monitor for an extended period, ensure it is powered off, unplugged, and stored in a cool, dry place away from direct sunlight and extreme temperatures. Use the original packaging if available for best protection.
7. Fehlerbehebung
Sollten Sie Probleme mit Ihrem Monitor haben, beachten Sie bitte die folgenden gängigen Schritte zur Fehlerbehebung:
- Kein Strom: Vergewissern Sie sich, dass das Netzteil fest mit dem Monitor und einer funktionierenden Steckdose verbunden ist. Prüfen Sie, ob die Betriebsanzeige am Monitor leuchtet.
- Kein Signal: Verify that the video cable (HDMI, USB-C, or DP) is securely connected to both the monitor and your source device. Ensure the correct input source is selected via the OSD menu.
- Berührungslose Funktionalität: Confirm that the USB B Touch Cable is properly connected from the monitor to your computer. Check your computer's device manager to see if the touch device is recognized.
- Flackernder Bildschirm: Check the video cable connection. Try a different cable or input port. Ensure your graphics card drivers are up to date.
- Bildverzerrung/Falsche Farben: Reset the monitor to factory settings via the OSD menu. Adjust brightness, contrast, and color settings.
Sollten die Probleme durch diese Schritte nicht behoben werden können, wenden Sie sich bitte an den Kundendienst.
8. Spezifikationen
| Besonderheit | Spezifikation |
|---|---|
| Modellnummer | QHD-2k100hz-24INTS |
| Bildschirmgröße | 24 Zoll |
| Auflösung | 2560 x 1440 Pixel (QHD Wide 1440p) |
| Seitenverhältnis | 16:9 |
| Bildwiederholrate | 100 Hz |
| Ansprechzeit | 3 ms |
| Panel-Typ | IPS |
| Tippen Sie auf Funktion | 10-Punkt-Multi-Touch |
| Bildhelligkeit | 400 Candela (cd/m²) |
| Kontrastverhältnis | 1500:1 |
| Beschreibung der Bildschirmoberfläche | Glänzend |
| Konnektivität | HDMI, USB-C, USB A, USB B (for Touch Function) |
| Anzahl USB-Anschlüsse | 2 (USB-C, USB-B) |
| Technische Daten | 1.97 x 21.26 x 12.6 Zoll |
| Artikelgewicht | 10.08 Pfund |
| Hersteller | Shenzhen Konowa Electronics Co., LTD |
9. Garantie und Support
For warranty information, please refer to the warranty card included in your product packaging or visit the official Pisichen website. If you require technical assistance, troubleshooting, or have questions about your product, please contact Pisichen customer support through their official channels.
Bitte bewahren Sie Ihren Kaufbeleg für Garantieansprüche auf.


