1. Einleitung
This manual provides comprehensive instructions for the safe and effective use of your Cangaroo Babypone Callisto Baby Monitor. This modern baby monitor offers clear image and sound transmission, convenient two-way communication, soothing lullabies, night vision capabilities, and a room temperature sensor. The camera can be remotely controlled from the parent unit, allowing for upward, downward, left, and right adjustments. The system provides reliable monitoring, flexible camera control, and clear picture and sound quality, day and night.
2. Packungsinhalt
Bitte überprüfen Sie den Packungsinhalt sorgfältig. Sollten Artikel fehlen oder beschädigt sein, wenden Sie sich bitte an Ihren Händler.
- Parent Unit with 2.8-inch LCD display
- Babyeinheit (Kamera)
- Netzteil für die Elterneinheit
- Netzteil für Babyeinheit
- USB Power Cables (2x)
- Wandmontage-Set (Schrauben und Dübel)
- Benutzerhandbuch (dieses Dokument)

Bild 2.1: Included accessories: two USB power cables, two power adapters, and a wall mounting kit.
3. Produktüberschreitungview
Familiarize yourself with the components and controls of your Cangaroo Babypone Callisto Baby Monitor.
3.1 Elterneinheit

Bild 3.1: Nahaufnahme view of the Parent Unit's 2.8-inch LCD screen and control buttons.
- 2.8-Zoll-LCD-Display: Shows live video feed from the baby unit.
- Netzschalter: Turns the parent unit on/off.
- OK-Taste: Bestätigt die Auswahl.
- Navigationsschaltflächen (Hoch, Runter, Links, Rechts): Navigate menus, control camera pan/tilt.
- Menü-Schaltfläche: Greift auf Einstellungen und Funktionen zu.
- Wiegenlied-Taste: Activates/deactivates lullabies.
- Mikrofon: Für die bidirektionale Audiokommunikation.
- Lautsprecher: For audio output from the baby unit and lullabies.
- Ladeanschluss: Zum Anschluss des Netzteils.
3.2 Babyeinheit (Kamera)

Bild 3.2: Front view of the Baby Unit (camera) with its lens and sensors.
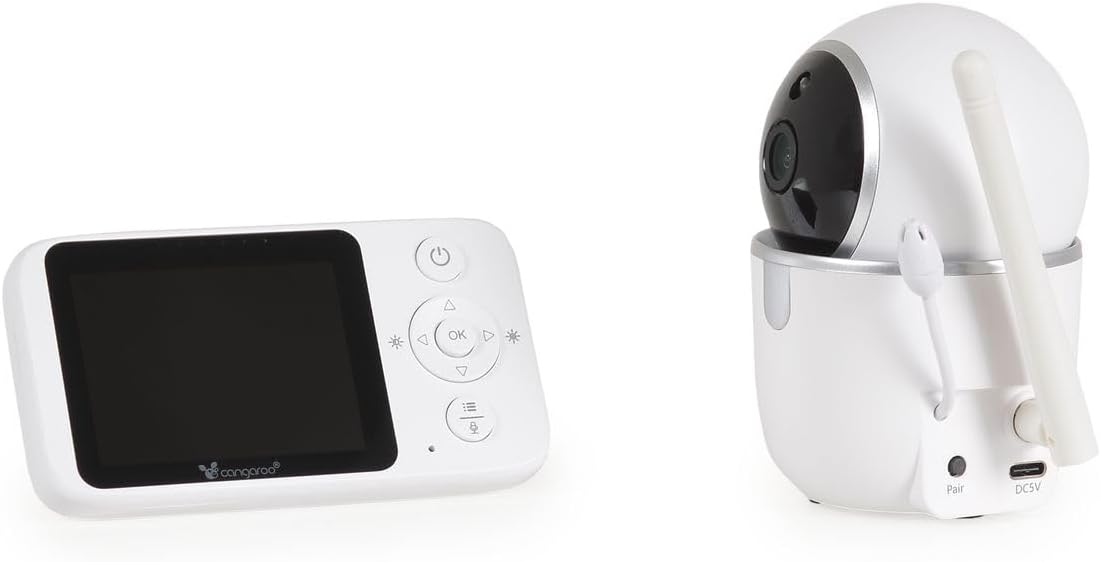
Bild 3.3: Hinteren view of the Baby Unit, showing the 'Pair' button and DC5V power input.
- Kameraobjektiv: Erfasst Videostream.
- Infrarot-LEDs: Für die Nachtsichtfunktion.
- Mikrofon: Nimmt Geräusche aus dem Babyzimmer auf.
- Lautsprecher: Für Zwei-Wege-Audio und Wiedergabe von Schlafliedern.
- Temperatursensor: Überwacht die Raumtemperatur.
- Pair-Taste: Used to pair the baby unit with the parent unit.
- DC5V-Stromeingang: Zum Anschluss des Netzteils.
- Antenne: Zur drahtlosen Signalübertragung.
4. Einrichtung
4.1 Powering On the Units
- Connect the power adapter to the Baby Unit's DC5V input and plug it into a power outlet. The baby unit will power on automatically.
- Connect the power adapter to the Parent Unit's charging port and plug it into a power outlet. Press and hold the Power Button on the Parent Unit to turn it on.
- Allow both units a few moments to establish a connection. The parent unit display will show the live video feed once connected.
4.2 Positionierung der Babyeinheit (Kamera)
Stellen Sie die Babyeinheit an einen Ort, der eine klare Sicht bietet. view of your baby's crib or sleeping area. Ensure it is at least 1 meter (3 feet) away from the baby to prevent any potential cord hazards. The camera can be placed on a flat surface or mounted to a wall using the included wall mounting kit.
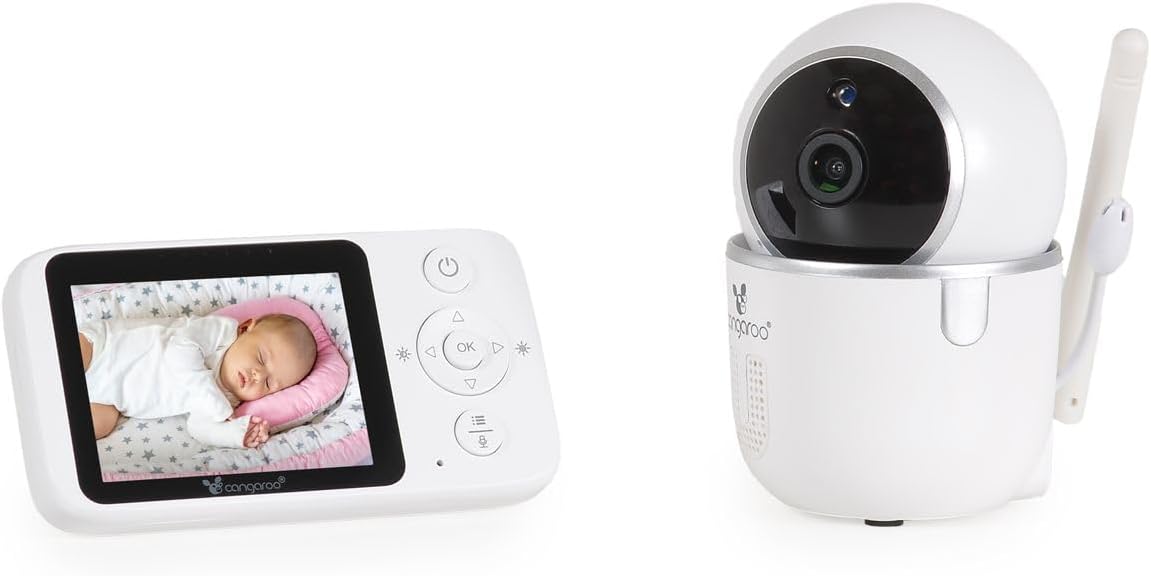
Bild 4.1: The Parent Unit displaying a baby, alongside the Baby Unit (camera).
- Optimale Platzierung: Positionieren Sie die Kamera so, dass der gesamte Bereich des Kinderbetts erfasst wird.
- Kabelsicherheit: Keep all cords out of reach of children.
- Signalbereich: The monitor has a radio range of up to 250m outdoors and up to 50m indoors. Obstacles like walls and furniture can reduce this range.
4.3 Paarung (falls erforderlich)
The units are typically pre-paired. If they do not connect automatically, follow these steps:
- Ensure both the Parent Unit and Baby Unit are powered on.
- On the Parent Unit, press the Menu button to access the menu.
- Navigate to the "Pairing" option using the navigation buttons and press OK.
- Within 10 seconds, press the "Pair" button located on the back of the Baby Unit.
- The Parent Unit will display a confirmation message once pairing is successful.
5. Bedienungsanleitung
5.1 Grundlegende Überwachung
- Once powered on and paired, the Parent Unit will automatically display the live video feed and audio from the Baby Unit.
- The screen will show the current room temperature detected by the Baby Unit's sensor.
- Nachtsicht: The Baby Unit automatically activates infrared night vision in low-light conditions, providing clear images up to 5 meters.
5.2 Zwei-Wege-Audiokommunikation
To speak to your baby through the Baby Unit's speaker:
- Press and hold the Talk button (often represented by a microphone icon) on the Parent Unit.
- Sprechen Sie deutlich in das Mikrofon der Elterneinheit.
- Release the Talk button to hear your baby again.
5.3 Remote Camera Control (Pan/Tilt)
Sie können die Kamera ferngesteuert einstellen. viewing angle from the Parent Unit:
- Use the Up/Down/Left/Right navigation buttons on the Parent Unit to pan (left/right) and tilt (up/down) the Baby Unit's camera. The camera supports 360° rotation.
5.4 Schlaflieder
So spielen Sie Ihrem Baby Schlaflieder vor:
- Press the Lullaby button on the Parent Unit.
- Use the navigation buttons to select one of the 5 built-in lullabies.
- Press OK to start playback. Press the Lullaby button again to stop.
5.5 Alarm Function and Settings
The monitor includes an alarm function and adjustable settings:
- Lautstärkeregelung: Use the Parent Unit's menu to adjust the alarm volume.
- Helligkeitsanpassung: Adjust the display brightness via the Parent Unit's menu.
- Energiesparmodus: Activate this mode in the menu to conserve battery life. The screen may turn off after a period of inactivity, but audio monitoring continues. The screen will reactivate upon detecting sound or pressing a button.
6. Wartung
- Reinigung: Wipe the units with a dry, soft cloth. Do not use abrasive cleaners or solvents.
- Batteriepflege (Elterneinheit): The Parent Unit has a built-in rechargeable ion battery. For optimal battery life, avoid fully discharging the battery frequently. Recharge when the low battery indicator appears.
- Lagerung: Wenn Sie das Gerät über einen längeren Zeitraum lagern, stellen Sie sicher, dass der Akku teilweise geladen ist und lagern Sie es an einem kühlen, trockenen Ort.
- Umgebungsbedingungen: Avoid exposing the units to extreme temperatures, direct sunlight, dust, or moisture.
7. Fehlerbehebung
| Problem | Mögliche Ursache | Lösung |
|---|---|---|
| Kein Bild/Ton auf der Elterneinheit. | Die Geräte sind nicht eingeschaltet oder nicht gekoppelt. Außerhalb der Reichweite. | Ensure both units are plugged in and powered on. Re-pair the units if necessary (see Section 4.3). Move Parent Unit closer to Baby Unit. |
| Poor picture/sound quality. | Interference from other devices. Units are too far apart or obstacles are blocking the signal. | Move the units away from other electronic devices (e.g., Wi-Fi routers, microwaves). Reduce the distance between units. |
| Der Akku der Elterneinheit entlädt sich schnell. | Energy Saving Mode is off. Frequent use of features. | Activate Energy Saving Mode in the menu. Reduce screen brightness. Ensure the battery is fully charged before use. |
| Camera not responding to remote control. | Geräte außerhalb der Reichweite oder Verbindungsproblem. | Move Parent Unit closer to Baby Unit. Check connection status. |
| Die Temperaturanzeige scheint ungenau zu sein. | Baby Unit placed near a heat source or draft. | Relocate the Baby Unit to a more central location in the room, away from windows, vents, or direct sunlight. |
8. Spezifikationen
- Modell: Cangaroo Babypone Callisto (Model Number: 112301)
- Parent Unit Display: 2.8-Zoll-LCD
- Drahtlose Technologie: Digital 2.4 GHz FHSS
- Indoor-Reichweite: Bis zu 50 Meter (ca. 164 Fuß)
- Outdoor-Bereich: Bis zu 250 Meter (ca. 820 Fuß)
- Nachtsicht: Infrared, up to 5 meters
- Kamerafunktionen: Pan/Tilt (360° rotation), Two-Way Audio, Temperature Sensor, Lullabies (5 built-in)
- Stromversorgung: DC 5V (via included adapters)
- Batterie der Elterneinheit: Eingebauter wiederaufladbarer Lithium-Ionen-Akku
- Material: Plastik
- Abmessungen der Elterneinheit: L 11 x W 3 x H 6 cm
- Abmessungen der Babyeinheit: L 6 x W 8 x H 10.5 cm
- Artikelgewicht: 400 g (total product)
9. Garantie und Support
Informationen zu Garantie und Kundendienst finden Sie in der mit Ihrem Kauf gelieferten Dokumentation oder wenden Sie sich an Ihren Händler. Bewahren Sie Ihren Kaufbeleg für eventuelle Garantieansprüche auf.


