1. Einleitung
This manual provides essential information for the safe and efficient operation of your LiTime 12V 40A DC to DC Charger. This smart charger is designed to efficiently charge 12V LiFePO4, AGM, Gel, SLA, and Calcium batteries from a vehicle's alternator or other DC power sources. Please read this manual thoroughly before installation and use.
2. Sicherheitshinweise
- Warnung: This 12V 40A DC to DC battery charger is not waterproof and is not suitable for marine environments such as boats, ships, yachts, or trolling motors.
- Ensure all terminals are tight to prevent overheating or melting.
- Check polarity: Red is Positive (+), Black is Negative (-).
- Place the charger in a stable, well-ventilated area when in use.
- Öffnen, zerlegen oder modifizieren Sie das Ladegerät nicht.
- Never use in a thunderstorm.
- Keep the charger and battery away from water, heat sources, sparks, flames, flammable gases, and hazardous chemicals.
- Do not place rods or other metal objects in vents or other openings.
- Do not puncture, drop, crush, burn, penetrate, shake, strike, or throw it with force.
3. Produktmerkmale
- Kompatibilität: Works seamlessly with 12V LiFePO4, AGM, Gel, SLA, and Calcium batteries. Supports 40A high-current charging for large battery packs, with a low current port to limit output to 20A.
- Smart Multi-Stage Aufladen: Automatically adjusts charging profiles based on battery type: 2-stage (CC, CV) for LiFePO4 and 3-stage (Bulk, Absorption, Float) for lead-acid batteries.
- 40A Output for Faster Charging: Quickly restores battery levels. Can charge service batteries or directly power DC loads, ideal for RV, Camper, Trailers, Home Backup, and Off-Grid Power Systems.
- Multi-Schutz: Funktionen über Lautstärketage, geringe Lautstärketage, short-circuit, reverse polarity, and over-temperature protection. Helps extend battery lifespan and ensures safe operation. Can reactivate lithium batteries after BMS shutdown.
- Compact & Rugged: Space-saving design fits tight installations. FCC, CE, and RoHS certifications ensure safe and eco-friendly operation.
4. Packungsinhalt
The LiTime 12V 40A DC to DC Battery Charger package includes the following items:
- 1x LiTime 12V 40A DC-DC Battery Charger
- 8x Befestigungsschrauben
- 2x Signal Cables

Image: The package contents laid out, showing the main charger unit, mounting screws, and signal cables.
5. Produktüberschreitungview und Komponenten
Familiarize yourself with the charger's various components and indicators.
Charger Display and Terminals
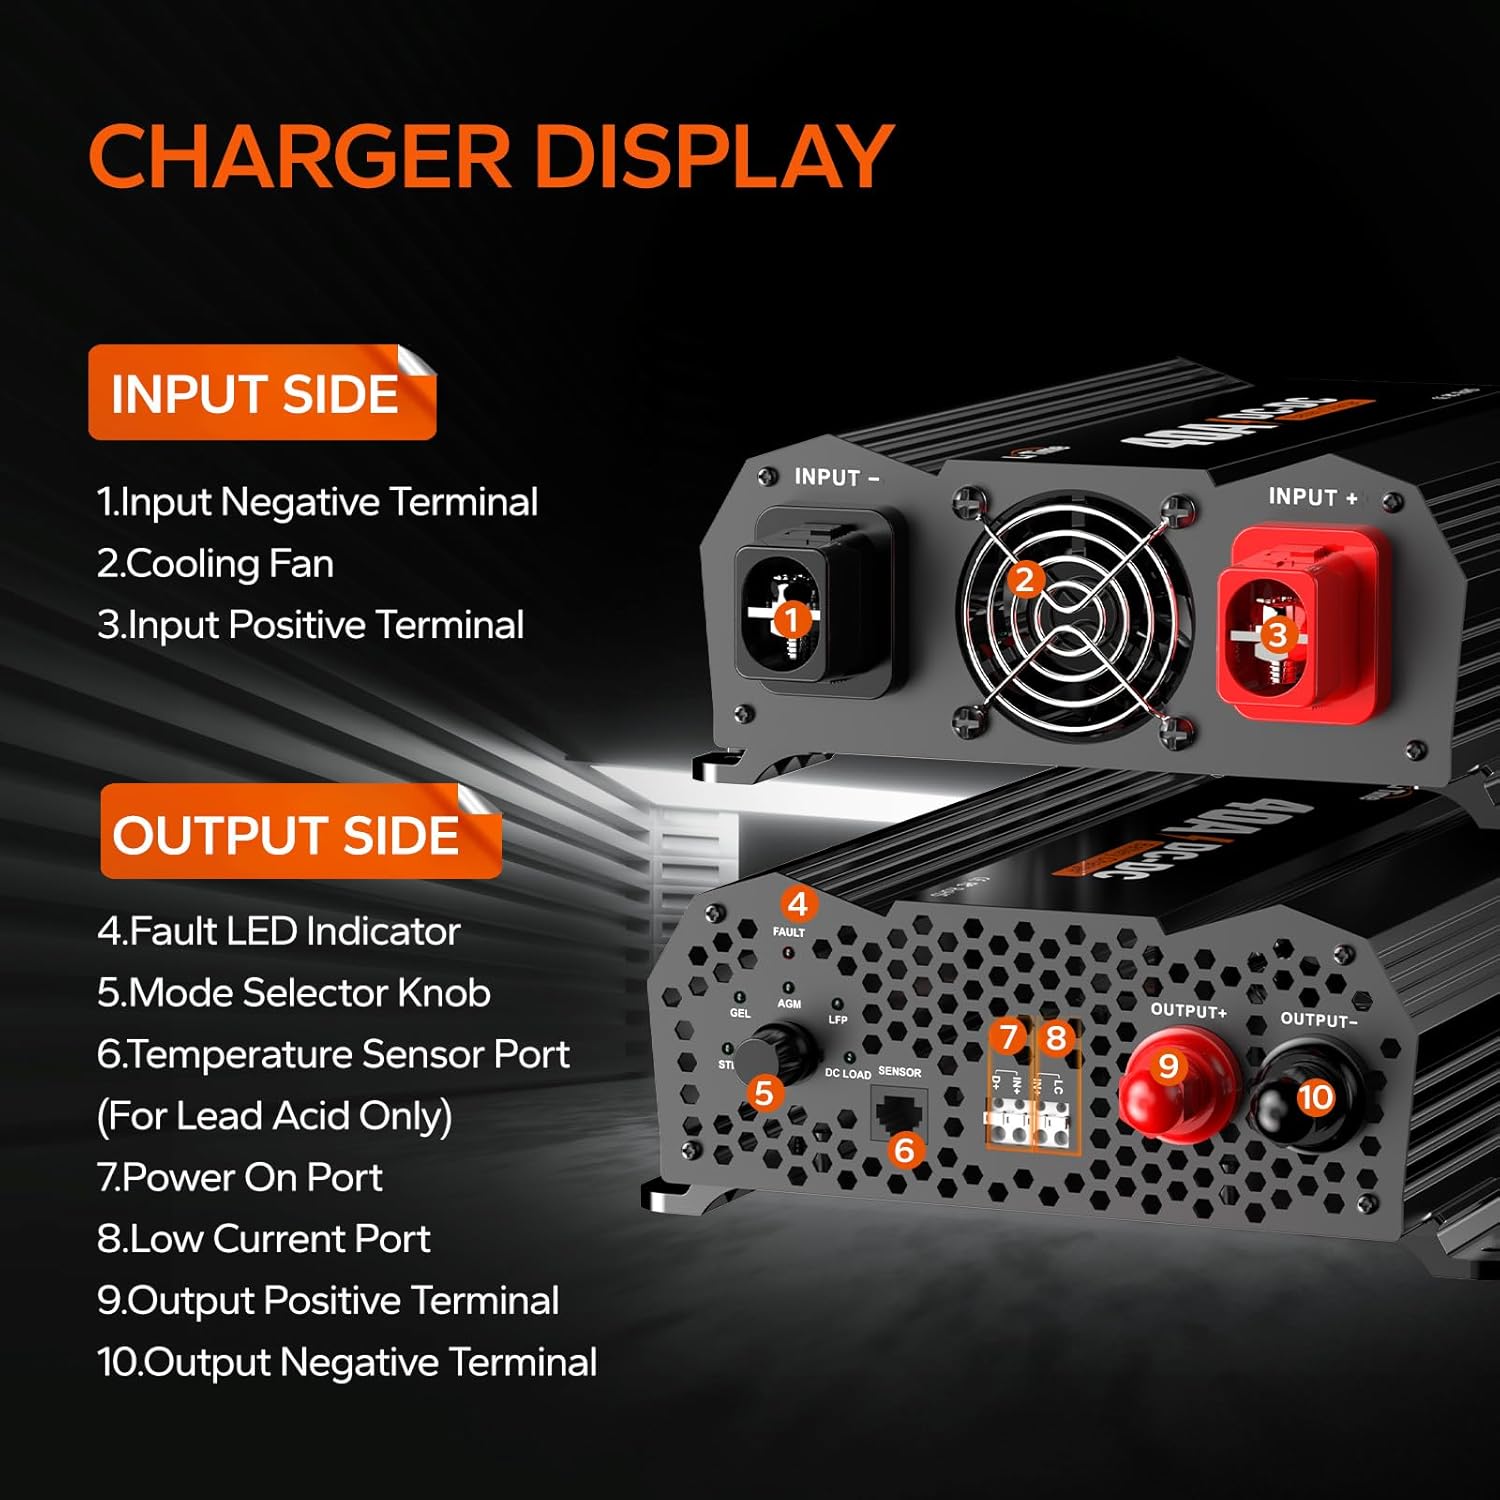
Bild: Detailliert view of the charger's input and output sides, labeling each component.
- Eingangsseite: Input Negative Terminal, Cooling Fan, Input Positive Terminal.
- Ausgangsseite: Fault LED Indicator, Mode Selector Knob (STD, GEL, AGM, LFP), Temperature Sensor Port (for Lead Acid only), Power On Port, Low Current Port, Output Positive Terminal, Output Negative Terminal.
Security Protection Features

Image: Icons representing various protection features: Over Voltage Schutz, niedrige Lautstärketage Protection, High Temperature Protection, Short Circuit Protection, and Reverse Polarity Protection.
6. Installation und Verkabelung
Proper installation and wiring are crucial for the safe and effective operation of your charger.
Montageoptionen

Image: Diagram showing the dimensions of the charger and recommended horizontal mounting, with vertical mounting also possible.
The charger can be placed or mounted horizontally or vertically. Ensure adequate ventilation around the unit.
Referenzschaltplan

Image: A detailed wiring diagram illustrating connections between the starter battery, DC-DC charger, and house battery/DC load, including optional fuses/breakers.
Connect the suitable house battery under STD/GEL/AGM/LFP mode to charge the battery. Alternatively, connect the DC Load under LFP Load mode.
Recommended Cable Sizing & Fusing
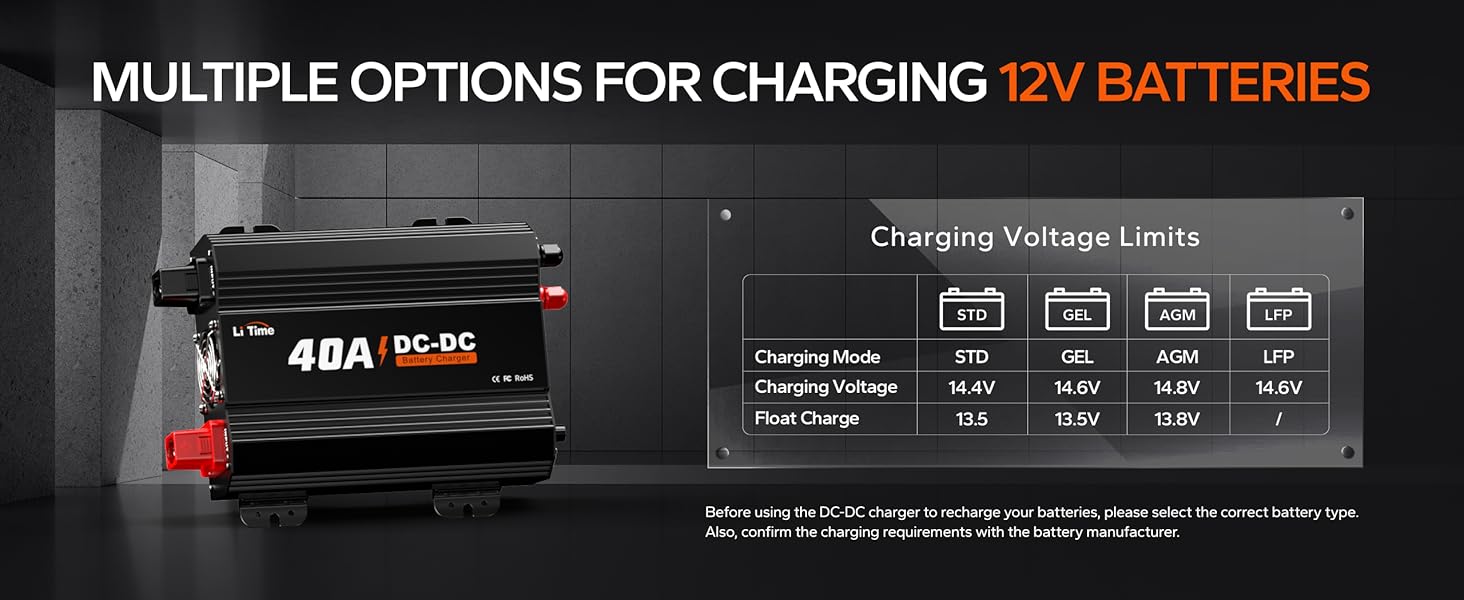
Image: A table detailing recommended cable gauges based on length and fuse ratings for both input (starter battery) and output (house battery or DC load).
Always use appropriately sized cables and fuses to ensure safety and optimal performance. Refer to the table above for guidance.
Installationsvideos
Video: This video from Victron Energy provides a general overview of DC to DC chargers and their applications in vehicles and boats. It highlights features like accurate three-step charging and protection against overload.
Video: This video from RenogyRego demonstrates the wiring process for a 12V 20A/40A DC-DC Battery Charger, including LiFePO4 activation. It provides visual guidance on connecting the charger to batteries.
Video: This video from POWO Carlife provides instructions on how to use a DC-DC charger, covering basic connection and operation steps.
7. Bedienungsanleitung
The LiTime DC to DC charger offers versatile charging and power supply options.
DC Load Mode
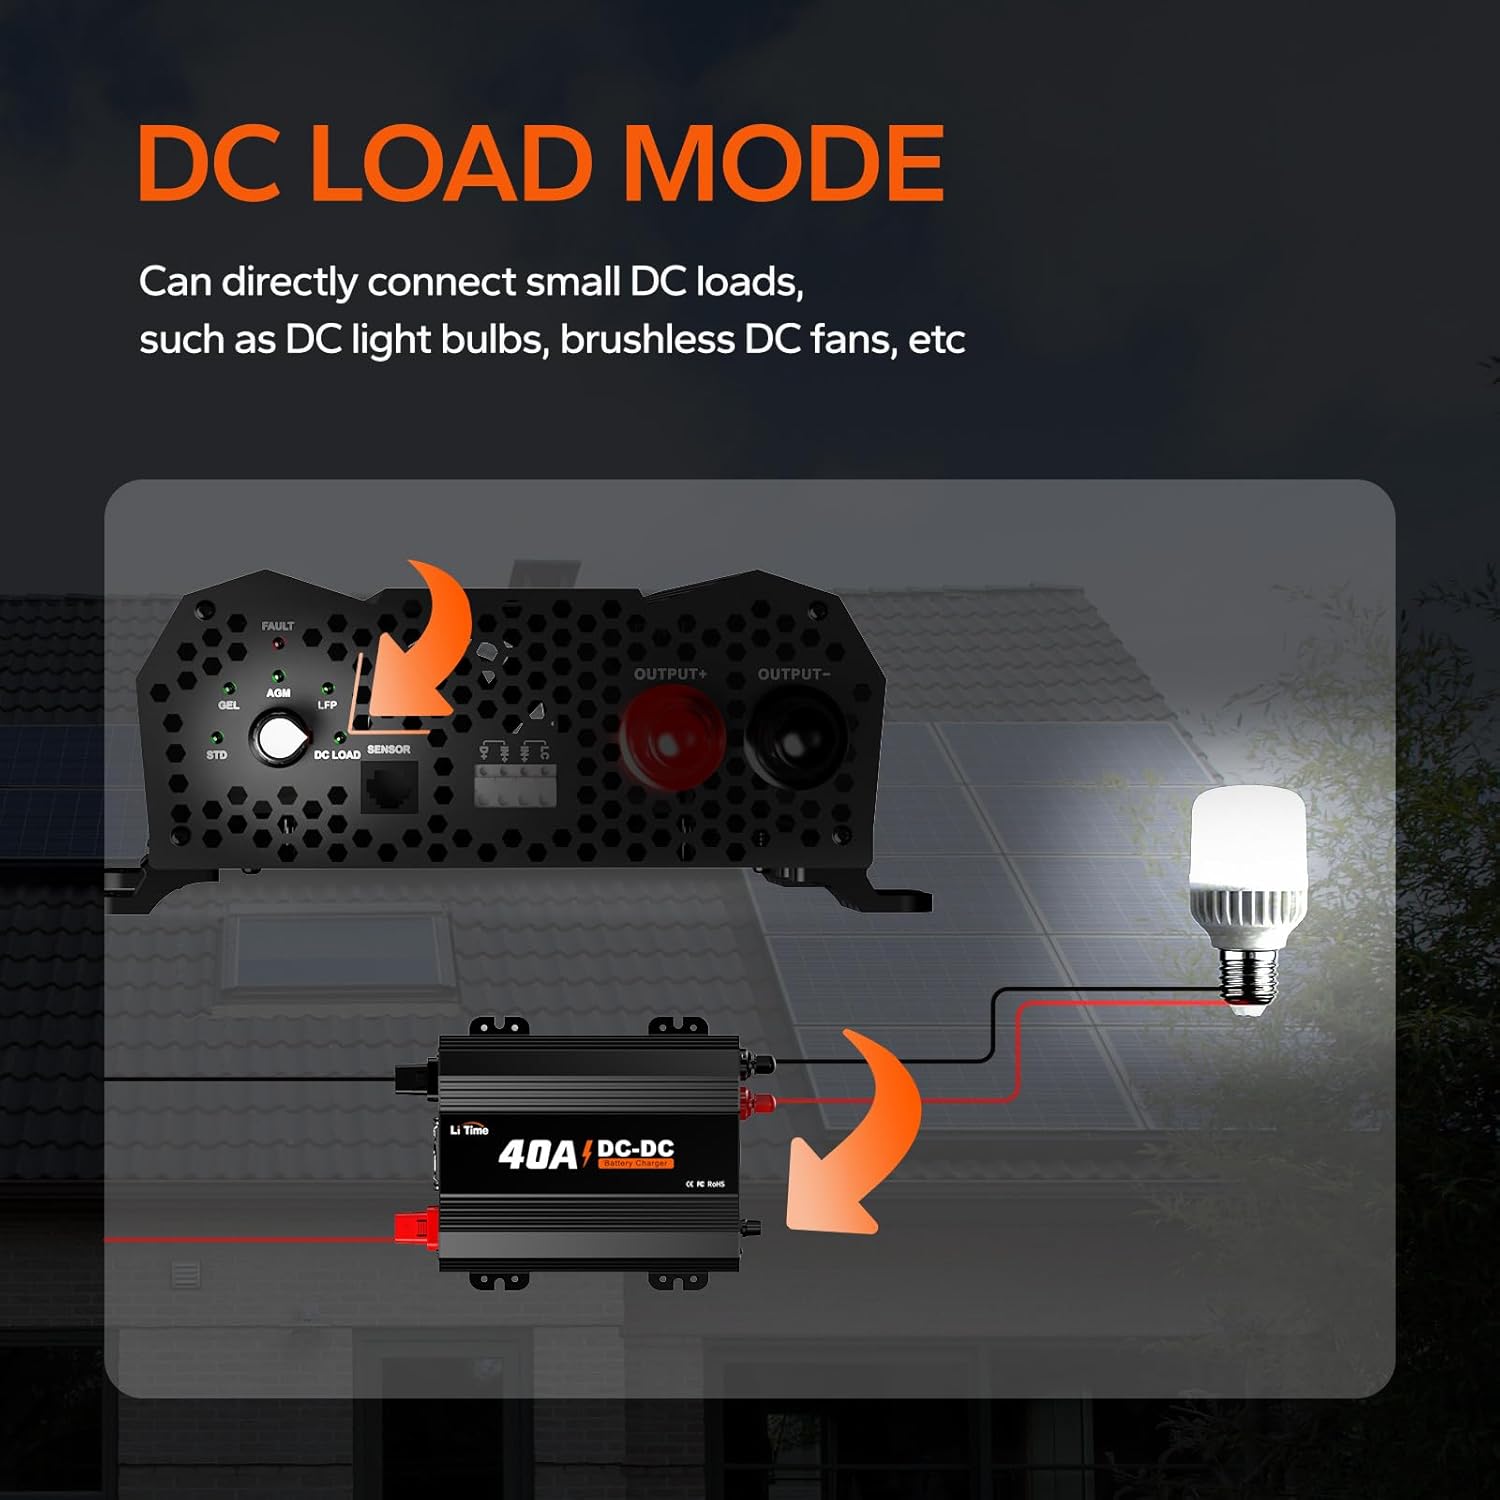
Image: Diagram illustrating how the DC-DC charger can directly connect to small DC loads like light bulbs or fans.
The charger can directly connect small DC loads, such as DC light bulbs or brushless DC fans, providing stable power.
Multiple Options for Charging 12V Batteries
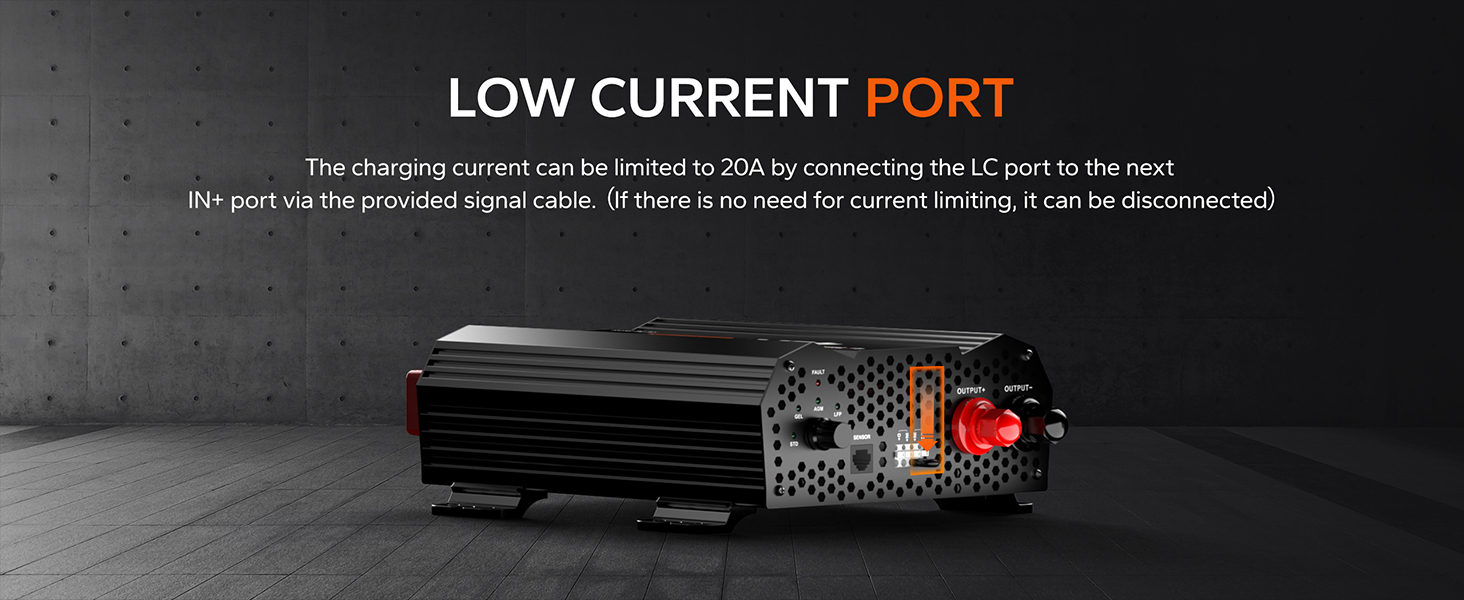
Image: A table showing charging voltage and float charge values for STD, GEL, AGM, and LFP battery types.
Before using the DC-DC charger to recharge your batteries, please select the correct battery type using the mode selector knob. Also, confirm the charging requirements with the battery manufacturer.
Low Current Port

Image: A diagram highlighting the low current port on the charger.
The charging current can be limited to 20A by connecting the LC port to the next IN+ port via the provided signal cable. If there is no need for current limiting, it can be disconnected.
8. Lademodi
The charger utilizes a multi-stagE-Ladevorgang zur Optimierung von Batterielebensdauer und -leistung.

Image: A graph illustrating the voltage and current curves during the three charging stages (Pre-Charge, Constant Current, Constant Voltage) over time.
- Vorladung Stage (T1): Wenn die Batterieladungtage is lower than its normal standard and cannot withstand high-current charging, the charger will charge it at a limited current. This charging mode will be able to activate and repair the battery and extend the battery's lifetime. When the output voltage den Normalwert erreicht, schaltet das Ladegerät automatisch auf den nächsten s umtage.
- Konstantstromladung Stage (T2): When the battery is in the main charging time, the charger will charge the battery with a 40A current. When the battery voltage steigt über den eingestellten Wert, das Ladegerät schaltet automatisch auf die nächste stage.
- Konstante Lautstärketage Aufladen Stage (T3): Das Ladegerät wechselt in den Modus „Konstantspannung“tage Aufladen Stage und der Ladestrom nimmt allmählich ab. Wenn die Ladespannungtage oder Strom erreicht den eingestellten Wert, schaltet das Ladegerät automatisch die Ausgangsspannungtage und der Ladevorgang der Batterie ist abgeschlossen.
Video: This video from Li Time US explains the internal workings of a LiFePO4 charger, detailing the charging process from 0% to 100% battery capacity.
9. Spezifikationen
| Spezifikation | Wert |
|---|---|
| Eingangslautstärketage | 100V to 120V AC, 47Hz to 63Hz |
| Ausgangsvolumentage | 14.6 V Gleichstrom |
| Ausgangsstrom | 40 A |
| Betriebstemperaturbereich | -20 °C bis 40 °C / -4 °F bis 104 °F |
| Lagertemperaturbereich | -40 °C bis 70 °C / -40 °F bis 158 °F |
| Technische Daten | 11.65 x 8.46 x 3.35 inches (L330 x W151 x H90.5 mm) |
| Artikelgewicht | 4.85 pounds (3.5kg / 7.72lbs) |
| Zertifizierungen | CE, FCC, RoHS |
10. Maintenance & Use Precautions
To ensure the longevity and safe operation of your charger, follow these guidelines:

Image: A diagram illustrating various precautions, including checking battery voltage, ensuring tight terminals, checking polarity, matching charger voltage, placing in a ventilated area, and not disassembling the unit.
- Überprüfen Sie vor dem Laden sorgfältig die Batteriespezifikationen, um sicherzustellen, dass die LiFePO4-Batterie mit den technischen Daten des Ladegeräts übereinstimmt.
- Make sure the charger is properly connected to the battery. To avoid a short circuit.
- Ziehen Sie das Eingangs-/Ausgangskabel des Ladegeräts sofort ab, wenn sich beim Laden ein ungewöhnliches Verhalten oder eine Beschädigung des Ladegeräts oder der Batterie zeigt.
- Do not use other input cables or extend the output connection cable personally, or please contact LiTime customer service for advice.
- Öffnen, zerlegen oder modifizieren Sie das Ladegerät nicht.
- Verwenden Sie es niemals bei Gewitter.
- Bitte halten Sie das Ladegerät und den Akku von Wasser, Wärmequellen, Funken, Flammen, brennbaren Gasen und gefährlichen Chemikalien fern.
- Place the charger in a well-ventilated area with sufficient heat dissipation to prevent overheating and damage.
- Do not puncture, drop, crush, burn, penetrate, shake, strike, or throw it with force.
11. Fehlerbehebung
If the charger does not work properly, the following methods can help you solve the general problem quickly. If you still cannot rule out the possibility of failure, please contact service@litime.com.

Image: A table outlining common problems, possible causes, and solutions for the charger.
- Problem: Charging indicator flashes red when charging. Mögliche Ursache: Under Over Temperature Protection. Lösung: Cool down the charger to normal temperature.
- Problem: Charging indicator flashes red after connected. Mögliche Ursache: Under Reverse Polarity Connection/Output Short Circuit Protection. Lösung: Connect the charger to the battery correctly.
- Problem: Charging indicator flashes red after connected. Mögliche Ursache: Unterleistung Überlautstärketage-Schutz. Lösung: Make sure the connected battery is a 12.8V LiFePO4 battery.
- Problem: Das Ladegerät lädt nicht und die LED ist aus, nachdem es an die Netzstromversorgung angeschlossen wurde. Mögliche Ursache: Schlechte Verbindung. Lösung: Stellen Sie sicher, dass alle Verbindungen korrekt und fest sind.
- Problem: Das Ladegerät lädt nicht und die LED ist aus, nachdem es an die Netzstromversorgung angeschlossen wurde. Mögliche Ursache: Charger Internal Damage. Lösung: Kontaktieren Sie uns unter service@litime.com for further solutions.
Video: This video from Li Time US provides guidance on what to do if your battery is not working, offering troubleshooting steps and solutions.
12. Garantie und Support
LiTime is committed to providing high-quality products and customer satisfaction. For any questions or assistance, please contact us.
- 24-Hour Prompt Response: Dedicated customer service team available.
- Up to 5-Year Service: Extended warranty options available for product protection.
- Local Warehouses in the US: For efficient service and delivery.
- Kontakt: For technical support or general inquiries, please email service@litime.com.


