1. Einleitung
This manual provides detailed instructions for the installation, operation, and maintenance of your Antec GSK750 V2 ATX3.1 750W Full Modular Power Supply. This power supply unit (PSU) is designed to deliver stable and efficient power to your computer system, featuring ATX3.1 and PCIe 5.1 compatibility, 80 PLUS Gold certification, and a full modular cable design for optimized cable management.

Image: The Antec GSK750 V2 750W Full Modular Power Supply, showcasing its compact design and modular connectors.
2. Sicherheitshinweise
Please read and follow all safety instructions carefully before installing or operating the power supply. Failure to do so may result in personal injury or damage to your equipment.
- Vor der Installation oder Wartung muss sichergestellt werden, dass die Stromversorgung von der Wechselstromsteckdose getrennt ist.
- Öffnen Sie nicht das Netzteil casing. Hohes VolumentagEs befinden sich im Inneren Teile, und es gibt keine vom Benutzer wartbaren Teile.
- Installieren Sie das Netzteil in einem gut belüfteten Bereich, fern von Wärmequellen, direkter Sonneneinstrahlung und Feuchtigkeit.
- Use only the modular cables provided with this power supply. Using incompatible cables may damage the PSU or connected components.
- Stellen Sie sicher, dass alle Kabel fest angeschlossen sind, bevor Sie das System einschalten.
3. Packungsinhalt
Überprüfen Sie, ob alle Artikel im Paket vorhanden sind:
- Antec GSK750 V2 ATX3.1 750W Full Modular Power Supply Unit
- Modulares Kabelset (einschließlich 12V-2x6 PCIe 5.1-Kabel)
- Netzkabel
- Befestigungsschrauben
- Benutzerhandbuch (dieses Dokument)
4. Einrichtung und Installation
Follow these steps to install your Antec GSK750 V2 power supply:
4.1 Physische Installation
- Stellen Sie sicher, dass Ihr Computer ausgeschaltet und vom Stromnetz getrennt ist.
- Öffnen Sie das Gehäuse Ihres Computers.
- Mount the Antec GSK750 V2 PSU into the designated power supply bay in your PC case using the provided mounting screws. Ensure the fan is oriented correctly for optimal airflow (typically facing down if there's a bottom vent, or up if not).

Image: The compact size of the Antec GSK750 V2 power supply, illustrating its smaller dimensions compared to larger PSUs, allowing for easier installation in various PC cases.
4.2 Kabelverbindungen
The GSK750 V2 is a full modular PSU, meaning you only connect the cables you need, which helps improve airflow and cable management within your case.
- Connect the necessary modular cables to the power supply unit. Refer to the labels on the PSU and the cables to ensure correct connections.
- Schließen Sie das 24-polige ATX-Kabel an Ihr Motherboard an.
- Connect the 8-pin (4+4) EPS/CPU cables to your motherboard's CPU power connectors.
- For graphics cards, use the appropriate PCIe cables. The GSK750 V2 supports PCIe 5.1 with a dedicated 12V-2x6 (450W) cable for modern GPUs. Connect these securely to your graphics card(s).
- Schließen Sie SATA-Stromkabel an Ihre Speicherlaufwerke (SSDs, HDDs) und andere SATA-betriebene Geräte an.
- Connect Molex cables for any peripherals that require them.
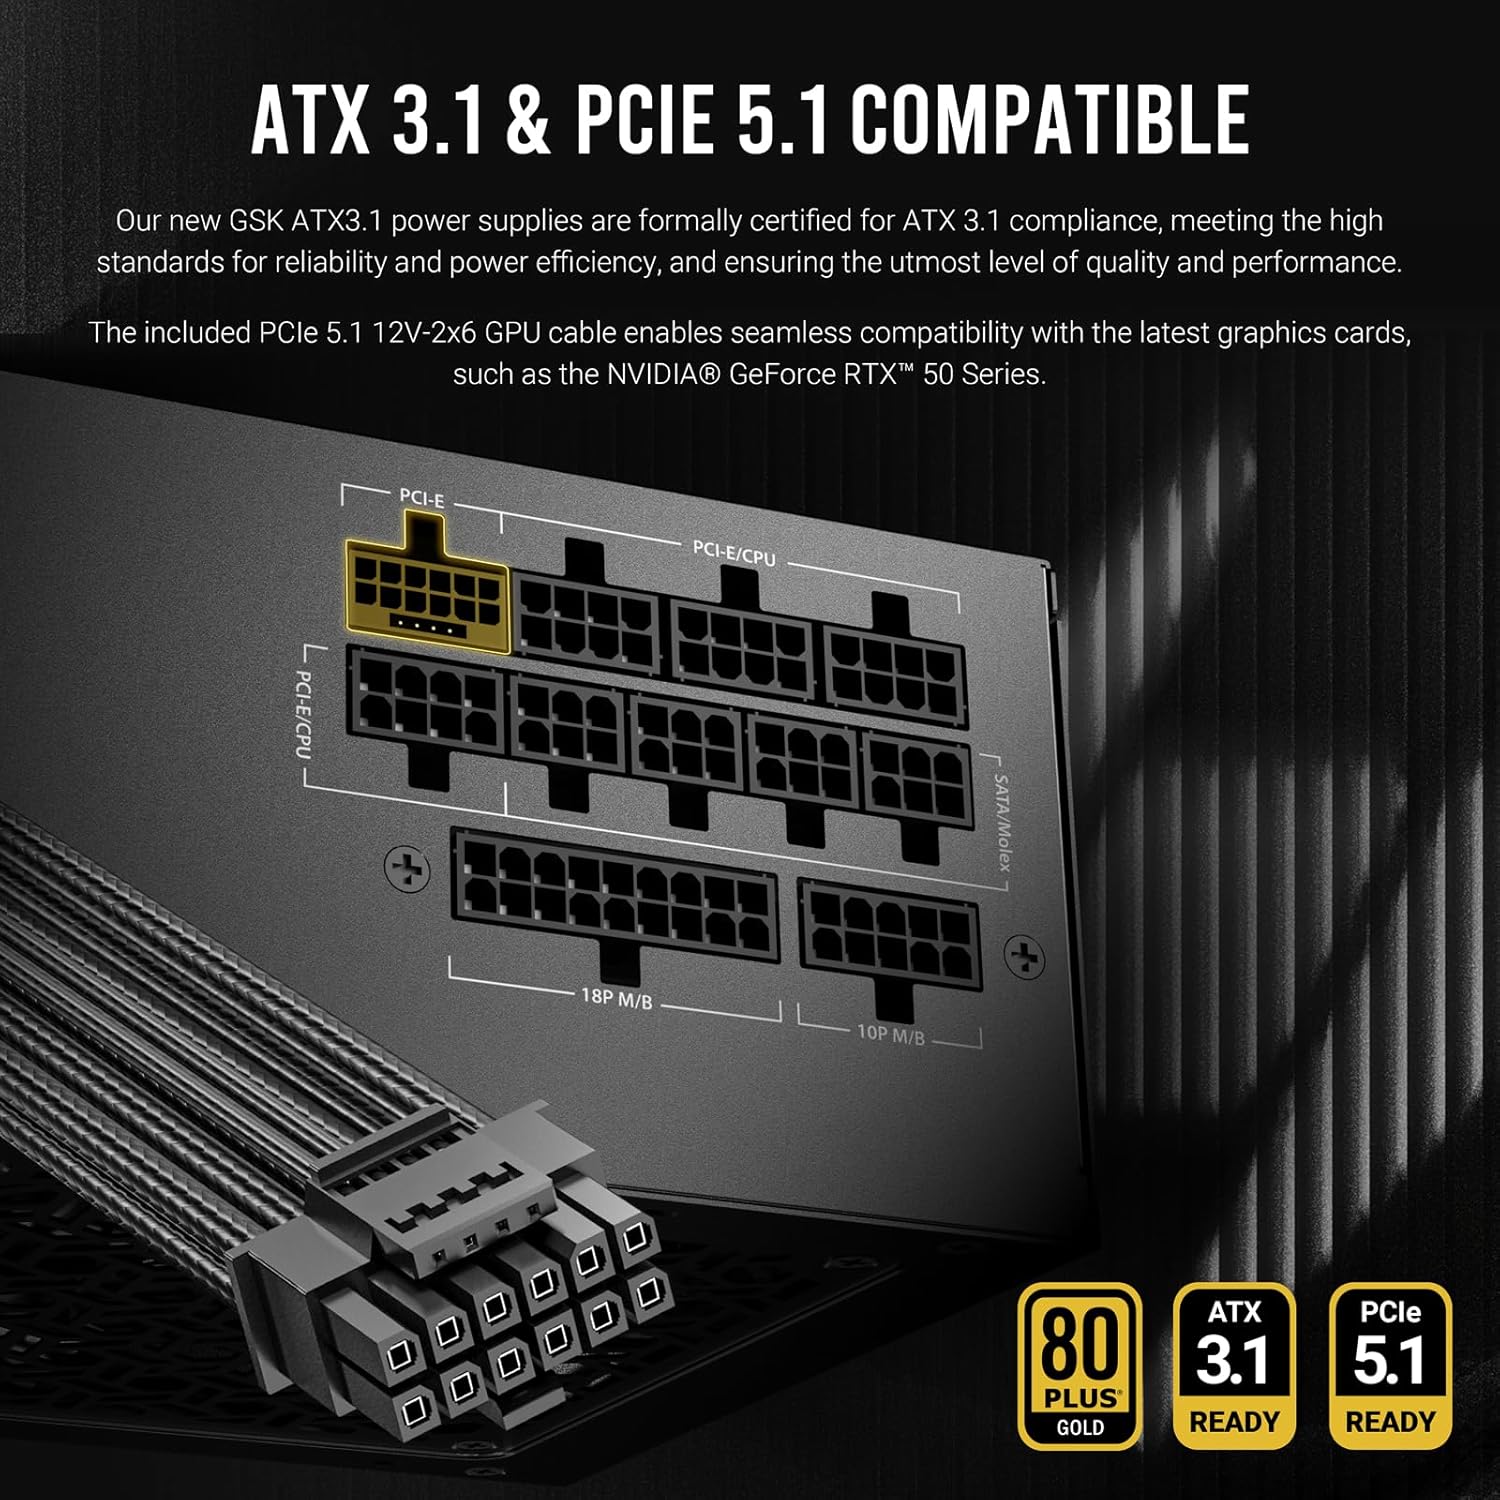
Bild: Eine detaillierte view of the Antec GSK750 V2's modular cable ports, highlighting the ATX3.1 and PCIe 5.1 compatibility and the various connection types available for system components.

Image: Illustration of the full modular cable design, demonstrating how only necessary cables are connected to the PSU, reducing clutter and improving airflow within the PC case.
4.3 Erstes Einschalten
- Sobald alle internen Verbindungen hergestellt sind, schließen Sie das Computergehäuse.
- Schließen Sie das Netzkabel an das Netzteil und anschließend an eine Wandsteckdose an.
- Schalten Sie den Netzschalter auf der Rückseite des Netzteils in die Position „EIN“.
- Schalten Sie Ihren Computer ein.
5. Bedienungsanleitung
The Antec GSK750 V2 PSU is designed for reliable and efficient operation with minimal user intervention.
5.1 Zero RPM Manager
This power supply features a Zero RPM Manager mode. In this mode, the 120mm silent fan remains off under low to moderate loads to provide silent operation. The fan will automatically activate when the power load increases, ensuring optimal cooling while minimizing noise levels.

Image: Diagram illustrating the Zero RPM Manager's fan speed curve relative to power load, alongside a visual of the 120mm silent fan designed for quiet and efficient cooling.
5.2 PhaseWave Design
The PSU incorporates Antec's PhaseWave Design, which utilizes an LLC + DC-DC topology for server-class power delivery. This design ensures high efficiency, stable voltage regulation, and reliable performance for your system.

Image: Explanation of PhaseWave Design for power delivery efficiency and CircuitShield, a suite of industrial-grade protections including OCP, OVP, UVP, SCP, OPP, OTP, SIP, and NLO.
6. Wartung
To ensure the longevity and optimal performance of your Antec GSK750 V2 power supply, follow these simple maintenance guidelines:
- Lüftungsschlitze freihalten: Stellen Sie sicher, dass die Lufteinlass- und -auslassöffnungen des Netzteils nicht durch Staub oder andere Gegenstände verstopft sind. Eine ausreichende Luftzirkulation ist für die Kühlung unerlässlich.
- Regelmäßige Reinigung: Periodically clean the exterior of the power supply and its fan grille using compressed air to remove dust buildup. Always disconnect the PSU from the AC power before cleaning.
- Kabelmanagement: Maintain tidy cable management within your PC case to prevent cables from obstructing airflow to the PSU and other components.
7. Fehlerbehebung
If you encounter issues with your Antec GSK750 V2 power supply, refer to the following common problems and solutions:
7.1 Keine Stromversorgung des Systems
- Check AC Power: Ensure the AC power cord is securely connected to both the PSU and the wall outlet. Verify the wall outlet is functional.
- Netzteilschalter: Confirm the power switch on the back of the PSU is in the 'ON' position.
- Interne Verbindungen: Double-check all modular cable connections to the PSU and to your components (motherboard, CPU, GPU). Ensure the 24-pin and 8-pin CPU cables are fully seated.
- Motherboard Stand-offs: Ensure your motherboard is properly installed with stand-offs to prevent short circuits.
7.2 Systeminstabilität oder zufällige Abschaltungen
- Überlast: Stellen Sie sicher, dass der Strombedarf Ihres Systems die Kapazität des Netzteils von 750 W nicht überschreitet.
- Überhitzung: Check for proper airflow within your case and ensure the PSU fan is operating when under load. Clean any dust buildup.
- CircuitShield Protection: The Antec GSK750 V2 includes comprehensive industrial-grade protections (OCP, OVP, UVP, SCP, OPP, OTP, SIP, NLO). If the PSU detects an unsafe condition, it may shut down to protect your components. If this occurs repeatedly, consult a professional.
7.3 Lüfter dreht sich nicht
- Zero-RPM-Modus: Under low loads, the fan will not spin. This is normal operation. The fan will activate automatically as the system load increases.
- Obstruktion: Ensure nothing is physically blocking the fan blades.
If problems persist after following these steps, please contact Antec customer support.
8. Spezifikationen
Detailed technical specifications for the Antec GSK750 V2 ATX3.1 750W Full Modular Power Supply:
| Besonderheit | Detail |
|---|---|
| Modellname | GSK750 V2 US |
| Wastage | 750 Watt |
| Formfaktor | ATX |
| Effizienzzertifizierung | 80 PLUS Gold-zertifiziert |
| ATX-Standard | ATX3.1 |
| PCIe-Unterstützung | PCIe 5.1 (mit 12V-2x6-Kabel) |
| Modularität | Vollständig modular |
| Kühlmethode | Air (120mm Silent Fan with Zero RPM Manager) |
| Design | PhaseWave Design (LLC + DC-DC) |
| Schutz | OCP, OVP, UVP, SCP, OPP, OTP, SIP, NLO (CircuitShield) |
| Technische Daten | 5.51 x 3.38 x 5.9 Zoll (140 x 86 x 150 mm) |
| Artikelgewicht | 5.29 Pfund |
| Kompatible Geräte | Personalcomputer |
8.1 Input and Output Ratings

Image: Table detailing the input voltage ranges and the output voltage, Strom und Watttage for each rail (+3.3V, +5V, +12V, -12V, +5VSB) of the Antec GSK750 V2 power supply.
| Eingang | |||||
|---|---|---|---|---|---|
| 100-240V~, 50Hz-60Hz, 10A Max 200-240V~, 50Hz-60Hz, 10A Max / for China and Korea | |||||
| Ausgabe | |||||
| +3.3V | +5V | +12V | -12 V | +5VSB | |
| 20 A | 20 A | 62.5 A | 0.3 A | 3.0 A | |
| 100 W | 750 W | 3.6 W | 15 W | ||
| 750 W (kombiniert) | |||||
9. Garantieinformationen
The Antec GSK750 V2 ATX3.1 750W Full Modular Power Supply comes with a 10 Jahr Garantie from the date of purchase. This warranty covers defects in materials and workmanship under normal use. Please retain your proof of purchase for warranty claims. For full warranty terms and conditions, please visit the official Antec webWebsite oder wenden Sie sich an den Kundendienst.
10. Kundendienst
For technical assistance, troubleshooting, or warranty inquiries, please contact Antec customer support through their official webWebsite:
Visit Antec Support WebWebsite
Auf der Supportseite finden Sie außerdem hilfreiche Ressourcen, FAQs und Treiber-Downloads.