Einführung
This manual provides detailed instructions for the installation, operation, and maintenance of the GuliKit 720° Adjustable Tension TMR Magnetic Joystick Replacement Kit (Model NS55) for PS4 DualShock controllers. This kit is designed to address stick drift and enhance control precision through advanced TMR (Tunnel Magnetoresistance) technology and adjustable tension.
Wichtiger Hinweis: The installation of this product requires desoldering and soldering skills. If you are not experienced with these procedures, professional assistance is recommended to ensure proper installation and prevent damage to your controller.

Bild: Überview of the GuliKit 720° Adjustable Tension TMR Magnetic Joystick Replacement Kit, showing the joystick modules, various thumbstick caps, and the adjustment tool.
Hauptmerkmale
- TMR Magnetic Joystick Technology: Utilizes contact-less magnetic field sensing to eliminate stick drift, offering enhanced stability, durability, and high precision with ultra-low power consumption.
- 720° Level-less Adjustable Tension: Allows for precise customization of control force across two full rotations (720°) using an included wrench. The hidden tension mechanism prevents accidental adjustments.
- Direkter Ersatz: Designed as a direct replacement for PS4 DualShock Controllers without requiring circuit modifications.
- Multiple Thumbstick Caps: Includes three pairs of joystick caps with varying heights and feels for user preference.
Installationshandbuch
This section outlines the steps for replacing your controller's joysticks. Please proceed with caution and ensure you have the necessary tools and skills.
Erforderliche Werkzeuge (nicht im Lieferumfang enthalten):
- Kleiner Kreuzschlitzschraubendreher
- Prying tool (plastic spudger)
- Lötkolben
- Desoldering pump or wick
- Lot
Installationsschritte:
- Disassemble the Controller: Carefully open your PS4 DualShock controller by removing the necessary screws and gently separating the casing. Disconnect any ribbon cables.
- Locate Existing Joysticks: Identify the current joystick modules on the controller's circuit board.
- Desolder Old Joysticks: Using a soldering iron and desoldering tool, carefully desolder all pins connecting the old joystick modules to the circuit board. Remove the old joysticks.
- Install New Joysticks: Position the GuliKit TMR Magnetic Joystick modules into the vacant spots on the circuit board, ensuring correct orientation.
- Solder New Joysticks: Solder all pins of the new joystick modules securely to the circuit board. Ensure clean solder joints to prevent short circuits.
- Controller wieder zusammenbauen: Carefully reattach any ribbon cables and reassemble the controller casing. Do not fully tighten screws until testing is complete.
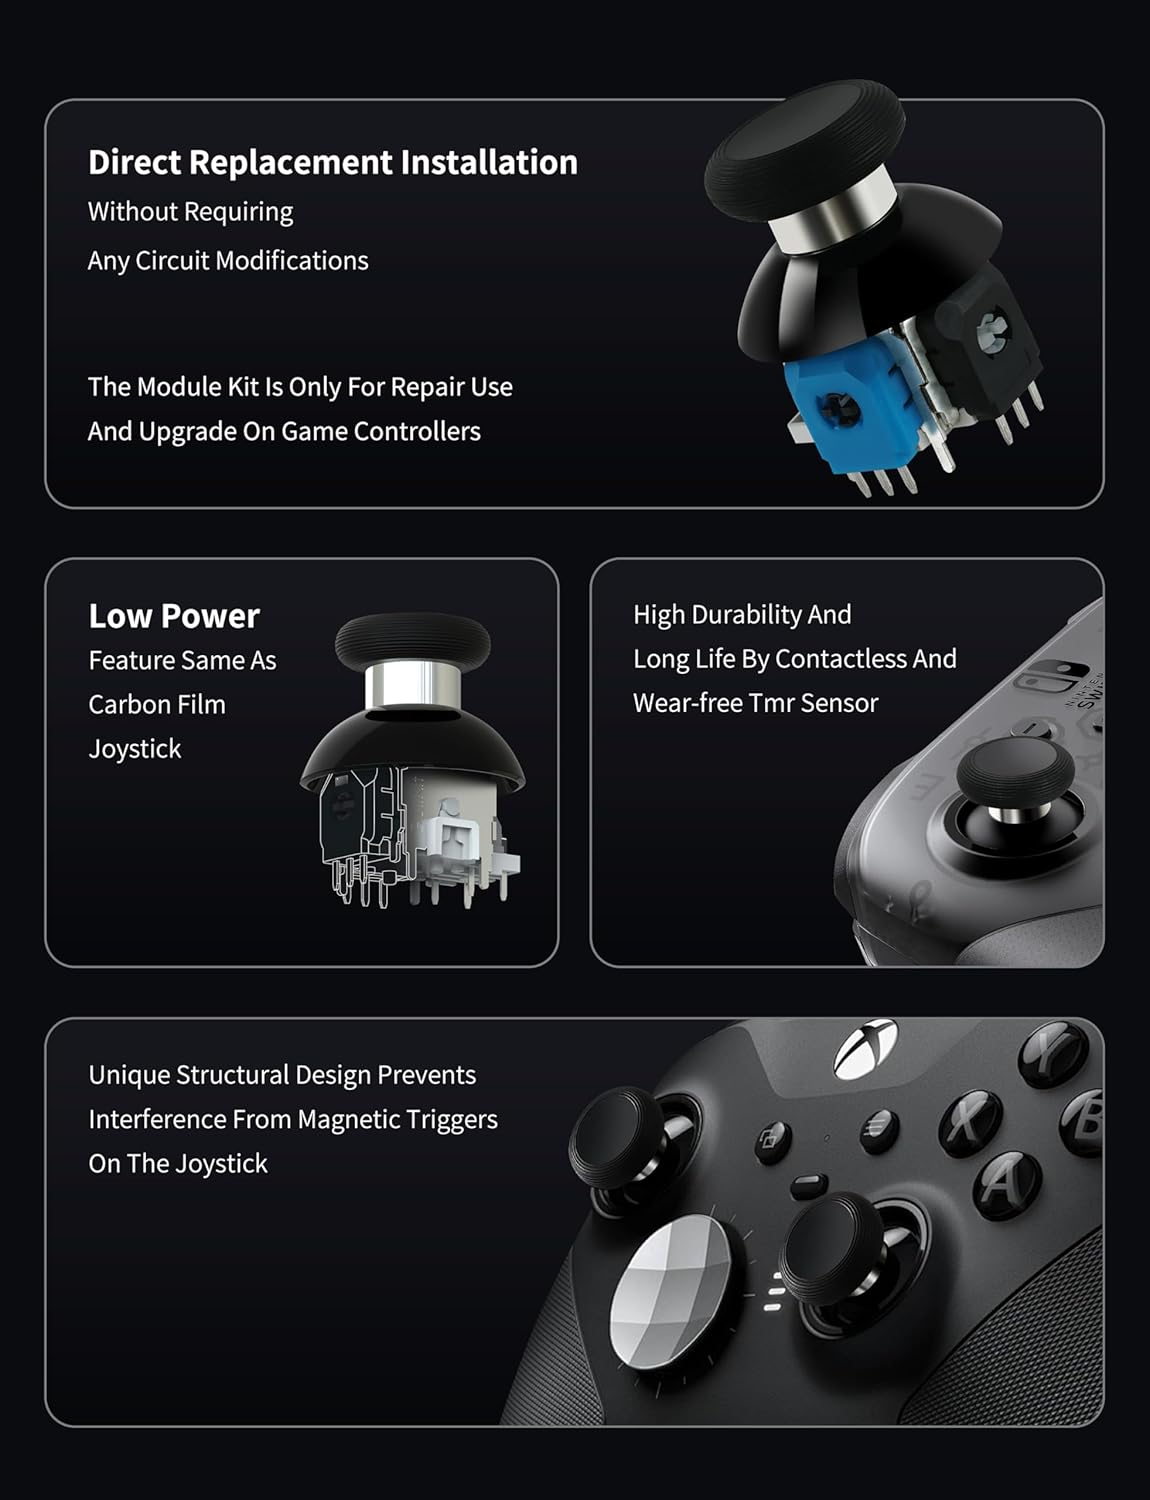
Image: Illustration of the GuliKit joystick module as a direct replacement, highlighting its internal components and compatibility for repair and upgrade.
Warning: The entire joystick module (joystick & cap) must be replaced as a unit. Attempting to replace only individual components may result in joystick damage or poor centering performance.
Bedienung und Einstellung
Adjusting Joystick Tension:
The GuliKit TMR joysticks feature a 720° level-less tension adjustment mechanism, allowing you to fine-tune the stick's resistance.
- Remove Thumbstick Cap: Gently pull the thumbstick cap vertically upward to remove it.
- Spannung einstellen: Use the included wrench to turn the screw located under the cap. Turning towards the '+' sign increases tension, while turning towards the '-' sign decreases tension.
- Kappe wieder anbringen: Press the thumbstick cap vertically downward until it is securely seated.

Image: Step-by-step diagram showing how to remove the thumbstick cap, use the wrench to adjust tension, and reattach the cap.

Image: Illustration demonstrating the hidden adjustable tension mechanism, showing how stick force can be varied from -30g to +30g, preventing accidental adjustments during use.
Using Different Thumbstick Caps:
The kit includes three pairs of caps with different heights and textures. You can also remove the metal ring on the joystick cap for a wider range of movement.
- To change caps: Pull vertically to remove, press vertically to attach.
- Removing the metal ring offers greater flexibility but may increase wear on the stick.

Image: Visual representation of the three included joystick cap types with different heights, and a diagram illustrating how the metal ring can be removed from a cap for increased range of motion.
Joystick-Kalibrierung:
After replacing the joysticks, calibration is required to ensure optimal performance and accurate input. Follow the instructions below for PS4 DualShock controllers:
- For PS4 DualShock controllers, after replacing the joysticks, use the calibration tool available on the GuliKit webSeite? ˅ (test.gulikit.com) to calibrate the joysticks according to the provided instructions.

Image: A graphic detailing the calibration process for various controllers, specifically mentioning the GuliKit website tool for PS4 DualShock controllers.
Wartung
- Reinigung: Keep the joystick modules and caps free from dust and debris. Use a soft, dry cloth for cleaning.
- Metal Ring Usage: Be aware that using the joystick cap without the metal ring, while offering a wider range of movement, may increase wear and tear on the stick over time.
- Demontage vermeiden: The dome part for tension adjustment under the joystick cap is integrated with the joystick component and cannot be separated. Do not attempt to disassemble this part as it will damage the entire joystick.

Image: A visual warning indicating that the dome part of the joystick, which contains the tension adjustment mechanism, should not be disassembled as it is integrated and attempting to separate it will cause damage.
Fehlerbehebung
- Stick Drift: The TMR technology is designed to eliminate stick drift. If drift occurs after installation, ensure proper soldering and perform joystick calibration as described in the 'Operation and Adjustment' section.
- Poor Centering/Functionality: This can occur if the entire joystick module was not replaced as a unit, or if individual components were attempted to be replaced. Ensure the full module is correctly installed. Also, verify proper soldering.
- Tension Mechanism Issues: If the tension mechanism does not function as expected or the stick does not return to center, re-check the tension adjustment screw. Ensure the dome part of the joystick was not tampbeschädigt oder demontiert werden.
- Kalibrierungsfehler: If the calibration tool does not work, ensure your controller is properly connected and recognized. Refer to the GuliKit website for specific calibration tool instructions and system requirements.
Technische Daten
| Modellnummer | NS55 |
| Technologie | TMR (Tunnel Magnetoresistance) |
| Kompatibilität | PS4 DualShock Controllers |
| Spannungseinstellung | 720° Level-less |
| Artikelgewicht | 1.44 Unzen (ca. 40.8 Gramm) |
| Verpackungsabmessungen | 3.7 x 3.66 x 1.14 Zoll (ca. 9.4 x 9.3 x 2.9 cm) |
Garantieinformationen
Specific warranty details for the GuliKit 720° Adjustable Tension TMR Magnetic Joystick Replacement Kit are not provided in the product information. Please refer to the official GuliKit webDie Garantiebedingungen finden Sie auf der Website oder wenden Sie sich an den Kundendienst.
Support und Kontakt
For further assistance, technical support, or to access the joystick calibration tool, please visit the official GuliKit webWebsite:
- GuliKit Official WebWebsite: www.gulikit.com
- Calibration Tool: test.gulikit.com
When contacting support, please have your product model (NS55) and purchase information ready.


