1. Einleitung
This manual provides detailed instructions for the setup, operation, and maintenance of your WOOPKER AK50 Stereo Amplifier. Please read this manual thoroughly before using the product to ensure proper functionality and to extend its lifespan.
1.1 Produktüberschussview
The WOOPKER AK50 is a multi-function 2-channel stereo amplifier designed for home audio systems. It features Bluetooth 5.0 connectivity, FM radio, USB and SD card playback, and multiple input options for various audio sources. It is suitable for driving passive speakers in home theater, studio, or karaoke setups.

Image 1.1: WOOPKER AK50 Stereo AmpVerstärker und Fernbedienung
This image displays the WOOPKER AK50 stereo amplifier, a compact black unit with blue illuminated knobs, alongside its black remote control. The amplifier features a central LED display, USB and SD card slots, microphone inputs, and controls for volume, bass, and treble.
1.2 Hauptmerkmale
- Ausgangsleistung: Provides a maximum output of 400W + 400W, compatible with 4-16 inch passive speakers.
- Vielseitige Eingabeoptionen: Supports Bluetooth, AUX, MIC, USB, and SD card inputs. Connects to external devices such as CD/DVD players, TVs, PCs, smartphones, and projectors.
- Bluetooth 5.0: Integrated Bluetooth 5.0 for stable wireless audio streaming. Optimal connection range is within 30 feet (10 meters) without obstructions.
- Klangregler: Independent knobs for adjusting Bass, Treble, Microphone Volume, and Echo effects.
- Fernbedienung: Includes a remote for convenient adjustment of input modes and volume from a distance.
2. Wichtige Sicherheitshinweise
Um das Risiko von Stromschlägen, Bränden oder Verletzungen zu verringern, beachten Sie bitte die folgenden Sicherheitsvorkehrungen:
- Setzen Sie dieses Gerät weder Regen noch Feuchtigkeit aus.
- Öffnen Sie nicht das casing. Alle Wartungsarbeiten sind qualifiziertem Personal zu überlassen.
- Sorgen Sie für ausreichende Belüftung. Blockieren Sie keine Belüftungsöffnungen.
- Stellen Sie das Gerät auf eine stabile, ebene Fläche.
- Das Gerät sollte nicht direkter Sonneneinstrahlung, Wärmequellen oder übermäßigem Staub ausgesetzt werden.
- Ziehen Sie den Netzstecker aus der Steckdose, wenn das Gerät längere Zeit nicht benutzt wird.
- Bedienen Sie das Gerät nicht mit nassen Händen.
3. Packungsinhalt
Bitte überprüfen Sie, ob alle unten aufgeführten Artikel in Ihrem Paket enthalten sind:
- WOOPKER AK50 Stereo Ampschwerer
- Fernbedienung
- Stromkabel
- FM-Antenne
- Benutzerhandbuch (dieses Dokument)
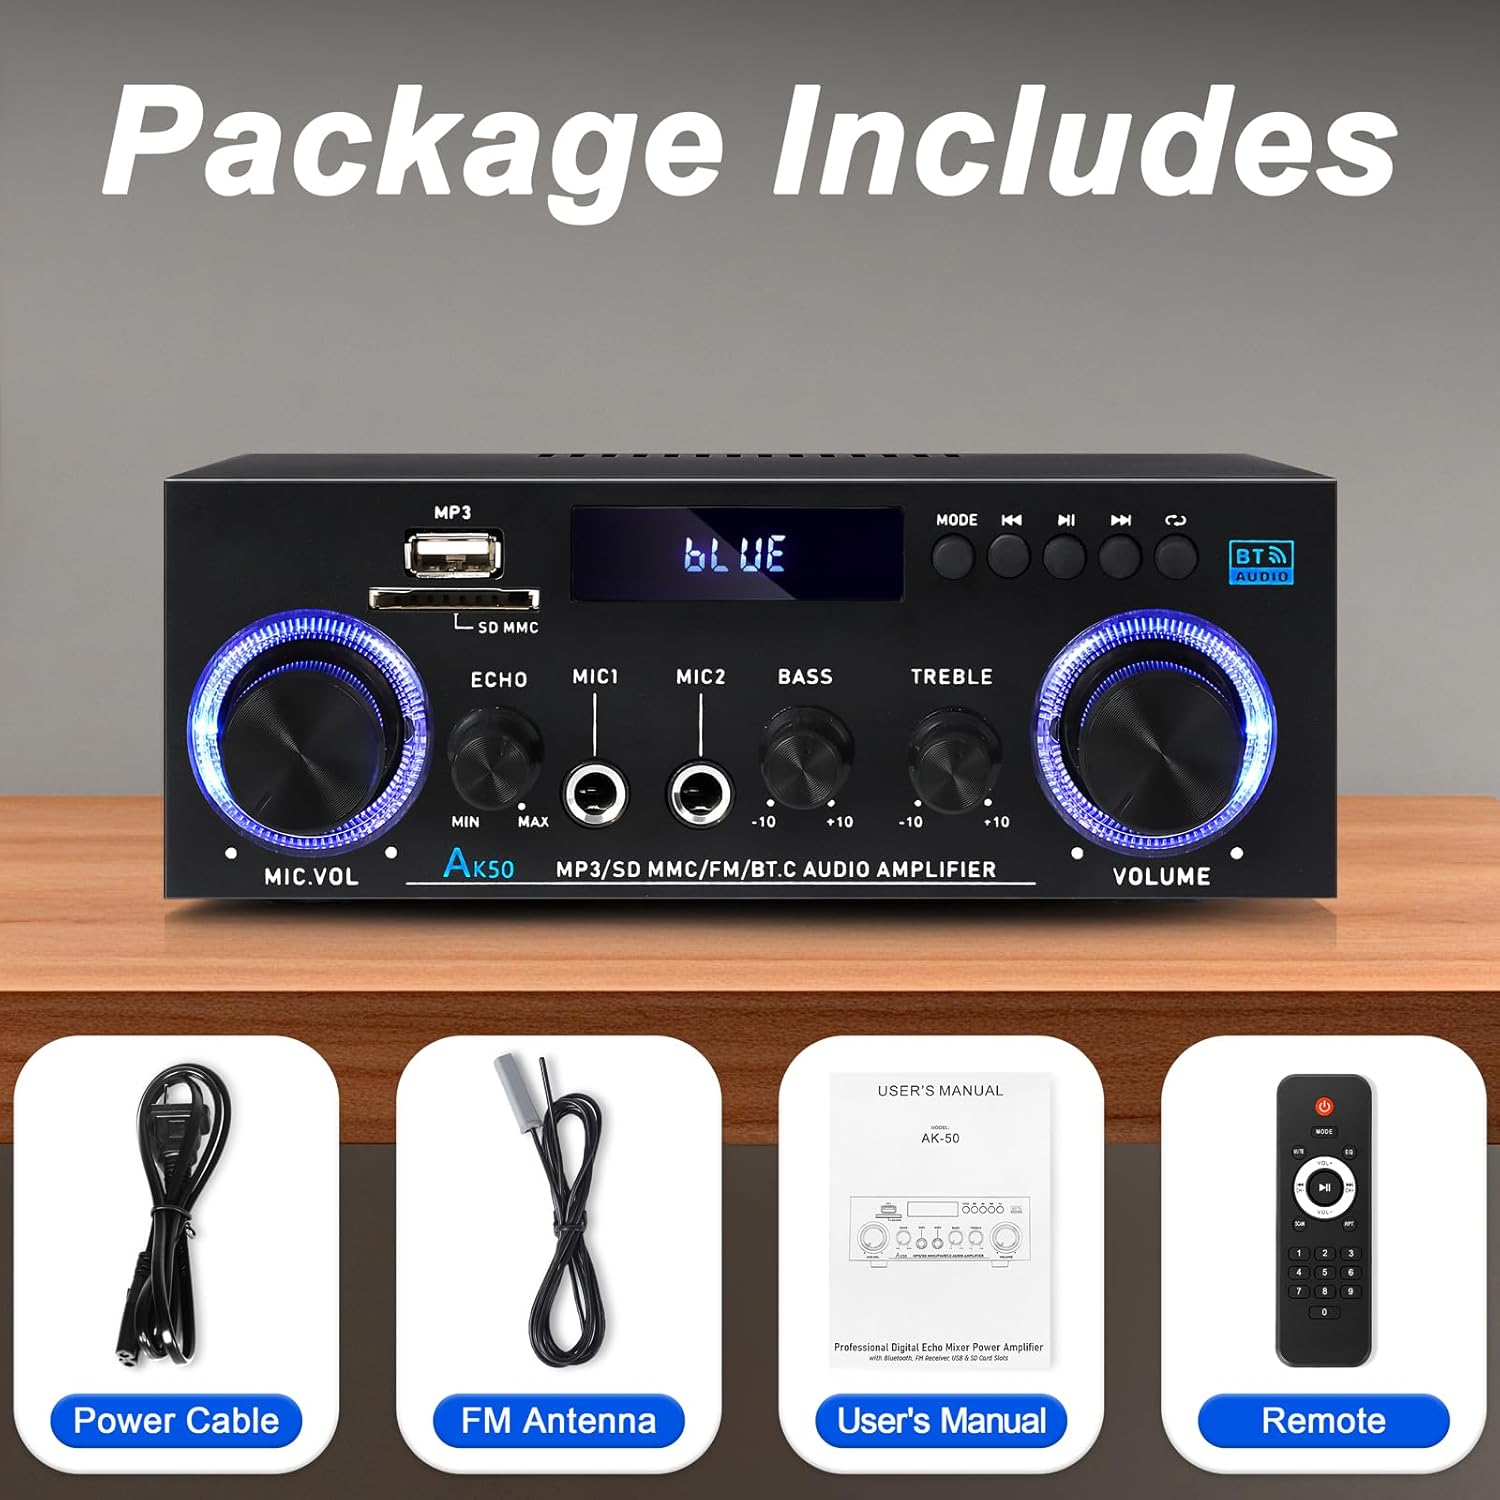
Abbildung 3.1: Mitgeliefertes Zubehör
This image shows the items included in the WOOPKER AK50 package: the amplifier unit, a power cable, an FM antenna, a user's manual, and a remote control.
4. Produktlayout
4.1 Frontplatte

Image 4.1: Front Panel Controls and Indicators
This diagram illustrates the front panel of the AK50 amplifier, highlighting its various controls and ports. Key features include the USB/SD port, LED display, mode selection buttons, microphone inputs, and rotary knobs for microphone volume, echo, bass, treble, and master volume.
- USB/SD-Anschluss: Zum Abspielen von Audio files von USB-Laufwerken oder SD-Karten.
- LED-Anzeige: Zeigt den aktuellen Modus, Streckeninformationen und andere Statusanzeigen an.
- Modus-Taste: Switches between input modes (Bluetooth, AUX, USB, SD, FM).
- Zurück-Schaltfläche: Navigiert zum vorherigen Gleis/Bahnhof.
- Wiedergabe-/Pause-Taste: Steuert die Wiedergabe über USB/SD/Bluetooth.
- Nächster Knopf: Navigiert zum nächsten Gleis/Bahnhof.
- Zyklustaste: Repeats playback mode for USB/SD.
- Mikrofonlautstärkeregler: Regelt die Lautstärke angeschlossener Mikrofone.
- Echo-Knopf: Passt den Echoeffekt für Mikrofone an.
- Mic Input Jacks (MIC1, MIC2): 6.35-mm-Klinkenbuchsen zum Anschluss von Mikrofonen.
- Bass-Knopf: Passt die Audioausgabe im Tieftonbereich an.
- Höhenregler: Passt die Hochfrequenz-Audioausgabe an.
- Master-Lautstärkeregler: Steuert die Gesamtausgangslautstärke.
4.2 Rückseite

Abbildung 4.2: Anschlüsse auf der Rückseite
This diagram details the rear panel of the AK50 amplifier, showing the various input and output terminals. It includes the FM antenna jack, power switch, audio input/output jacks, speaker output terminals, and power input ports.
- FM-Antennenanschluss: Connects to the included FM antenna for radio reception.
- Stromschalter: Schaltet den ampschalter.
- Audio Input Jacks (AUX/LINE): RCA jacks for connecting external audio sources (e.g., CD player, TV).
- Lautsprecherausgangsanschlüsse: Anschlussmöglichkeit für passive Lautsprecher (4-16 Ω Impedanz).
- Gleichstromeingang 12V/5A: For DC power supply (if applicable, check model specifications).
- Eingangsspannung Wechselstrom 90-240 V: Wird über das mitgelieferte Netzkabel an die Hauptstromversorgung angeschlossen.
5. Installationsanleitung
Follow these steps to set up your AK50 Stereo AmpReiniger:
5.1 Lautsprecheranschluss
- Stellen Sie sicher, dass ampDer Verstärker ist ausgeschaltet und vom Stromnetz getrennt.
- Verbinden Sie Ihre passiven Lautsprecher mit dem Lautsprecher-Ausgangsanschlüsse on the rear panel. Ensure correct polarity (red to red, black to black) for each speaker.
- Der ampDer Verstärker unterstützt Lautsprecher mit einer Impedanz von 4-16Ω.
5.2 Audioquellenanschluss
You can connect various audio sources to the AK50 ampReiniger:
- AUX/LINE Input: Use RCA cables to connect devices like CD players, DVD players, TVs, or PCs to the Audioeingangsbuchsen auf der Rückseite.
- USB/SD-Karte: Insert a USB flash drive or SD card (pre-loaded with audio files) into the respective port on the front panel.
- Bluetooth: Hinweise zur Bluetooth-Kopplung finden Sie in Abschnitt 6.3.
- FM-Antenne: Schließen Sie die mitgelieferte FM-Antenne an die UKW-Antennenbuchse Anschluss auf der Rückseite für Radioempfang. Ziehen Sie die Antenne für besseren Empfang aus.
5.3 Stromanschluss
- Verbinden Sie das mitgelieferte Netzkabel mit dem AC 90-240 V Stromeingang auf der Rückseite.
- Stecken Sie das andere Ende des Stromkabels in eine geeignete Wandsteckdose.
- Stellen Sie sicher, dass Netzschalter on the rear panel is in the OFF position before plugging in.

Abbildung 5.1: Beispielample Anschlussplan
This image illustrates various connection possibilities for the AK50 amplifier, including connecting to speakers, a CD player, a DVD player, a PC/laptop, and a TV/Blu-ray player. It also shows the FM antenna and power connections.
6. Bedienungsanleitung
6.1 Ein-/Ausschalten
Nachdem alle Verbindungen hergestellt sind, drehen Sie die Netzschalter on the rear panel to the ON position. The LED display on the front panel will illuminate.
6.2 Modusauswahl
Drücken Sie die Modustaste on the front panel or the remote control to cycle through the available input modes: Bluetooth, AUX, USB, SD, and FM.
6.3 Lautstärke- und Klangregelung
- Master-Lautstärke: Drehen Sie den Master-Lautstärkeregler to adjust the overall sound level.
- Bass Hochtöne: Verwenden Sie die Bass-Knopf Und Höhenregler to fine-tune the low and high frequencies of the audio output.
- Mic Volume/Echo: Wenn Mikrofone angeschlossen sind, verwenden Sie die Mikrofon-Lautstärkeregler to adjust their volume and the Echo-Knopf to add an echo effect.

Image 6.1: Bass and Treble Controls
This image highlights the Bass and Treble control knobs on the front panel of the AK50 amplifier, indicating their function in adjusting audio frequencies.
6.4 Bluetooth-Kopplung
- Schalten Sie den ampVerstärker in den Bluetooth-Modus schalten mithilfe des Modustaste. The LED display will show "BLUE" or a similar indicator, and the unit will enter pairing mode.
- Aktivieren Sie Bluetooth auf Ihrem Bluetooth-fähigen Gerät (z. B. Smartphone, Tablet) und suchen Sie nach verfügbaren Geräten.
- Select "AK50" (or similar device name) from the list to pair.
- Nach der Kopplung ist die amplifier will indicate a successful connection, and you can play audio from your device.
- Maintain a distance of within 30 feet (10 meters) for optimal Bluetooth performance.

Image 6.2: Bluetooth Connection
This image demonstrates the Bluetooth pairing process, showing a smartphone displaying available Bluetooth devices and the AK50 amplifier in Bluetooth mode, indicating a successful connection.

Image 6.3: Bluetooth Range
This image illustrates the effective Bluetooth range of the AK50 amplifier, indicating a maximum distance of 32 feet (10 meters) for stable wireless connection between the amplifier and a paired device.
6.5 USB/SD-Wiedergabe
Insert a USB drive or SD card into the corresponding slot. The ampDer Verstärker schaltet automatisch in den USB/SD-Modus und beginnt mit der Audiowiedergabe. fileS. Verwenden Sie die Vorherige, Abspielen/Pause, Und Nächste Tasten zur Steuerung der Wiedergabe.
6.6 FM-Radiobetrieb
- Schalten Sie den ampVerstärker in FM-Modus schalten mit dem Modustaste.
- Der ampDer Verstärker scannt und speichert automatisch verfügbare FM-Sender.
- Verwenden Sie die Vorherige Und Nächste Tasten zur Navigation zwischen gespeicherten Stationen.
- Adjust the FM antenna position for optimal reception.
6.7 Verwendung der Fernbedienung
Die mitgelieferte Fernbedienung ermöglicht eine bequeme Bedienung des Geräts. amplifier from a distance. Ensure the plastic isolation sheet is removed from the battery compartment before first use.

Image 6.4: Remote Control
This image displays the remote control for the AK50 amplifier, showing buttons for power, mode selection, EQ, volume adjustment, track navigation, and numerical input for direct track selection.
7. Wartung
Durch sachgemäße Wartung wird die Langlebigkeit und optimale Leistung Ihres Geräts sichergestellt. ampReiniger:
- Reinigung: Use a soft, dry cloth to clean the exterior of the unit. Do not use liquid cleaners or abrasive chemicals.
- Belüftung: Um eine Überhitzung zu vermeiden, achten Sie darauf, dass die Lüftungsöffnungen frei von Staub und Schmutz sind.
- Lagerung: Bei der Speicherung der ampWenn Sie den Verstärker über einen längeren Zeitraum nicht benutzen, ziehen Sie den Stecker aus der Steckdose und bewahren Sie ihn an einem kühlen, trockenen Ort auf.
- Netzkabel: Regularly inspect the power cord for any damage. If damaged, discontinue use and replace it with an appropriate cord.
8. Fehlerbehebung
If you encounter issues with your AK50 amplifier, beachten Sie die folgenden häufigen Probleme und Lösungen:
| Problem | Mögliche Ursache | Lösung |
|---|---|---|
| Kein Strom | Netzkabel nicht angeschlossen; Netzschalter ausgeschaltet; Steckdose defekt. | Check power cable connection; Turn power switch ON; Test outlet with another device. |
| Keine Tonausgabe | Speakers not connected; Incorrect input mode; Volume too low; Audio source issue. | Check speaker connections and polarity; Select correct input mode; Increase master volume; Verify audio source is playing. |
| Bluetooth stellt keine Verbindung her | Amplifier not in Bluetooth mode; Device not in pairing mode; Too far from ampschwerer. | Schalten amplifier to Bluetooth mode; Ensure device Bluetooth is ON and searching; Move device closer to ampschwerer. |
| Fernbedienung funktioniert nicht | Battery isolation sheet not removed; Batteries depleted; Obstruction between remote and ampschwerer. | Remove plastic sheet; Replace batteries; Ensure clear line of sight to ampIR-Empfänger des Verstärkers. |
| Schlechter UKW-Empfang | FM antenna not connected or positioned incorrectly. | Connect FM antenna securely; Adjust antenna position for better signal. |
Wenn das Problem nach dem Ausprobieren dieser Lösungen weiterhin besteht, wenden Sie sich bitte an den Kundensupport.
9. Spezifikationen
| Besonderheit | Spezifikation |
|---|---|
| Modellnummer | AK50 |
| Marke | WOOPKER |
| Ausgangsleistung | 400 Watt (Spitzenleistung) |
| Surround Sound-Kanalkonfiguration | 2.0 Kanäle |
| Konnektivitätstechnologie | Bluetooth 5.0, Auxiliary (RCA), USB, SD Card |
| Kompatible Geräte | Speakers, Smartphones, Tablets, PCs, CD/DVD Players |
| Audioausgabemodus | Stereo |
| Farbe | Schwarz |
| Artikelgewicht | 1.98 Pfund |
| Verpackungsabmessungen | 8.66 x 7.87 x 3.54 Zoll |
10. Garantie und Support
For warranty information or technical support, please refer to the documentation provided at the time of purchase or contact WOOPKER customer service through their official channels. Keep your purchase receipt as proof of purchase.


