1. Sicherheitshinweise
Sicherheit hat beim Bedienen von Schweißgeräten stets oberste Priorität. Die Nichtbeachtung der Sicherheitsrichtlinien kann zu schweren Verletzungen oder zum Tod führen.
- Tragen Sie geeignete persönliche Schutzausrüstung (PSA): This includes a welding helmet with proper shade, welding gloves, flame-resistant clothing, and safety shoes.
- Für ausreichende Belüftung sorgen: Welding fumes can be hazardous. Work in a well-ventilated area or use a fume extractor.
- Protect against electric shock: Ensure the welder is properly grounded. Do not operate in wet conditions. Inspect cables for damage before each use.
- Prevent fire and explosions: Brennbare Materialien vom Schweißbereich fernhalten. Einen Feuerlöscher griffbereit halten.
- Protect eyes and skin from arc rays: Beim Schweißen entstehen intensive UV- und IR-Strahlung, die schwere Verbrennungen an Augen und Haut verursachen kann.
- Lesen und verstehen Sie das gesamte Handbuch: Before operating the welder, familiarize yourself with all instructions and warnings.
2. Produktüberschreitungview
The ANDELI 135Amp MIG Welder is a versatile 4-in-1 machine designed for various welding tasks. It features a robust design with advanced controls for precision and safety.

Image: The ANDELI 135Amp MIG Welder shown with its included accessories, including the MIG torch, ground clamp, and a spool of flux-cored wire.
Hauptmerkmale:
- 4-in-1 Welding Capabilities: Supports MAN Gasless MIG, SYN Gasless MIG, Lift TIG, and MMA Welding. (Lift TIG torch sold separately).
- High-Power 135A Output: Capable of welding mild steel plates up to 2/5 inches thick.
- Dual-Voltage Vielseitigkeit: Operates on both 110V and 220V power sources for adaptability to different environments and tasks.
- Smart Synergic Control: Automatically optimizes voltage and wire feed speed when amperage or wire diameter is adjusted.
- 4.1-Inch Precision LED Display: Provides clear, real-time welding data, protected by a transparent cover.
- Fortschrittliches Schutzsystem: Includes automatic voltage compensation, over-current, overload, overheating, and over-voltage Schutz.
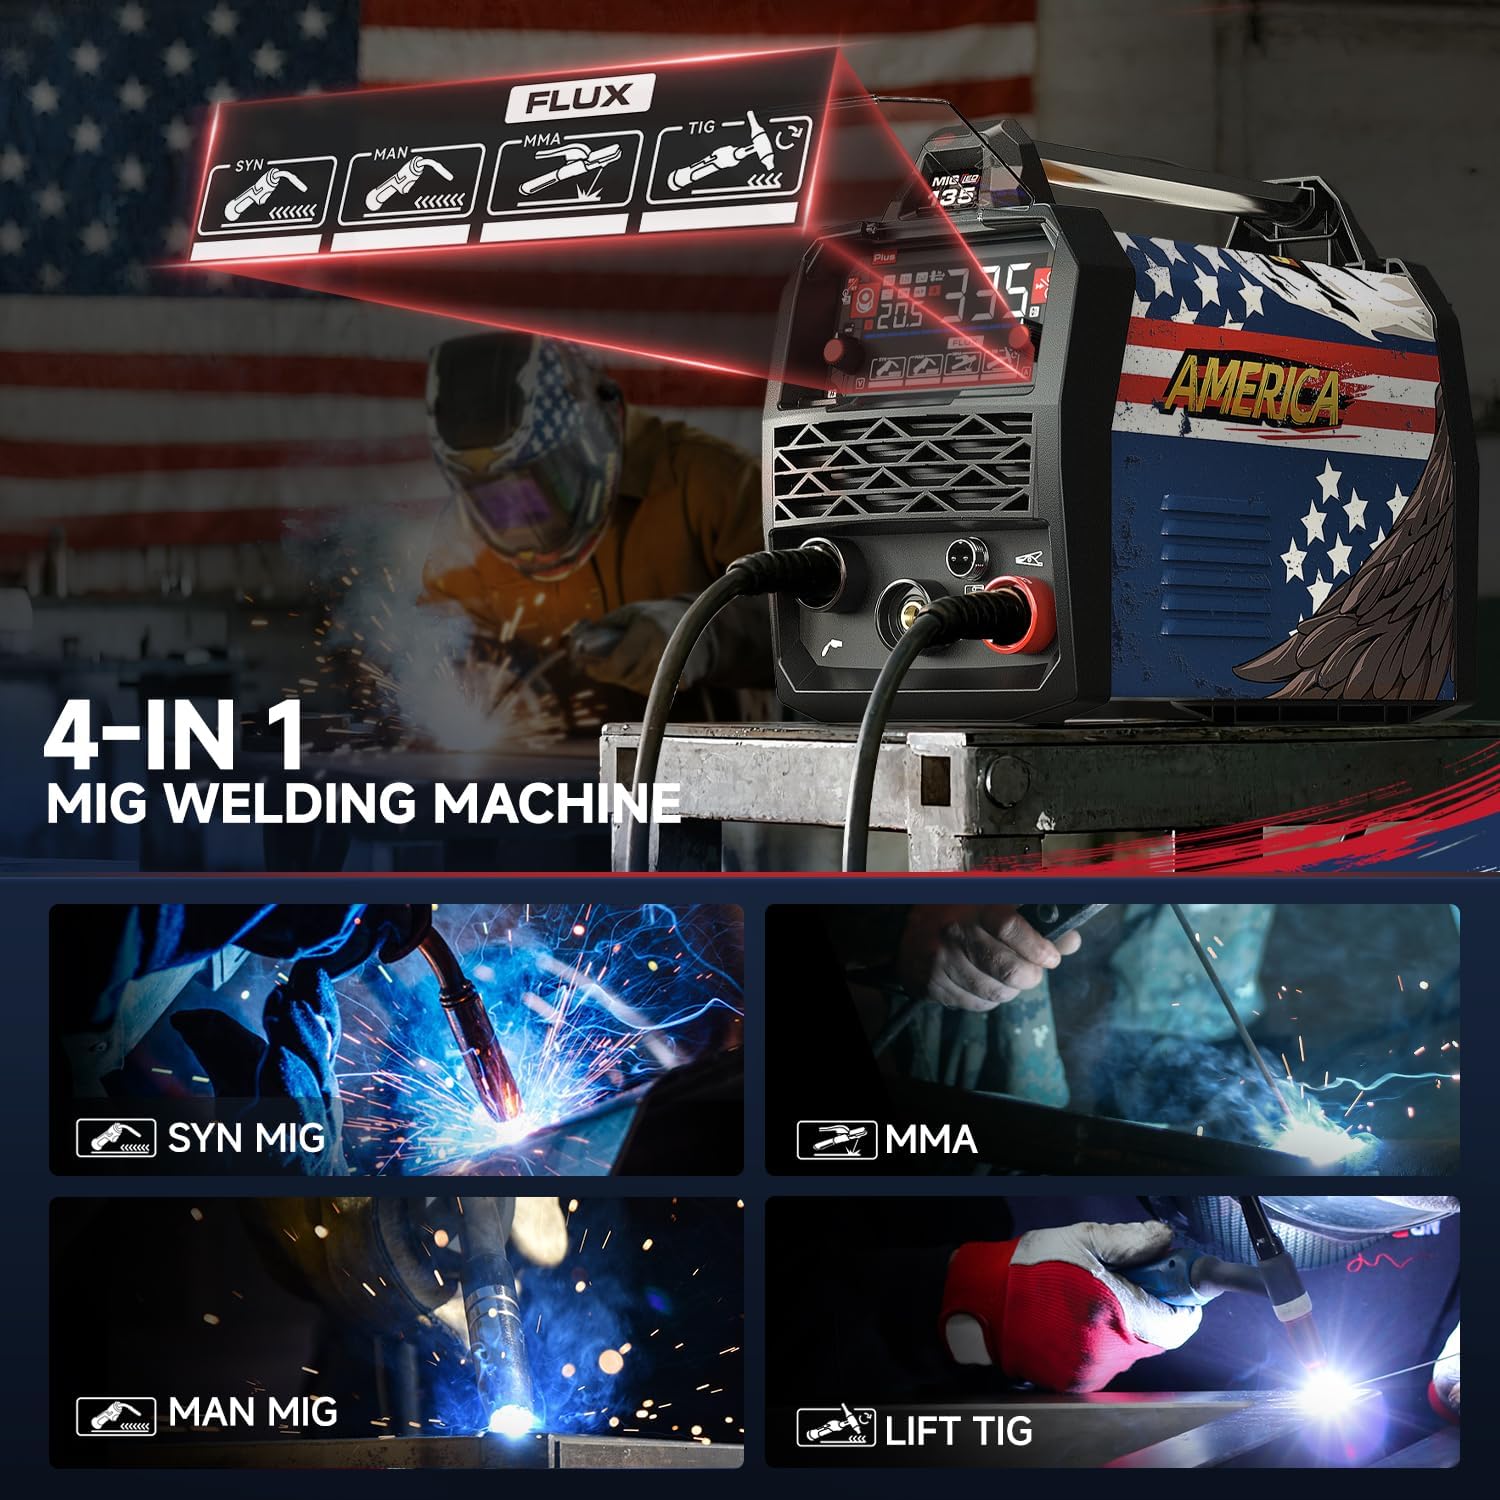
Image: A close-up of the ANDELI 135Amp MIG Welder's control panel, highlighting the four welding modes: SYN MIG, MAN MIG, MMA, and Lift TIG.
3. Einrichtung
3.1 Auspacken und Prüfen
- Entnehmen Sie vorsichtig alle Komponenten aus der Verpackung.
- Inspect the welder and accessories for any signs of damage during shipping. Contact your supplier immediately if any damage is found.
- Stellen Sie sicher, dass alle aufgeführten Komponenten vorhanden sind.
3.2 Stromanschluss
This welder supports dual voltage operation (110V/220V).
- Schließen Sie das Netzkabel an eine geeignete geerdete Steckdose an.
- For 110V operation, use a standard 110V outlet.
- For 220V operation, ensure the appropriate adapter or dedicated 220V outlet is used. The machine automatically detects the input voltage.
- Always ensure the power source meets the welder's requirements to prevent damage.

Image: Illustration demonstrating the dual voltage capability of the ANDELI 135Amp MIG Welder, indicating 110V for lighter tasks and 220V for thicker metals.
3.3 Wire Installation (Gasless MIG)
- Öffnen Sie das Drahtzufuhrfach.
- Setzen Sie die Spule mit dem Fülldraht auf die Spindel und achten Sie darauf, dass sie sich frei drehen kann.
- Fädeln Sie den Draht durch das Führungsrohr und in die Antriebsrollen.
- Schließen Sie den Spannarm der Antriebsrolle und stellen Sie die Spannung ein. Der Draht sollte reibungslos und ohne Durchrutschen oder Verformung transportiert werden.
- Feed the wire through the MIG torch liner until it exits the nozzle. Trim any excess wire.
3.4 Anschließen von Schweißkabeln
- Connect the MIG torch cable to the positive (+) terminal for flux-cored welding.
- Verbinden Sie die Erdungsklemmeamp Kabel an den Minuspol (-) anschließen.
- Befestigen Sie die Bodenklemme sicher.amp zum Werkstück oder Schweißtisch, um einen guten elektrischen Kontakt zu gewährleisten.
4. Bedienungsanleitung
4.1 Einschalten und Modusauswahl
- Turn on the main power switch located on the back of the welder.
- Das LED-Display leuchtet auf.
- Use the mode selection knob/button to choose your desired welding process: MAN Gasless MIG, SYN Gasless MIG, Lift TIG, or MMA.
4.2 Synergic Control (SYN Gasless MIG)
In SYN Gasless MIG mode, the welder's smart synergic control simplifies settings:
- Passen Sie die amperage (current) or select the wire diameter.
- The machine will automatically optimize the corresponding voltage and wire feed speed for the selected setting.
- This feature is ideal for achieving consistent weld quality with minimal manual adjustment.
4.3 Manual Control (MAN Gasless MIG, MMA, Lift TIG)
For MAN Gasless MIG, MMA, and Lift TIG modes, you will manually adjust parameters:
- AmpZeitalter: Adjust the current using the dedicated knob.
- Bandtage (MIG only): Stellen Sie die Lautstärke eintage as needed for MIG welding.
- Wire Feed Speed (MIG only): Adjust the wire feed speed to match your ampDurchschnitt und Volumentage-Einstellungen.
4.4 2T/4T-Einstellungen
The welder offers 2T (Two-Touch) and 4T (Four-Touch) trigger modes:

Image: The welder's display indicating the 2T and 4T trigger settings, with descriptions for each mode.
- 2T (Two-Touch): Press and hold the torch trigger to start welding; release to stop. This is suitable for short welds and tacking.
- 4T (Vier-Touch): Press and release the trigger to start welding; press and release again to stop. This mode is beneficial for long welds, reducing hand fatigue.
4.5 Schweißerhandschuhe
The included welding gloves are designed for protection and comfort during welding operations.

Image: A pair of ANDELI welding gloves, showing their design and extended cuffs for wrist protection.
- Ensure gloves are worn at all times during welding to protect hands from heat, sparks, and UV radiation.
- The reinforced areas on the palm, thumb, and fingers provide enhanced durability and comfort.
- The stitching technology is designed for fire and temperature resistance.
5. Wartung
Regelmäßige Wartung gewährleistet die Langlebigkeit und optimale Leistung Ihrer Schweißmaschine.
- Maschine reinigen: Periodically clean the exterior of the welder with a dry cloth. Use compressed air to clear dust from internal components, ensuring the power is disconnected first.
- Inspect cables and connections: Regularly check all welding cables, power cords, and connections for cuts, fraying, or loose fittings. Replace damaged components immediately.
- Check wire feed system: Ensure the drive rollers are clean and free of debris. Verify proper wire tension and inspect the torch liner for blockages or wear.
- Torch nozzle and contact tip: Clean or replace the nozzle and contact tip as they wear out to maintain good arc stability and wire feeding.
- Lagerung: Bewahren Sie das Schweißgerät bei Nichtgebrauch in einer sauberen, trockenen Umgebung auf.
6. Fehlerbehebung
Dieser Abschnitt behandelt häufig auftretende Probleme. Bei Problemen, die hier nicht aufgeführt sind, wenden Sie sich bitte an den Kundendienst.
| Problem | Mögliche Ursache | Lösung |
|---|---|---|
| Schweißgerät lässt sich nicht einschalten | No power from outlet; power switch off; internal fuse blown | Check power outlet and circuit breaker; ensure power switch is ON; contact service for fuse replacement. |
| No arc when triggering torch | Poor ground connection; incorrect settings; damaged torch/cable | Sicherstellen, dass die Erdung geschlossen istamp has good contact; verify welding mode and parameters; inspect torch and cables for damage. |
| Der Draht wird nicht reibungslos zugeführt | Incorrect drive roller tension; clogged liner; wrong contact tip size | Adjust drive roller tension; clean or replace torch liner; ensure contact tip matches wire diameter. |
| Mangelhafte Schweißqualität | Incorrect parameters (ampAlter, voltage, WFS); improper technique; contaminated workpiece | Adjust settings according to material and thickness; practice welding technique; clean workpiece thoroughly. |
| Überhitzungsschutz aktiviert | Exceeded duty cycle; insufficient ventilation | Maschine abkühlen lassen; für ausreichende Luftzirkulation um das Schweißgerät herum sorgen. |
7. Spezifikationen
Technical specifications for the ANDELI 135Amp MIG-Schweißgerät.
- Modell: 135Amp MIG-Schweißer
- Eingangslautstärketage: 110 V/220 V (Dual Vol)tage)
- Ausgangsstrom: Bis zu 135A
- Schweißverfahren: MAN Gasless MIG, SYN Gasless MIG, Lift TIG, MMA
- Max Plate Thickness (Mild Steel): Bis zu 2/5 Zoll
- Anzeige: 4.1-Zoll-LED
- Schutzfunktionen: Automatische Lautstärketage compensation, over-current, overload, overheating, over-voltage Schutz.
- ASIN: B0FSDC2WR2
- Datum der Erstveröffentlichung: 3. Juni 2025
8. Garantie und Support
For detailed warranty information and customer support, please refer to the warranty card included with your product or visit the official ANDELI webBewahren Sie Ihren Kaufbeleg als Kaufnachweis für Garantieansprüche auf.
ANDELI Official Store US: Visit Seller Page


