1. Einführung und Endeview
This manual provides essential information for the safe and efficient operation of your Mayer 35L Electric Oven, model MMO3501. Please read these instructions thoroughly before first use and retain for future reference. This appliance is designed for household use only.
The Mayer 35L Electric Oven MMO3501 is a versatile kitchen appliance featuring a 35-liter capacity, ideal for baking, grilling, and roasting. It includes convection and rotisserie functions, adjustable temperature control from 100°C to 230°C, and dual heating elements with independent upper and lower temperature control. A 60-minute timer, dual tempered glass door, non-stick cavity, interior cooking light, and three rack positions enhance its functionality. A removable crumb tray simplifies cleaning.
2. Wichtige Sicherheitshinweise
Beim Gebrauch von Elektrogeräten sollten zur Verringerung der Gefahr von Bränden, Stromschlägen und Verletzungen immer grundlegende Sicherheitsvorkehrungen getroffen werden. Dazu gehören die folgenden:
- Lesen Sie vor der Inbetriebnahme des Backofens alle Anweisungen sorgfältig durch.
- Do not touch hot surfaces. Always use oven mitts or gloves when handling hot materials.
- Bei der Benutzung von Geräten durch oder in der Nähe von Kindern ist eine genaue Aufsicht erforderlich.
- To protect against electric shock, do not immerse the cord, plug, or any part of the oven in water or other liquid.
- Ziehen Sie den Netzstecker, wenn das Gerät nicht benutzt wird und vor der Reinigung. Lassen Sie es vollständig abkühlen, bevor Sie Teile anbringen oder abnehmen und bevor Sie das Gerät reinigen.
- Betreiben Sie kein Gerät mit beschädigtem Kabel oder Stecker oder wenn das Gerät eine Fehlfunktion aufweist oder auf andere Weise beschädigt wurde. Wenden Sie sich für Hilfe an den Kundendienst.
- Die Verwendung von Zubehörteilen, die nicht vom Gerätehersteller empfohlen werden, kann zu Gefahren oder Verletzungen führen.
- Nicht im Freien verwenden.
- Lassen Sie das Kabel nicht über die Kante eines Tisches oder einer Theke hängen und berühren Sie keine heißen Oberflächen.
- Do not place the oven on or near a hot gas or electric burner, or in a heated oven.
- Beim Bewegen eines Geräts, das heißes Öl oder andere heiße Flüssigkeiten enthält, ist äußerste Vorsicht geboten.
- Decken Sie das Krümelfach oder andere Teile des Ofens nicht mit Metallfolie ab. Dies führt zu einer Überhitzung des Ofens.
- Lagern Sie in diesem Ofen keine anderen Materialien als das vom Hersteller empfohlene Zubehör, wenn er nicht in Gebrauch ist.
- Legen Sie keine übergroßen Lebensmittel oder Metallutensilien in den Ofen, da dies zu einem Brand oder Stromschlag führen kann.
- Es kann zu einem Brand kommen, wenn der Ofen während des Betriebs abgedeckt ist oder brennbare Materialien wie Vorhänge, Gardinen, Wände usw. berührt.
- Always ensure proper ventilation around the oven during use.
3. Produktkomponenten und Zubehör
Familiarize yourself with the various parts of your Mayer 35L Electric Oven:

Abbildung 3.1: Front view of the oven, showcasing the main door, control knobs on the right, and an interior cooking light illuminating a roasted chicken.

Abbildung 3.2: Abgewinkelt view of the oven, highlighting the control panel with temperature, function, and timer knobs, and the interior with a baking rack and baking tray.
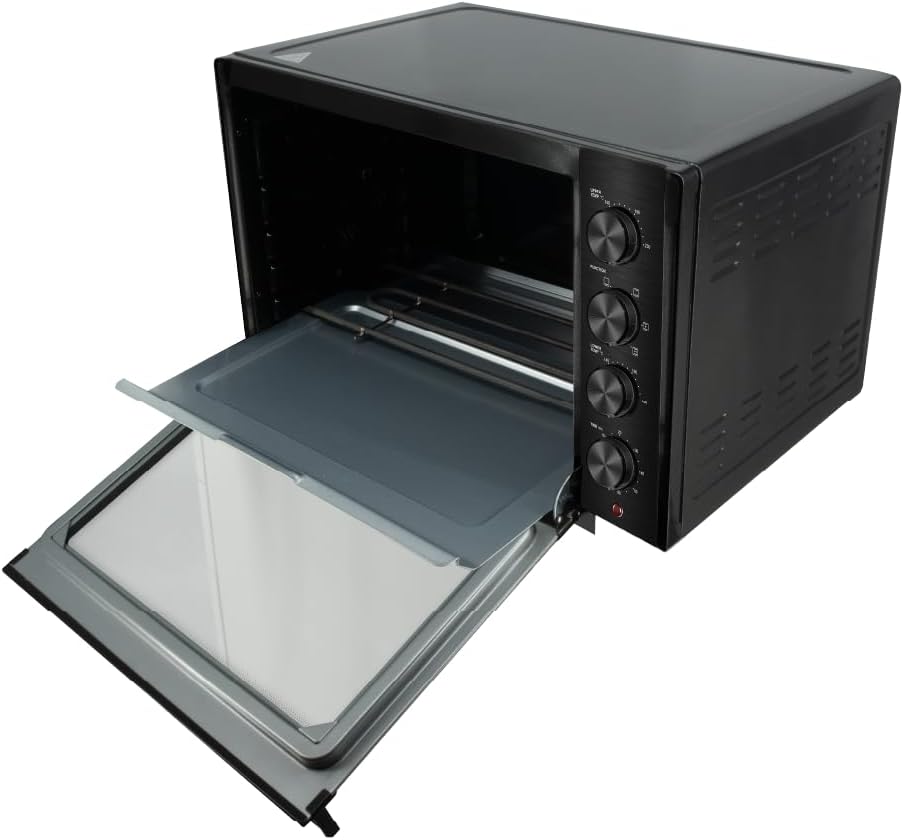
Abbildung 3.3: The oven with its door open, providing a clear view of the non-stick interior cavity, upper and lower heating elements, and the removable crumb tray at the bottom.
Mitgeliefertes Zubehör:
- Backrost: For supporting food items during baking or grilling.
- Blech: For collecting drips or baking various foods.
- Tablett-Griff: For safely inserting and removing hot baking trays and racks.
- Rotisserie-Kit: Includes spit, forks, and handle for rotisserie cooking.
4. Einrichtung und erste Verwendung
Auspacken:
- Nehmen Sie den Backofen und sämtliches Zubehör vorsichtig aus der Verpackung.
- Remove any packing materials, stickers, or labels from the oven and its accessories.
- Überprüfen Sie den Backofen auf Beschädigungen. Beschädigte Geräte dürfen nicht in Betrieb genommen werden.
Platzierung:
- Stellen Sie den Ofen auf eine stabile, ebene und hitzebeständige Oberfläche.
- Ensure there is adequate space (at least 10-15 cm) on all sides and above the oven for proper ventilation. Do not place it directly against a wall or under cabinets.
- Keep the oven away from flammable materials such as curtains, drapes, and paper.
- Stecken Sie das Netzkabel in eine geerdete Steckdose.
Vor dem ersten Gebrauch:
- Wash the baking rack, baking tray, and rotisserie kit in warm, soapy water. Rinse and dry thoroughly.
- Wischen Sie das Innere und Äußere des Ofens mit Ad abamp Tuch.
- To eliminate any manufacturing oils or odors, operate the oven empty for approximately 15 minutes at 230°C on the 'Bake' function. A slight odor or smoke may be present; this is normal and will dissipate. Ensure the room is well-ventilated during this process.
5. Bedienungsanleitung
Systemsteuerung überview:
- Oberer Temperaturregler: Adjusts the temperature for the upper heating elements (100°C - 230°C).
- Funktionsknopf: Selects the cooking mode (e.g., Bake, Grill, Convection, Rotisserie).
- Regler für niedrigere Temperatur: Adjusts the temperature for the lower heating elements (100°C - 230°C).
- Timer-Knopf: Sets the cooking duration (up to 60 minutes) or to 'Stay On'.
Allgemeine Bedienung:
- Essen zubereiten: Place food on the baking tray or rack. For rotisserie, secure food onto the rotisserie spit.
- Zubehör einfügen: Slide the baking rack or tray into one of the three rack positions. For rotisserie, insert the rotisserie spit into the designated slots.
- Temperatur einstellen: Turn the Upper and/or Lower Temperature Control Knobs to the desired temperature (100°C - 230°C). For most baking, both upper and lower elements are used.
- Funktion auswählen: Turn the Function Knob to select the desired cooking mode. Options typically include:
- Backen: Uses both upper and lower heating elements for general baking.
- Grill: Primarily uses the upper heating elements for grilling.
- Konvektion: Activates the fan for even heat distribution, ideal for faster and more uniform cooking.
- Rotisserie: Rotates the spit for even roasting of larger items.
- Timer einstellen: Turn the Timer Knob to the desired cooking time (up to 60 minutes). The oven will automatically turn off when the timer reaches zero. To cook for longer periods, turn the timer to the 'Stay On' position. Remember to manually turn off the oven when using 'Stay On'.
- Vorwärmen: For best results, pre-heat the oven for 10-15 minutes before placing food inside. Set the desired temperature and function, then set the timer. Once the pre-heating time is complete, insert your food.
- Interior Cooking Light: The oven is equipped with an interior light to monitor cooking progress without opening the door.
- Fertigstellung: When cooking is complete, the timer will chime (if set). Carefully remove food using oven mitts and the tray handle. Unplug the oven when not in use.
6. Wartung und Reinigung
Regelmäßige Reinigung und Wartung gewährleisten die Langlebigkeit und optimale Leistung Ihres Backofens.
- Den Backofen immer vom Stromnetz trennen. Vom Stromnetz trennen und vor der Reinigung vollständig abkühlen lassen.
- Außenreinigung: Wischen Sie die Außenflächen mitamp cloth and mild detergent. Do not use abrasive cleaners or scouring pads, as they may damage the finish.
- Innenreinigung: The oven features a non-stick cavity. Wipe the interior walls with a damp cloth and mild, non-abrasive cleaning solution. For stubborn stains, a paste of baking soda and water can be applied, left for a few minutes, then wiped clean.
- Herausnehmbares Krümelblech: Pull out the crumb tray from the bottom of the oven. Discard crumbs and wash the tray in warm, soapy water. Rinse and dry thoroughly before replacing. Clean regularly to prevent grease buildup and potential fire hazards.
- Zubehör: Wash the baking rack, baking tray, and rotisserie kit in warm, soapy water. Rinse and dry thoroughly. These accessories may also be dishwasher safe (check manufacturer's recommendations if available).
- Do NOT immerse the oven body, cord, or plug in water or any other liquid.
7. Fehlerbehebung
Sollten Sie Probleme mit Ihrem Backofen haben, beachten Sie bitte die folgenden häufigen Probleme und Lösungen:
| Problem | Mögliche Ursache | Lösung |
|---|---|---|
| Der Ofen lässt sich nicht einschalten. | Keine Stromversorgung. Timer nicht eingestellt. | Check if the oven is properly plugged into a working outlet. Ensure the Timer Knob is set to a cooking duration or 'Stay On'. |
| Das Essen gart ungleichmäßig. | Falsche Rackposition. Der Backofen wird überfüllt. Tür nicht vollständig geschlossen. | Adjust the rack position for optimal heat distribution. Avoid placing too much food in the oven at once. Ensure the oven door is securely closed. Consider using the convection function for more even cooking. |
| Rauch oder ungewöhnlicher Geruch während des Betriebs. | First use burn-off. Food spills or residue. Excessive grease buildup. | This is normal during initial use; ensure good ventilation. Clean the interior thoroughly after the oven cools down. Regularly clean the crumb tray and interior to prevent buildup. |
| Die Drehspießfunktion funktioniert nicht. | Rotisserie kit not properly installed. Function knob not set to Rotisserie. | Ensure the rotisserie spit is correctly seated in the drive socket and support. Turn the Function Knob to the Rotisserie setting. |
Sollte das Problem nach Überprüfung dieser Punkte weiterhin bestehen, wenden Sie sich bitte an den Kundendienst.
8. Spezifikationen
| Modell: | MMO3501 |
| Bruttokapazität: | 35 Liter |
| Bandtage: | 220-240 V ~, 50-60 Hz |
| Wastage: | 1600 Watt |
| Einstellbare Temperatur: | 100 °C - 230 °C |
| Timer: | Bis zu 60 Minuten |
| Produktabmessungen (L*B*H): | 536 mm * 380 mm * 335 mm |
| Nettogewicht: | 7.5 kg |
| Bruttogewicht: | 10 kg |
| Safety Mark: | 250995-11 |
| Besondere Merkmale: | Convection & Rotisserie Functions, Dual Heating with Independent Upper & Lower Temperature Control |
9. Garantie und Support
Garantieinformationen:
This Mayer 35L Electric Oven MMO3501 comes with a 1 Jahr Garantie Diese Garantie gilt ab Kaufdatum und deckt Herstellungsfehler bei normalem Haushaltsgebrauch ab. Bitte bewahren Sie Ihren Kaufbeleg für Garantieansprüche auf.
Kundendienst:
For technical assistance, warranty claims, or inquiries regarding your Mayer oven, please contact Mayer customer support. Contact details can typically be found on the manufacturer's official webWebsite oder Ihre Kaufdokumentation.
Please note: Do not attempt to repair the appliance yourself. Unauthorized repairs will void the warranty.