Einführung
This manual provides detailed instructions for the setup, operation, maintenance, and troubleshooting of your Pisichen 24-inch Touchscreen Monitor with Built-in Webcam (Model 238TS-CMR). This monitor features a 2K QHD (2560x1440) resolution display with a 100Hz refresh rate, 10-point multi-touch functionality, and an integrated pop-up webcam, designed to enhance your productivity and interactive experience.
Sicherheitshinweise
- Um ein versehentliches Herunterfallen zu vermeiden, stellen Sie den Monitor immer auf eine stabile, ebene Fläche.
- Setzen Sie den Monitor weder Regen, Feuchtigkeit noch extremen Temperaturen aus.
- Vermeiden Sie es, die Lüftungsöffnungen zu blockieren, um eine Überhitzung zu vermeiden.
- Verwenden Sie ausschließlich das mit dem Monitor gelieferte Netzteil.
- Disconnect the power cable from the outlet before cleaning or if the monitor will be unused for an extended period.
- Versuchen Sie nicht, den Monitor selbst zu zerlegen oder zu reparieren. Überlassen Sie alle Wartungsarbeiten qualifiziertem Fachpersonal.
Packungsinhalt
Bitte überprüfen Sie, ob alle Artikel in Ihrem Paket vorhanden sind:
- Pisichen 24-inch Touchscreen Monitor (Model 238TS-CMR)
- Monitorständer (Fuß und Arm)
- Netzteil und Kabel
- HDMI-Kabel
- USB-C-auf-USB-C-Kabel
- USB-A to USB-B Cable (for touch functionality with non-USB-C devices)
- Benutzerhandbuch (dieses Dokument)
Aufstellen
1. Standaufbau
- Nehmen Sie den Monitor vorsichtig aus der Verpackung und legen Sie ihn mit der Vorderseite nach unten auf eine weiche, saubere Oberfläche, um Kratzer zu vermeiden.
- Attach the stand arm to the back of the monitor using the provided screws.
- Connect the stand base to the stand arm and secure it with the designated screw.
- Once assembled, carefully lift the monitor and place it upright on your desk.

Figure 1: Monitor stand assembly and adjustment capabilities.
2. Verbindung mit Ihrem Gerät herstellen
The monitor supports multiple connection types. Choose the appropriate cable for your device.
- Stromanschluss: Connect the power adapter to the monitor's DC power port and then plug it into a power outlet.
- USB-C Connection (Recommended for full functionality): If your device has a USB-C port that supports DisplayPort Alternate Mode, connect the monitor using the provided USB-C to USB-C cable. This single cable can transmit video, audio, and touch signals, and may also provide power delivery to your laptop.
- HDMI or DisplayPort Connection: Connect an HDMI or DisplayPort cable from your device to the corresponding port on the monitor for video and audio. For touch functionality, you must also connect the USB-A to USB-B cable from your device's USB port to the monitor's USB-B upstream port.
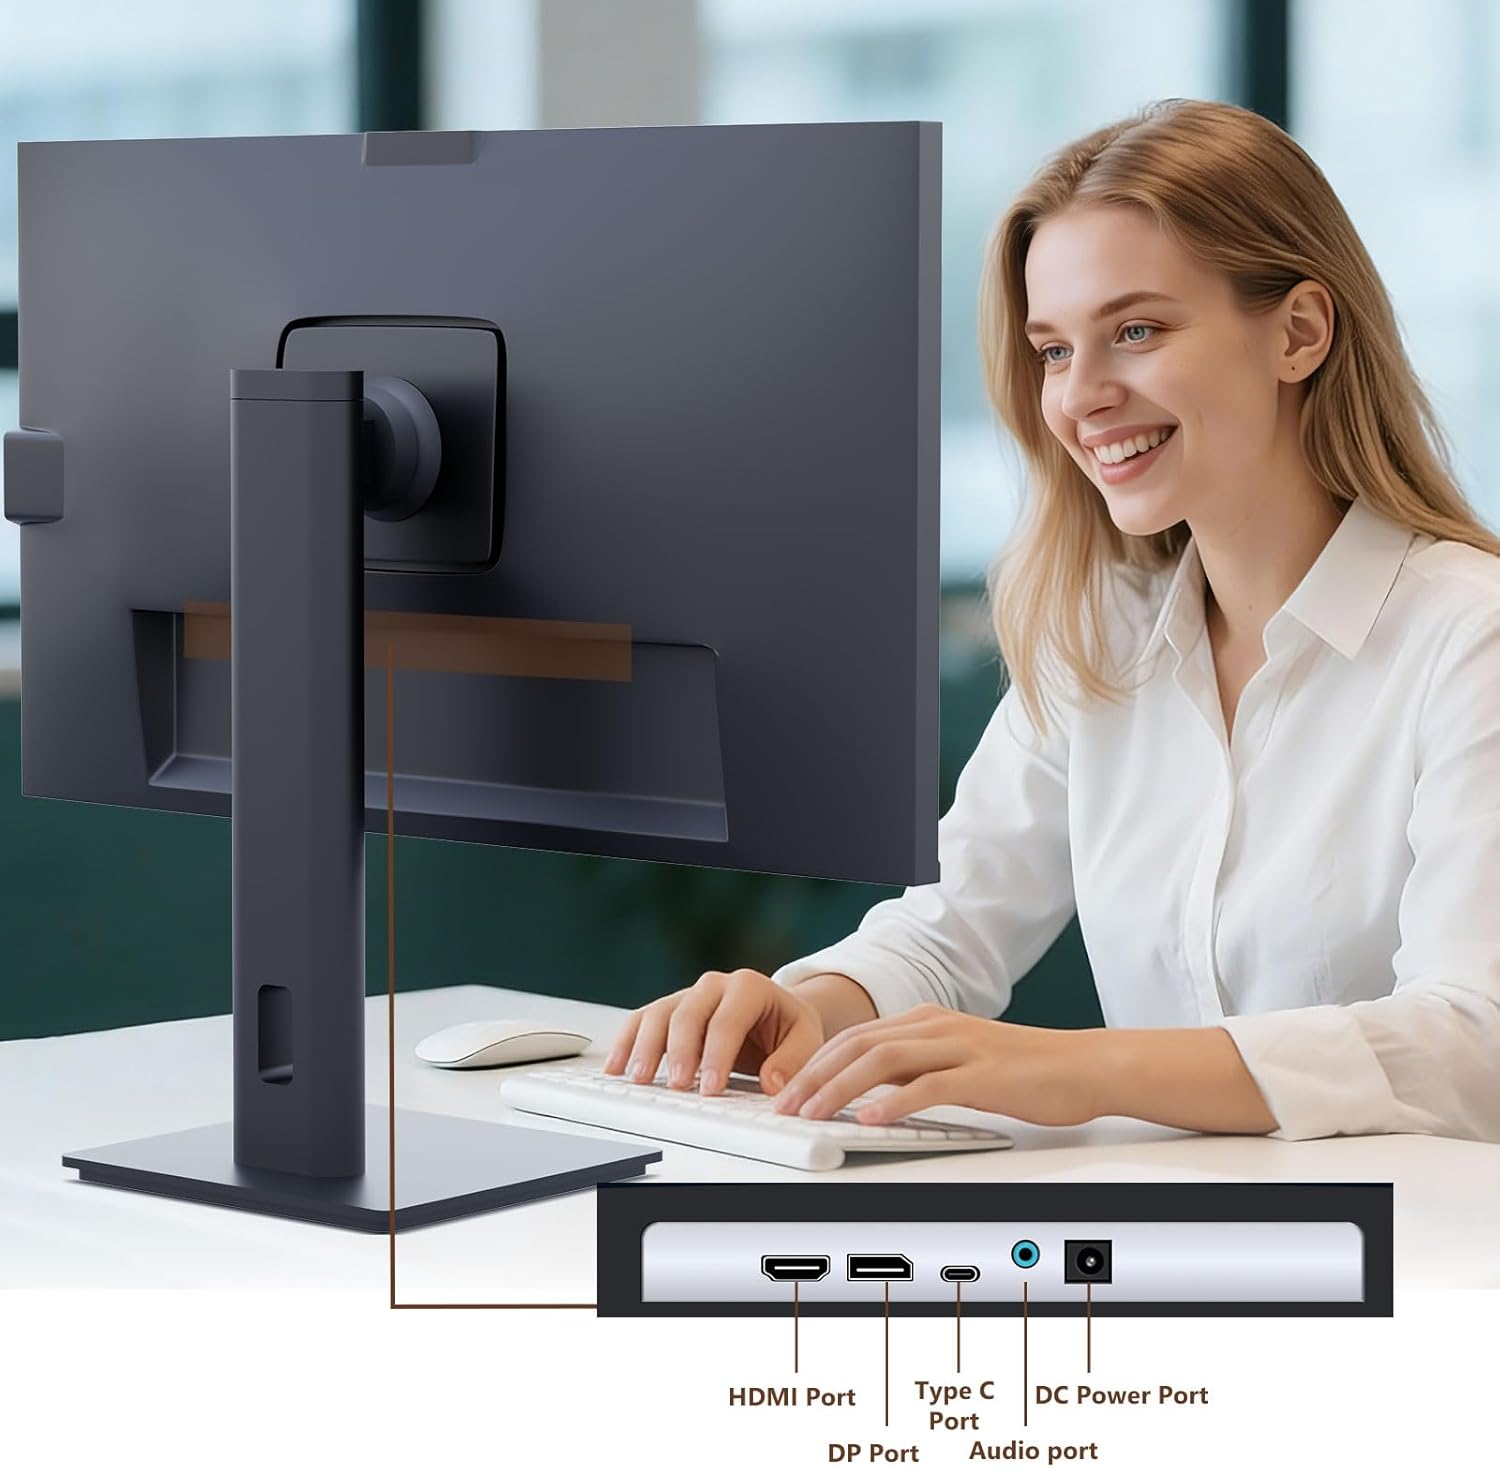
Figure 2: Available ports on the Pisichen monitor.

Figure 3: USB-C one-cable connection for simplified setup.

Figure 4: Connection options for desktop and laptop devices.
3. Erstes Einschalten
Press the power button located on the monitor to turn it on. The monitor will automatically detect the active input source. If multiple sources are connected, you may need to select the correct input via the On-Screen Display (OSD) menu.
Bedienungsanleitung
1. Touchscreen-Funktionalität
The monitor supports 10-point multi-touch. Ensure the USB-C cable is connected (for full functionality) or the USB-A to USB-B cable is connected in addition to your video cable for touch input to work. Touch gestures are similar to those used on tablets or smartphones.
- Klopfen: Single touch for selection or activation.
- Ziehen: Touch and hold, then move your finger to move items.
- Kneifen/Spreizen: Verwenden Sie zwei Finger zum Vergrößern oder Verkleinern.
- Wischen: Move your finger across the screen to scroll or navigate.

Figure 5: Demonstrating intuitive touch interaction.

Figure 6: Collaborative use of the multi-touch display.
2. Built-in WebCam-Nutzung
The monitor features a pop-up webcam for privacy and convenience. To use the webcam, gently press the top center of the monitor frame where the webcam is located. It will pop up. To retract it, gently press it down until it clicks into place.
Ensure your operating system and video conferencing software recognize the webcam. No additional drivers are typically required for basic functionality.

Figure 7: The monitor with its built-in pop-up webcam in use during a video conference.

Figure 8: High-definition video calls using the integrated webNocken.
3. Bildschirmmenü (OSD)
The OSD menu allows you to adjust various monitor settings. Use the buttons on the back or bottom of the monitor to navigate and select options.
- Helligkeit Kontrast: Passen Sie die Helligkeits- und Kontrastwerte des Displays an.
- Farbeinstellungen: Ändern Sie die Farbtemperatur, den Gammawert und andere farbbezogene Parameter.
- Eingabequelle: Manually select between HDMI, DisplayPort, or USB-C inputs.
- Audio: Die Lautstärke für die eingebauten Lautsprecher oder die angeschlossenen Kopfhörer anpassen.
- Bildmodus: Wählen Sie voreingestellte Anzeigemodi (z. B. Standard, Spiel, Film).
- HDR: Enable or disable High Dynamic Range settings for improved dark detail optimization.

Figure 9: HDR feature for enhanced visual detail.
4. Ergonomische Anpassungen
Der Monitorständer ermöglicht verschiedene Einstellmöglichkeiten zur Optimierung Ihres Arbeitsplatzes. viewKomfort:
- Höhenverstellung: Den Monitor vorsichtig nach oben oder unten schieben oder ziehen.
- Neigung: Tilt the screen forward or backward to find the ideal angle.
- Schwenken: Drehen Sie den Monitor auf seinem Standfuß nach links oder rechts.
- Drehpunkt: Drehen Sie den Bildschirm um 90 Grad, um den Hochformatmodus zu aktivieren. viewing.
Figure 10: Ergonomic adjustments for optimal viewing.
Wartung
- Reinigen des Bildschirms: Wischen Sie den Bildschirm vorsichtig mit einem weichen, fusselfreien Tuch ab. Bei hartnäckigen Flecken dampBefeuchten Sie das Tuch leicht mit Wasser oder einem nicht scheuernden Bildschirmreiniger. Sprühen Sie keine Flüssigkeit direkt auf den Bildschirm.
- Reinigung des Körpers: Verwenden Sie ein weiches, trockenes Tuch, um den Bildschirm des Monitors abzuwischen.asing. Vermeiden Sie die Verwendung von starken Reinigungsmitteln oder Scheuermitteln.
- Lagerung: Wenn Sie den Monitor über einen längeren Zeitraum lagern, trennen Sie alle Kabel und bewahren Sie ihn an einem kühlen, trockenen Ort auf, vorzugsweise in seiner Originalverpackung.
Fehlerbehebung
Kein Strom
- Stellen Sie sicher, dass das Netzkabel sowohl am Monitor als auch an der Steckdose fest angeschlossen ist.
- Überprüfen Sie, ob die Steckdose funktioniert, indem Sie ein anderes Gerät anschließen.
- Check if the power adapter is correctly connected to the monitor.
Kein Signal / Bildschirm schwarz
- Confirm the video cable (HDMI, DP, or USB-C) is securely connected to both the monitor and your device.
- Stellen Sie sicher, dass im OSD-Menü des Monitors die richtige Eingangsquelle ausgewählt ist.
- Überprüfen Sie die Anzeigeeinstellungen Ihres Computers, um sicherzustellen, dass der Monitor erkannt und aktiviert ist.
- Versuchen Sie, falls verfügbar, ein anderes Videokabel oder einen anderen Anschluss.
Die Touch-Funktion funktioniert nicht.
- If using HDMI or DisplayPort, ensure the USB-A to USB-B cable is connected from your device to the monitor.
- If using USB-C, ensure your device's USB-C port supports DisplayPort Alternate Mode and touch data transmission.
- Check your operating system's touch settings.
- Note that some devices, such as game consoles (PS3/4/5, Xbox, Steam Deck, Fire TV Cube) and certain Apple products (iPhone, iPad, Switch), do not support touch functionality with this monitor.

Figure 11: Touch compatibility chart for various devices.
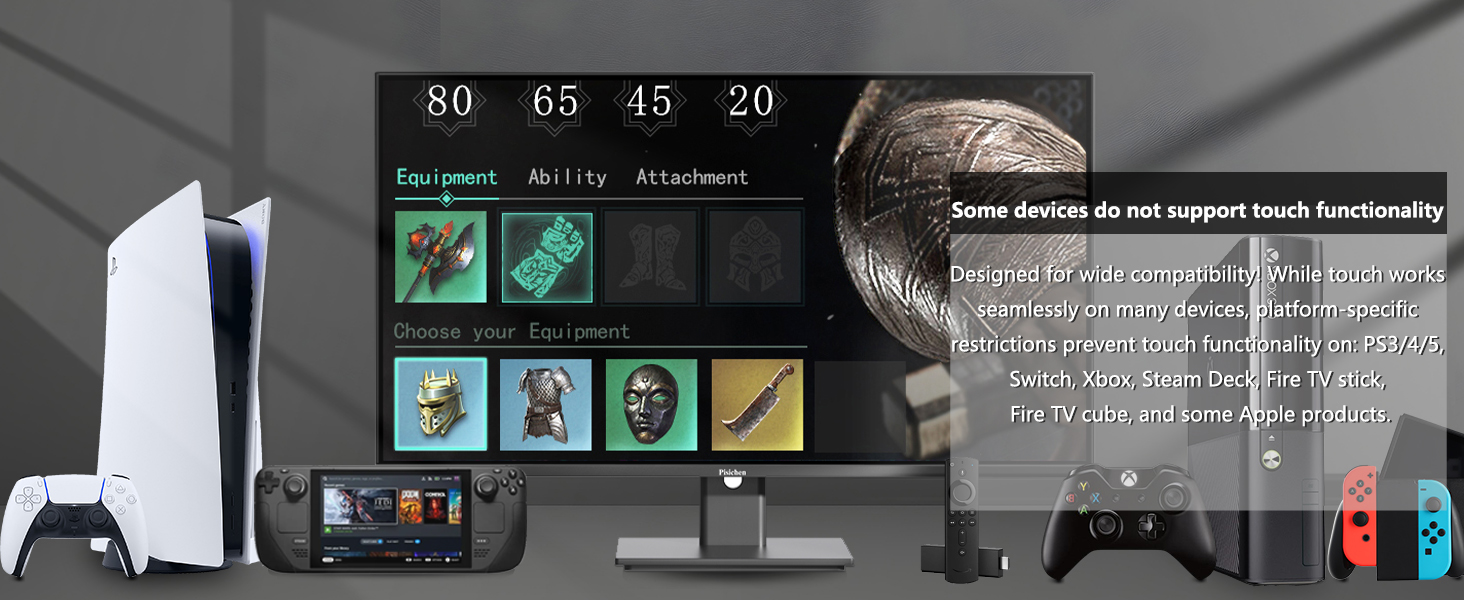
Figure 12: Devices that do not support touch functionality.
WebKamera nicht erkannt
- Stellen Sie sicher, dass webcam is fully popped up.
- Verify that the USB connection (either USB-C or USB-A to USB-B) is properly established.
- Überprüfen Sie die Datenschutzeinstellungen Ihres Betriebssystems, um sicherzustellen, dass Anwendungen Zugriff auf die Kamera erhalten.
- Starten Sie Ihren Computer neu.
Technische Daten
| Besonderheit | Beschreibung |
|---|---|
| Modellnummer | 238TS-CMR |
| Bildschirmgröße | 23.8 Zoll |
| Auflösung | 2560 x 1440 (QHD Wide 1440p) |
| Bildwiederholrate | 100 Hz |
| Helligkeit | 400 Candela (Nits) |
| Kontrastverhältnis | 3000:1 |
| Touch Technology | 10-Punkt-Multi-Touch |
| WebNocken | Built-in Pop-up Camera |
| Konnektivität | HDMI, DisplayPort (DP), USB Type-C, USB-B (upstream), Audio Out, DC Power |
| Seitenverhältnis | 16:9 |
| Bildschirmoberfläche | Glänzend |
| Technische Daten | 1.97 x 21.26 x 12.6 Zoll |
| Artikelgewicht | 11.53 Pfund |
| Hersteller | Shenzhen Konowa Electronics Co., LTD |
Garantie und Support
Your Pisichen monitor is covered by a limited warranty. Please refer to the warranty card included in your package for specific terms and conditions, including the warranty period and coverage details.
For technical support, troubleshooting assistance, or warranty claims, please contact Pisichen customer service. Contact information can typically be found on the manufacturer's webauf der Website oder auf der Garantiekarte.
When contacting support, please have your monitor's model number (238TS-CMR) and purchase information readily available.


