1. Einleitung
This manual provides detailed instructions for the setup, operation, and maintenance of your GEEKOM Mini PC IT12. This compact desktop computer is equipped with a 12th Gen Intel Core i7-1260P processor, 32GB of DDR4 RAM, and a 1TB NVMe PCIe 4.0 SSD, running Windows 11 Pro. Its design focuses on efficient performance and versatile connectivity for various applications.
2. Installationsanleitung
2.1. Auspacken und erste Inspektion
Nehmen Sie alle Komponenten vorsichtig aus der Verpackung. Überprüfen Sie, ob alle im Abschnitt „Lieferumfang“ aufgeführten Artikel vorhanden und unbeschädigt sind.
- 1x GEEKOM Mini-PC IT12
- 1x HDMI-Kabel
- 1x VESA-Halterung
- 1x Netzteil
- 1x Benutzerhandbuch
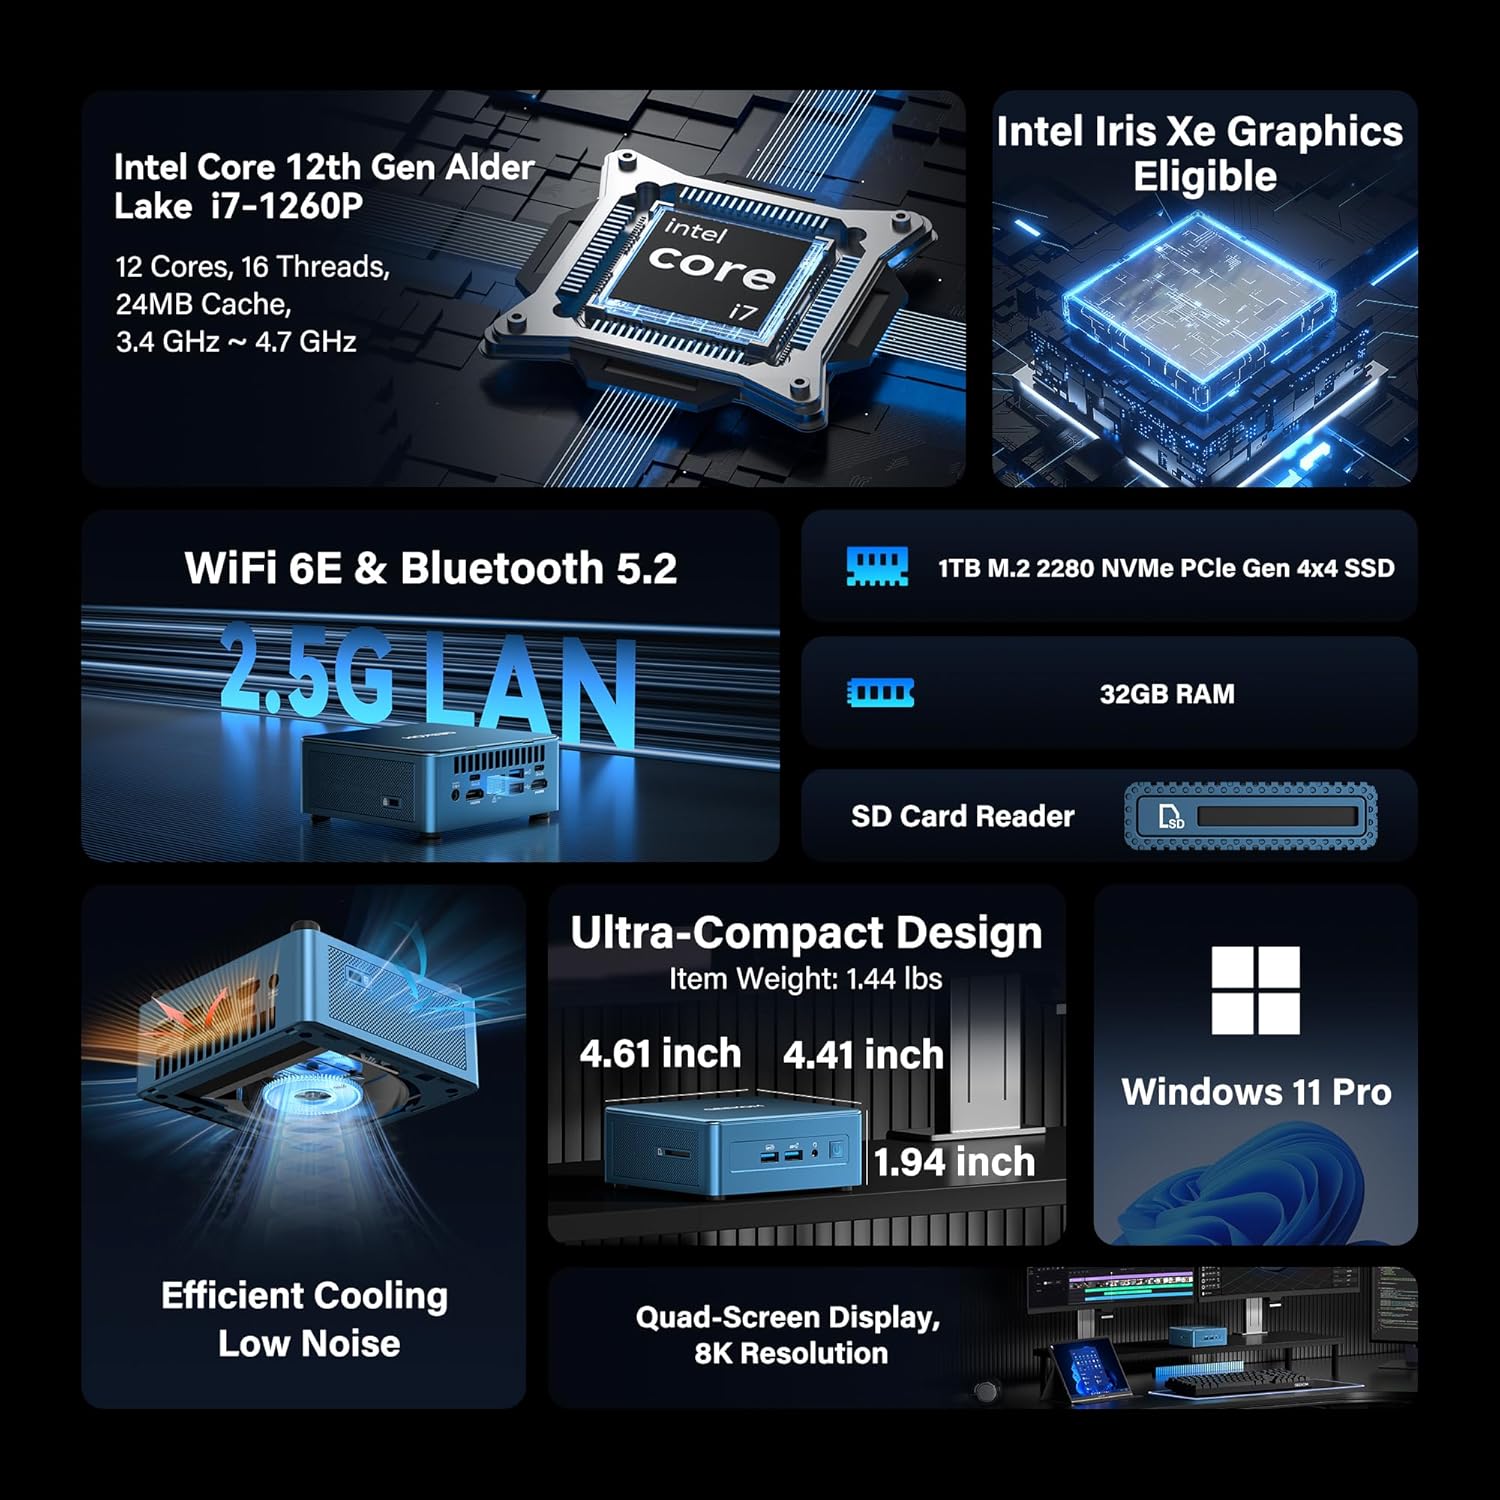
Image: GEEKOM Mini PC IT12 and its accessories, including the mini PC unit, power adapter, HDMI cable, and VESA mount.
Unboxing-Videoanleitung
Video: A hands-on unboxing of the GEEKOM Mini PC, showing the contents of the box and the initial presentation of the device and its accessories.
2.2. Peripheriegeräte anschließen
- Display anschließen: Use the provided HDMI cable to connect your monitor to one of the HDMI 2.0 ports on the back of the Mini PC. Alternatively, use a USB4 port for DisplayPort output.
- Tastatur und Maus anschließen: Plug your USB keyboard and mouse into the available USB 3.2 Gen 2 ports on the front or USB ports on the back.
- Strom anschließen: Schließen Sie das Netzteil an den DC-Eingangsanschluss auf der Rückseite des Mini-PCs an und stecken Sie das Netzteil anschließend in eine Steckdose.
- Netzwerkverbindung: For a wired connection, connect an Ethernet cable to the 2.5GbE LAN port. For wireless, ensure the Wi-Fi antenna is connected (if external) or rely on the internal Wi-Fi 6E.

Bild: Rückseite view of the GEEKOM Mini PC IT12, showing the arrangement of ports including DC-in, USB4, HDMI, 2.5GbE LAN, USB 3.2, and USB 2.0. Cables are connected to some ports.
2.3. Erster Start
Press the power button on the front of the Mini PC. The system will boot into Windows 11 Pro. Follow the on-screen instructions to complete the initial Windows setup.
3. Bedienungsanleitung
3.1. Ein-/Ausschalten
- Einschalten: Drücken Sie den Netzschalter auf der Vorderseite.
- Ausschalten: Klicken Sie in Windows auf die Schaltfläche „Start“ und wählen Sie dann „Ein/Aus“ > „Herunterfahren“.
- Neustart: Klicken Sie in Windows auf die Schaltfläche „Start“ und wählen Sie dann „Ein/Aus“ > „Neustart“.
3.2. Anzeigekonfiguration
The GEEKOM Mini PC IT12 supports up to four displays simultaneously via its dual USB4 (8K DP1.4) and dual HDMI 2.0 (4K@120Hz) ports. To configure multiple displays in Windows 11:
- Klicken Sie mit der rechten Maustaste auf den Desktop und wählen Sie „Anzeigeeinstellungen“.
- Unter „Mehrere Displays“ können Sie Ihre Displays erkennen, identifizieren und anordnen.
- Choose your preferred display mode (e.g., Extend these displays, Duplicate these displays).

Image: A GEEKOM Mini PC IT12 connected to two large monitors and a tablet, demonstrating its quad-display capability for a multi-screen workstation.
3.3. Netzwerk und Konnektivität
- Kabelgebundenes LAN: The 2.5Gb Ethernet port provides high-speed internet access.
- WLAN 6E: Connect to wireless networks for fast and stable internet.
- Bluetooth 5.2: Pair with compatible Bluetooth devices such as keyboards, mice, and headphones.
4. Wartung und Upgrades
4.1. Kühlsystem
The IT12 Mini PC features an upgraded IceBlast cooling system with an all-copper module and a silent fan. To ensure optimal performance and longevity, keep the ventilation grilles clear of obstructions. Regularly clean dust from the vents using compressed air.

Bild: Eine explodierte view diagram illustrating the internal components of the GEEKOM Mini PC IT12, highlighting the IceBlast cooling system with its fan and copper heat pipes.
4.2. Speicher- und Speichererweiterung
The GEEKOM Mini PC IT12 offers flexible upgrade options:
- RAM: The 32GB DDR4 RAM can be expanded up to 96GB.
- NVMe-SSD: The 1TB NVMe PCIe 4.0 SSD can be expanded up to 4TB.
- Zusätzlicher Speicherplatz: The unit includes additional slots for M.2 2242 SATA SSD (up to 2TB) and 2.5" SATA HDD (up to 4TB) expansion.
For detailed instructions on how to access internal components for upgrades, please refer to the official GEEKOM support resources or consult a qualified technician.

Abbildung: Ein detailliertes Diagramm zeigtasing the expandable storage options within the GEEKOM Mini PC IT12, illustrating slots for M.2 NVMe PCIe SSD, M.2 SATA SSD, and a 2.5-inch SATA HDD/SSD.
5. Fehlerbehebung
5.1. Kein Strom
- Stellen Sie sicher, dass das Netzteil sowohl mit dem Mini-PC als auch mit einer funktionierenden Steckdose fest verbunden ist.
- Überprüfen Sie die Funktionsfähigkeit der Steckdose, indem Sie ein anderes Gerät anschließen.
- Prüfen Sie das Netzteil auf sichtbare Beschädigungen.
5.2. Keine Displayausgabe
- Confirm the display cable (HDMI or USB4) is firmly connected to both the Mini PC and the monitor.
- Stellen Sie sicher, dass der Monitor eingeschaltet und auf die richtige Eingangsquelle eingestellt ist.
- Versuchen Sie es gegebenenfalls mit einem anderen Displaykabel oder Monitor.
5.3. Probleme mit der Netzwerkverbindung
- Verdrahtet: Check the Ethernet cable connection and router status.
- Kabellos: Verify Wi-Fi is enabled in Windows settings and you are connected to the correct network. Restart your router if necessary.
5.4. Systemleistungsprobleme
- Stellen Sie sicher, dass der Mini-PC ausreichend belüftet ist und nicht überhitzt.
- Schließen Sie unnötige Anwendungen, die im Hintergrund laufen.
- Check for available Windows updates and driver updates.
6. Spezifikationen
| Besonderheit | Detail |
|---|---|
| Prozessor | 12th Gen Intel Core i7-1260P (12 Cores, 16 Threads, up to 4.70 GHz, 24MB Cache) |
| Grafik | Intel Iris Xe Grafik (integriert) |
| RAM | 32 GB DDR4 (erweiterbar auf 96 GB) |
| Lagerung | 1TB NVMe PCIe 4.0 SSD (Expandable to 4TB) + M.2 2242 SATA SSD slot (up to 2TB) + 2.5" SATA HDD (up to 4TB) |
| Betriebssystem | Windows 11 Pro |
| Videoausgang | 2x USB4 (8K DP1.4), 2x HDMI 2.0 (4K@120Hz) - Supports Quad Display |
| USB-Anschlüsse | 2x USB4, 3x USB 3.2 Gen 2, 1x USB 2.0 |
| Netzwerk | 2.5Gb Ethernet, Wi-Fi 6E, Bluetooth 5.2 |
| Kartenleser | SD Card Reader (UHS-II) |
| Abmessungen (LxBxH) | 4.6 x 4.4 x 1.9 Zoll |
| Gewicht | 3.3 Pfund |
7. Energieeffizienz
The GEEKOM Mini PC IT12 is designed for low power consumption, making it an energy-efficient alternative to traditional desktop PCs. Its 12th Gen Intel Core P-series CPU (28W single-CPU power draw) consumes significantly less power than high-performance H/HK series processors (45W+), reducing electricity costs and enabling 24/7 reliable operation with a quiet experience.
Video: A comparison demonstrating the energy consumption between a traditional desktop PC and the GEEKOM Mini PC IT12 under both light and heavy workloads.
8. Garantie und Support
Your GEEKOM Mini PC IT12 comes with a 3-year limited warranty. For technical assistance or warranty claims, please contact GEEKOM support through the following channels:
- Amazon-Verkäufersupport: Log into your Amazon buyer's account, find your order, and click "Get help" for product assistance.
- E-Mail-Support: Senden Sie eine E-Mail an das Kundendienstteam unter shirley.li@geekom.tw.
GEEKOM is committed to providing dedicated US-based technical support and ensures full certification including CE, FCC, CB, and CC for guaranteed safety and compliance.


