1. Wichtige Sicherheitshinweise
Please read all instructions before using this sewing machine. This machine is intended for household use only.
DANGER - To reduce the risk of electric shock:
- Ein Gerät sollte niemals unbeaufsichtigt bleiben, wenn es eingesteckt ist.
- Ziehen Sie dieses Gerät immer sofort nach dem Gebrauch und vor der Reinigung aus der Steckdose.
- Vor dem Wiedereinschalten immer den Stecker ziehenamping. Ersetzen Sie die Glühbirne durch eine 15-Watt- (110-120-V-Bereich) oder 15-Watt- (220-240-V-Bereich) des gleichen Typs.
WARNING - To reduce the risk of burns, fire, electric shock, or injury to persons:
- Nicht als Spielzeug verwenden. Besondere Aufmerksamkeit ist geboten, wenn dieses Gerät von oder in der Nähe von Kindern verwendet wird.
- Verwenden Sie dieses Gerät nur für den vorgesehenen Zweck, wie in dieser Anleitung beschrieben. Verwenden Sie nur vom Hersteller empfohlenes Zubehör, wie es in diesem Handbuch enthalten ist.
- Betreiben Sie dieses Gerät niemals, wenn das Kabel oder der Stecker beschädigt ist, wenn es nicht richtig funktioniert, wenn es heruntergefallen oder beschädigt ist oder ins Wasser gefallen ist. Bringen Sie das Gerät zur Überprüfung, Reparatur oder elektrischen oder mechanischen Einstellung zum nächstgelegenen autorisierten Händler oder Servicecenter.
- Betreiben Sie das Gerät niemals, wenn die Luftöffnungen blockiert sind. Halten Sie die Lüftungsöffnungen der Nähmaschine und des Fußpedals frei von Flusen, Staub und losen Stoffen.
- Halten Sie die Finger von allen beweglichen Teilen fern. Besondere Sorgfalt ist um die Nähmaschinennadel erforderlich.
- Verwenden Sie immer die richtige Stichplatte. Bei Verwendung einer falschen Platte kann die Nadel abbrechen.
- Verwenden Sie keine gebogenen Nadeln.
- Ziehen oder drücken Sie den Stoff beim Nähen nicht. Dadurch kann die Nadel abgelenkt werden und brechen.
- Always unplug sewing machine off ("O") when making any adjustments in the needle area, such as threading needle, changing needle, threading bobbin, or changing presser foot, and the like.
- Ziehen Sie immer den Stecker der Nähmaschine aus der Steckdose, wenn Sie Abdeckungen entfernen, schmieren oder andere in der Bedienungsanleitung angegebene Einstellungen für die Wartung des Benutzers vornehmen.
- Lassen Sie niemals Gegenstände in Öffnungen fallen oder stecken Sie sie hinein.
- Nicht im Freien verwenden.
- Arbeiten Sie nicht dort, wo Aerosolsprayprodukte verwendet werden oder wo Sauerstoff verabreicht wird.
- To disconnect, turn all controls to the off ("O") position, then remove plug from outlet.
- Ziehen Sie den Stecker nicht am Kabel, sondern fassen Sie ihn am Stecker und nicht am Kabel an.
- Der Schalldruckpegel unter normalen Betriebsbedingungen beträgt 75 dB(A).
- Always turn off the machine or unplug when the machine is not operating properly.
- Stellen Sie niemals etwas auf das Fußpedal.
- If the supply cord to the foot controller is damaged, it must be replaced by the manufacturer or its service agent or a similar qualified person in order to avoid a hazard.
- Dieses Gerät ist nicht für den Gebrauch durch Personen (einschließlich Kinder) mit eingeschränkten physischen, sensorischen oder geistigen Fähigkeiten oder Mangel an Erfahrung und Wissen bestimmt, es sei denn, sie werden von einer für ihre Sicherheit verantwortlichen Person beaufsichtigt oder erhalten Anweisungen zur Verwendung des Geräts.
- Kinder sollten beaufsichtigt werden, um sicherzustellen, dass sie nicht mit dem Gerät spielen.
BEWAHREN SIE DIESE ANWEISUNGEN AUF
Image: Important Safety Instructions page from the Singer 2250 manual, detailing electrical and general safety warnings.
2. Einrichtung
2.1 Zubehör
The Singer 2250 sewing machine comes with a set of standard accessories and supports various optional accessories for different sewing tasks.
- Standardzubehör: All purpose foot, Button sewing foot, Zipper foot, Screwdriver, Seam ripper/brush, Pack of needles, Bobbin (3), Darning plate, Spool holder.
- Optional Accessories (not supplied with machine, available from SINGER® retailers): Edge/quilting guide, Zipper foot, Straight stitch foot, Overcasting foot, Hemmer foot, Blind hem foot, Satin stitch foot, Cording/embroidery foot, Second spool pin, Spool pin felt.
2.2 Aufwickeln der Spule
- Place thread and corresponding spool holder onto the spool pin.
- Snap the thread into the thread guide.
- Wind the thread counterclockwise around the bobbin winder tension disc.
- Thread the bobbin as illustrated and place it on the spindle.
- Push the bobbin spindle to the right.
- Hold the thread end.
- Step on the foot control pedal to begin winding.
- Cut the thread once the bobbin is full.
- Push the bobbin spindle to the left and remove the wound bobbin.
Bitte beachten Sie: When the bobbin winder spindle is in the "bobbin winding" position, the machine will not sew and the hand wheel will not turn. To start sewing, push the bobbin winder spindle to the left (sewing position).

Image: Manual page illustrating standard and optional accessories, and a step-by-step guide for winding the bobbin.
2.3 Anschluss an die Stromquelle
Ensure the machine's power switch is in the "O" (off) position. Insert the machine plug into the electrical outlet. Always use a grounded outlet.
2.4 Raising the Presser Foot Lifter
The presser foot lifter is located at the back of the needle bar area. Lift it to raise the presser foot for placing fabric, and lower it to hold the fabric in place for sewing.
3. Bedienung
3.1 Choosing Your Pattern
The Singer 2250 features a Pattern Selector Dial to choose various stitch patterns.
- Stitches indicated in black on the diagram correspond to the Pattern Selector Dial.
- For patterns indicated with the "S" color, turn the Pattern Selector Dial to "S", then use the Stitch Length Dial to adjust the desired stitch length.
- The Pattern Selector Dial can be turned in either direction.
3.2 Stitch Length Dial
The Stitch Length Dial controls the length of straight stitches and the density of zig-zag stitches.
- For Straight Stitching: Turn the Pattern Selector Dial to the straight stitch symbol. The stitch length increases as the dial approaches "4". Use longer stitches for heavier fabrics and thicker needles, shorter stitches for lighter fabrics and finer needles.
- For Zig-Zag Stitching: Turn the Pattern Selector Dial to "~~~ ". The density of zig-zag stitches increases as the setting of the stitch length dial approaches "0". Dense zig-zag stitches are known as satin stitches.

Image: Manual page detailing how to choose stitch patterns and adjust stitch length for various sewing applications.
3.3 Einfädeln der Maschine
Proper threading is crucial for smooth sewing. Follow these general steps:
- Setzen Sie die Garnrolle auf den Garnrollenhalter.
- Führen Sie den Faden durch die oberen Fadenführungen.
- Führe den Faden durch die Spannscheiben.
- Führe den Faden durch den Fadenhebel nach oben.
- Guide the thread down through the needle bar thread guide.
- Fädeln Sie die Nadel von vorne nach hinten ein.
- Raise the bobbin thread by turning the handwheel towards you, catching the bobbin thread with the needle thread.
- Pull both threads under the presser foot and towards the back.
3.4 Sewing on Buttons
To sew buttons using your Singer 2250:
- Bringen Sie die Stopfplatte an.
- Change the all-purpose foot to the button sewing tool.
- Position the fabric and button under the foot.
- Lower the button to the desired position and lower the foot.
- Set the Pattern Selector Dial on "---" and sew a few securing stitches.
- Select one of the two narrow zig-zag patterns (between 0.5 and 1.5) and sew through both holes of the button. Turn the handwheel to check needle clearance.
- Slowly sew the button with about 10 stitches.
- Select pattern "---" again and sew a few securing stitches.
- If a shank is required, place a darning needle on top of the button and sew.
- For buttons with 4 holes, sew through the front two holes first, then sew backwards and then sew through the back two holes.
3.5 Installing the Removable Extension Table
The removable extension table provides a larger work surface and also serves as an accessory box.
- So installieren Sie: Hold the removable extension table horizontally and push it in the direction of the arrow until it clicks into place.
- So entfernen Sie: Pull the extension table towards the left.
- The inside of the removable extension table can be used as an accessory box. To open, flip the cover down.
4. Wartung
4.1 Darning Plate
The darning plate is used for specific tasks like darning or free-hand embroidery.
- Installation: Install the darning plate as illustrated in the manual.
- Entfernung: Zum normalen Nähen entfernen Sie die Stopfplatte.
- For free-motion sewing, a darning/embroidery foot (optional accessory) is recommended.
4.2 Inserting & Changing Needles
Regularly change your needle, especially if sewing problems occur. Use SINGER® Brand Needles for best results.
- Turn the power switch to off ("O").
- Lösen Sie die Nadel clamp Schraube.
- Insert the new needle with the flat side of the shaft facing the back, pushing it up as far as it will go.
- Ziehen Sie die Nadel clamp Schraube.
Aufmerksamkeit: Needles must be in perfect condition. Problems can occur with bent needles, damaged points, or blunt needles.
4.3 Changing the Bulb
To change the light bulb, ensure the machine is unplugged. Replace the bulb with the same type rated 15 watts (110-120V area) or 15 watts (220-240V area).
4.4 Reinigung
Regularly clean the lint and dust from the bobbin case area and feed dogs using the provided brush. Ensure the machine is unplugged before cleaning.
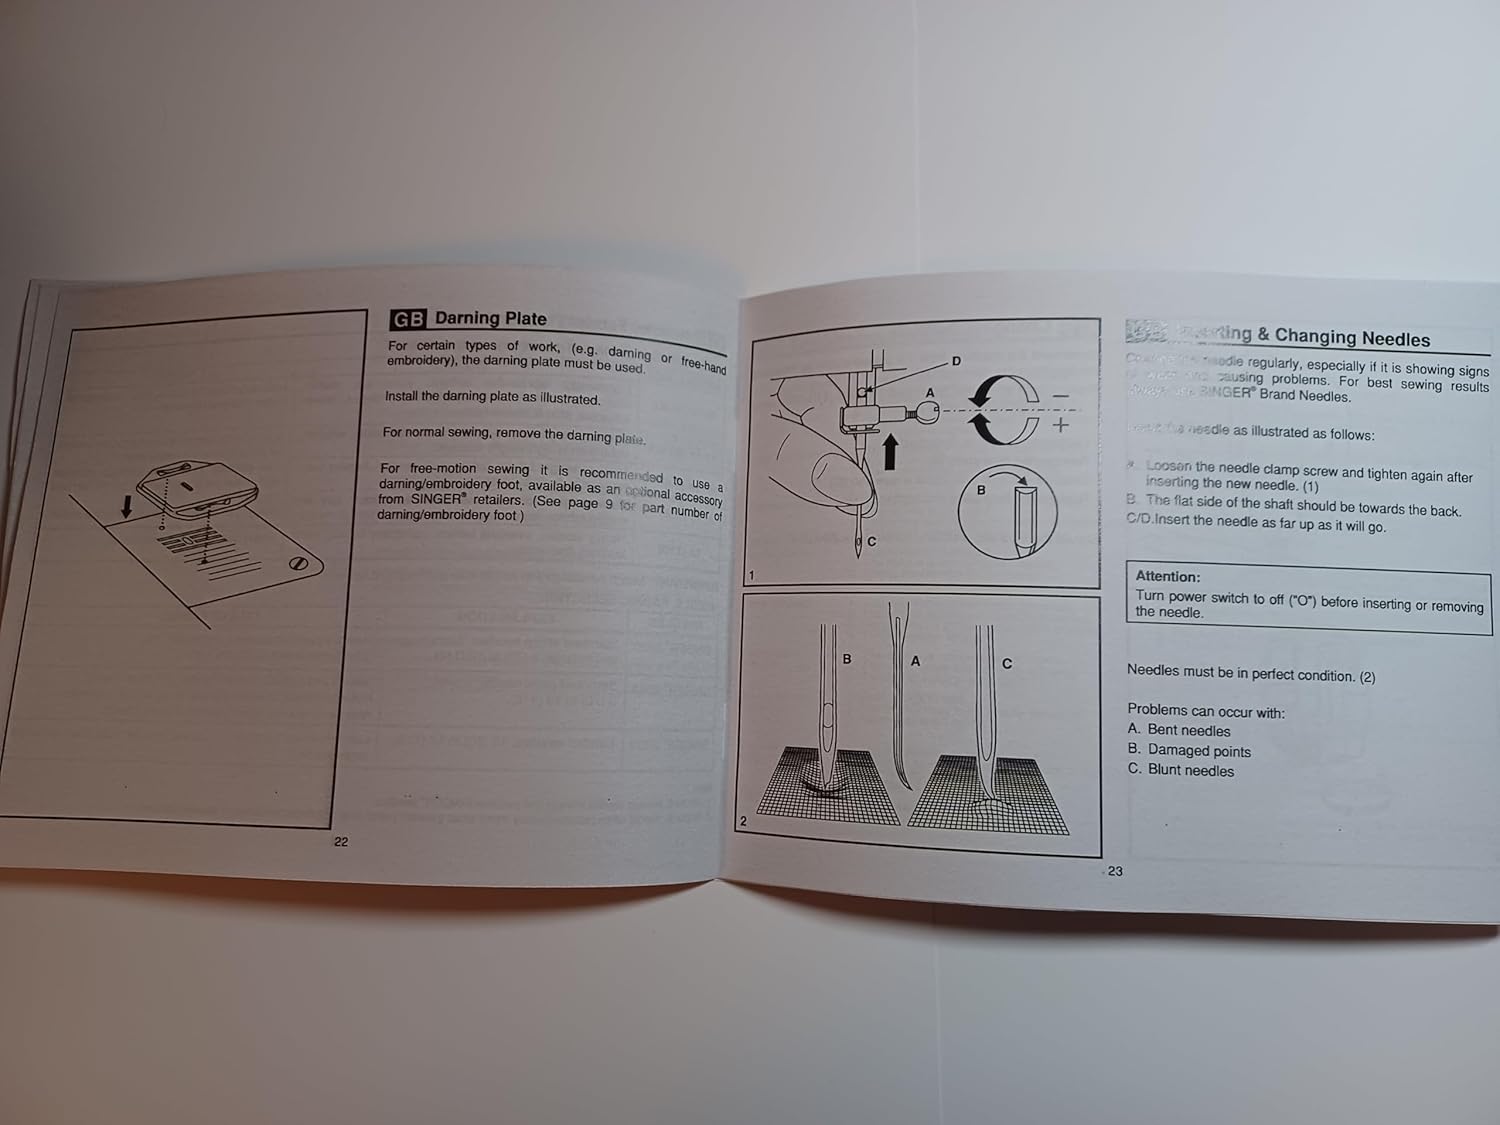
Image: Manual page illustrating procedures for sewing on buttons, installing the extension table, using the darning plate, and changing needles.
5. Fehlerbehebung
If you encounter issues with your Singer 2250, refer to the following common problems and solutions:
- Übersprungene Stiche: Ensure the needle is inserted correctly, not bent, and is the appropriate size for the fabric and thread. Re-thread the machine.
- Threadbruch: Check for correct threading, proper tension, a bent or blunt needle, or burrs on the needle plate or bobbin case.
- Stoffkräuselung: Adjust tension settings, use the correct needle size, or ensure the presser foot pressure is appropriate for the fabric.
- Machine Not Feeding Fabric: Check if the feed dogs are raised. Ensure the presser foot is lowered.
- Lauter Betrieb: Clean and lubricate the machine as per maintenance instructions. Check for loose parts or a bent needle.
For persistent problems, contact an authorized Singer service center.
6. Spezifikationen
| Technische Daten | 8.5 x 5.5 x 0.1 Zoll |
| Artikelgewicht | 3 Unzen |
| Modellnummer | SINGER 2250 Manual |
| Hersteller | TabSynth Design (for reproduction manual) |
| ASIN | B0G19M5M63 |
7. Garantie und Support
This instruction manual is a reproduction for the Singer 2250 Sewing Machine. For warranty information regarding your Singer 2250 sewing machine, please refer to the original documentation provided with your machine or contact Singer customer support directly.
For support related to the operation or maintenance of your Singer 2250, please consult this manual. If further assistance is needed, contact an authorized Singer service center or your local Singer dealer.


