1. Einleitung
This manual provides detailed instructions for the assembly, safe operation, and proper maintenance of your Polibi Wood Full Over Full Bunk Bed with Trundle, Storage Shelves & Hooks. Please read all instructions carefully before beginning assembly and retain this manual for future reference.
The Polibi bunk bed is designed to offer a space-saving sleeping solution with integrated storage. It features a full-size upper bunk, a full-size lower bunk, a pull-out trundle bed, and convenient storage shelves with hooks.
2. Wichtige Sicherheitshinweise
Die Nichtbeachtung dieser Warnungen kann zu schweren Verletzungen führen.
- LESEN SIE VOR DEM GEBRAUCH ALLE ANWEISUNGEN.
- WARNUNG: Bunk beds can present a serious risk of injury from falls. Always use the provided ladder for access to the upper bunk.
- WARNUNG: Das obere Bett ist nicht für Kinder unter sechs Jahren geeignet.
- WARNUNG: Ensure all connections are tight before use and check periodically. Do not use the bed if any structural part is broken or missing.
- WARNUNG: Erlauben Sie nicht mehr als einer Person die obere Koje.
- WARNUNG: Befestigen oder hängen Sie keine Gegenstände an Teilen des Etagenbetts auf, die nicht für die Verwendung mit dem Bett vorgesehen sind; zum Beispielampbeispielsweise Haken, Gürtel oder Springseile.
- WARNUNG: Always use the recommended mattress size for both upper and lower bunks, and the trundle bed. The maximum mattress thickness for the upper bunk should not exceed 6 inches to ensure proper guardrail height.
- WARNUNG: Halten Sie Kinder während der Bauarbeiten vom Montagebereich fern.
- WARNUNG: Springen Sie nicht auf das Bett.
- WARNUNG: Verwenden Sie auf beiden Seiten der oberen Koje Schutzgeländer.
- WARNUNG: Überprüfen Sie regelmäßig, ob sich das Geländer, die Leiter und alle anderen Bauteile in der richtigen Position befinden und unbeschädigt sind.
3. Packungsinhalt
Prüfen Sie vor Beginn der Montage, ob alle Teile vorhanden und unbeschädigt sind. Sollten Teile fehlen oder beschädigt sein, fahren Sie nicht mit der Montage fort. Wenden Sie sich in diesem Fall bitte an den Kundendienst.
Typische Komponenten sind:
- Bunk bed frame components (headboards, footboards, side rails)
- Komponenten des Ausziehbettgestells
- Wooden slats for all bed levels
- Leiter
- Storage shelves and hooks
- Hardware-Set (Schrauben, Bolzen, Muttern, Inbusschlüssel)
- Bedienungsanleitung
4. Aufbau- und Montageanleitung
Assembly requires at least two adults. Clear a spacious area for assembly. Do not use power tools for assembly as this may overtighten fasteners and damage the wood.
Schritt 1: Auspacken und Teile identifizieren
Carefully unpack all components and lay them out on a soft, clean surface to prevent scratches. Refer to the parts list (usually found at the beginning of the included paper manual) to identify each piece.

Image: Overall dimensions of the bunk bed, including length, width, and height measurements for the main bed and trundle.
Step 2: Assemble the Lower Bunk Frame
Begin by connecting the side rails to the headboard and footboard of the lower bunk using the provided hardware. Ensure all bolts are finger-tight at this stage.
Step 3: Assemble the Upper Bunk Frame
Similar to the lower bunk, assemble the upper bunk frame, including the guardrails. Pay close attention to the orientation of the guardrails and the decorative house-like structure on the upper bunk.

Image: Detail of the upper bunk's design, showing the decorative roofline and window cutouts.
Step 4: Attach Storage Shelves and Hooks
Install the storage shelves and hooks onto the designated areas of the bunk bed frame, typically on the side of the lower bunk. Secure them firmly with the appropriate hardware.

Image: Integrated storage shelves, providing space for books or small items.
Step 5: Stack the Bunks and Install Ladder
Carefully lift the upper bunk frame and place it onto the lower bunk frame, aligning the connecting pins or brackets. Secure these connections. Then, attach the ladder to the designated side of the bunk bed.
Step 6: Assemble the Trundle Bed
Assemble the trundle bed frame according to the instructions, attaching its wheels or casters. The trundle is designed to slide underneath the lower bunk.

Image: Detail of the trundle bed frame, showing its slat support system.
Step 7: Install Bed Slats and Final Tightening
Place the wooden slats across the bed frames for both the upper and lower bunks, and the trundle. Secure them as instructed (usually with screws). Once all components are assembled, go back and tighten all bolts and screws securely, but do not overtighten.

Image: The fully assembled bunk bed, showcasing its structure and features.
5. Bedienung
Verwendung des Ausziehbettes
The trundle bed is designed to slide smoothly from underneath the lower bunk. To use, gently pull the trundle frame outwards until it is fully extended. To store, push the trundle back underneath the lower bunk until it is completely hidden.

Image: The bunk bed with the trundle extended, ready for use.
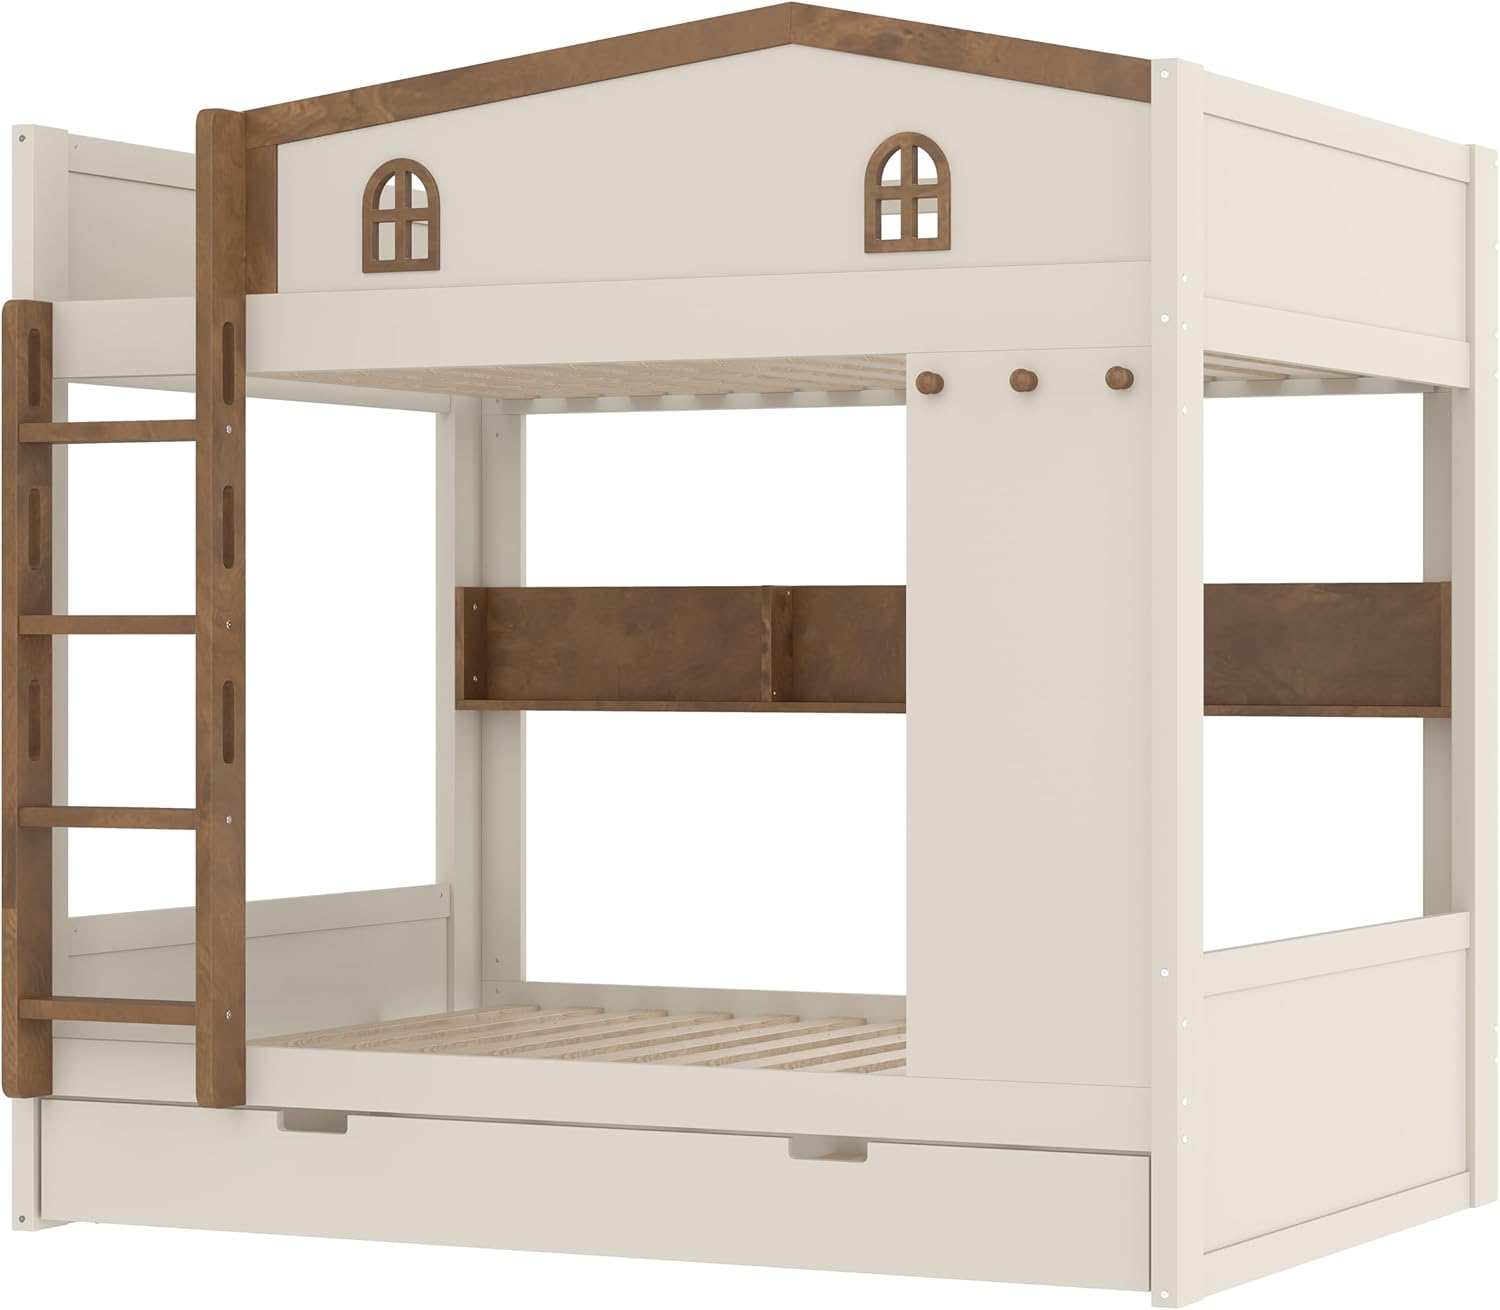
Image: The bunk bed with the trundle stored, demonstrating its space-saving design.
Using Storage Shelves and Hooks
The integrated shelves provide convenient storage for books, small electronics, or decorative items. The hooks are suitable for hanging lightweight items such as bags, hats, or robes. Do not overload shelves or hooks beyond their intended capacity.
6. Wartung
- Reinigung: Wischen Sie das Bettgestell mit einem weichen, fusselfreien Tuch ab.amp Mit einem Tuch abwischen. Vermeiden Sie die Verwendung von scharfen Chemikalien oder Scheuermitteln, da diese die Holzoberfläche beschädigen können.
- Hardwareprüfung: Überprüfen Sie regelmäßig (alle 3–6 Monate) alle Schrauben, Bolzen und Verbindungen auf festen Sitz. Ziehen Sie sie gegebenenfalls nach, aber nicht zu fest.
- Strukturelle Integrität: Inspect the bed frame for any signs of wear, damage, or loose parts. If any damage is found, discontinue use and contact customer support for replacement parts or advice.
- Matratzenpflege: Follow the care instructions provided with your mattresses. Rotate and flip mattresses regularly to prolong their lifespan.
7. Fehlerbehebung
| Problem | Mögliche Ursache | Lösung |
|---|---|---|
| Das Bett fühlt sich wackelig oder instabil an. | Lose Beschläge. | Prüfen und ziehen Sie alle Schrauben und Bolzen fest. Stellen Sie sicher, dass alle Verbindungen fest sitzen. |
| Quietschgeräusche. | Lose Verbindungen oder Reibung zwischen den Holzteilen. | Tighten all hardware. Apply a small amount of paraffin wax or silicone spray to contact points between wood components if squeaking persists. |
| Das Ausziehbett lässt sich nicht leichtgängig verschieben. | Hindernisse unter der Ladefläche oder verschmutzte Räder. | Clear any objects from under the lower bunk. Clean the trundle wheels and their tracks. Check for damaged wheels. |
| Fehlende oder beschädigte Teile. | Verpackungsfehler oder Transportschaden. | Do not proceed with assembly. Contact Polibi customer support immediately for replacement parts. |
8. Spezifikationen
- Marke: polybi
- Modell: Full Over Full w/trundle
- Produktabmessungen (L x B x H): 77.5" x 56.8" x 66.5"
- Material: Konstruktionsholz, Kiefernholz
- Farbe: Beige & Natural
- Besonderheit: Trundle, Storage Shelves & Hooks
- Montage erforderlich: Ja
- Artikelgewicht: Ungefähr 230.16 Pfund
- Recommended Mattress Thickness (Upper Bunk): Bis zu 6 Zoll
9. Garantie und Support
For specific warranty information regarding your Polibi Wood Full Over Full Bunk Bed, please refer to the documentation included with your purchase or contact the retailer/manufacturer directly. Warranty terms typically cover manufacturing defects for a specified period from the date of purchase.
If you require assistance with assembly, missing parts, or have any questions about your product, please contact Polibi customer support. Contact details can usually be found on the packaging, the retailer's website, or the Polibi brand store on Amazon.
Polibi Brand Store: Besuchen Sie den Polibi Store auf Amazon


